Align a panel-ready dishwasher without trapping its moving front
Coordinate the cabinet grid with the actual appliance, panel and hinge arrangement. A closed front can look correct while its lower edge meets the toe kick during opening.
Treat a panel-ready dishwasher front as a moving appliance component that also belongs to the cabinet elevation. Set the desired appearance, then check whether the selected machine and panel arrangement can produce it throughout normal opening. Matching neighboring door edges in a closed drawing is only part of the decision; the lower edge and toe kick must work together as well.
Define the visible alignment separately from the appliance position
Record the intended top edge, side reveals, front plane and lower edge of the finished panel. Show the countertop underside and adjacent cabinet fronts from the same reference points. Then place the actual appliance body and its permitted panel position behind that elevation. Moving the entire machine and changing the panel position are different changes with different consequences.
Fisher & Paykel’s cited planning guide distinguishes custom-panel dimensions, surrounding gaps and panel weight including the handle. Those are model-specific relationships. A matching cabinet door is not automatically a suitable dishwasher panel merely because its finished height looks right.
Check the panel assembly against the selected mechanism
Have the cabinetmaker and installer coordinate the actual panel construction, attachment arrangement and handle with the selected appliance’s instructions. Include all parts that move with the door. Confirm the permitted panel dimensions and weight rather than relying on an unfinished blank or an estimated handle. The final front should remain within the appliance’s documented limits after decorative details are added.
Identify the hinge or panel-motion system actually supplied or approved for the machine. Do not assume every integrated dishwasher follows the same path, or that an accessory sliding arrangement can be added to any model. Use the appropriate drawings to examine the moving panel, including its thickness and lower extension, instead of a generic cabinet-door swing.
ABCD
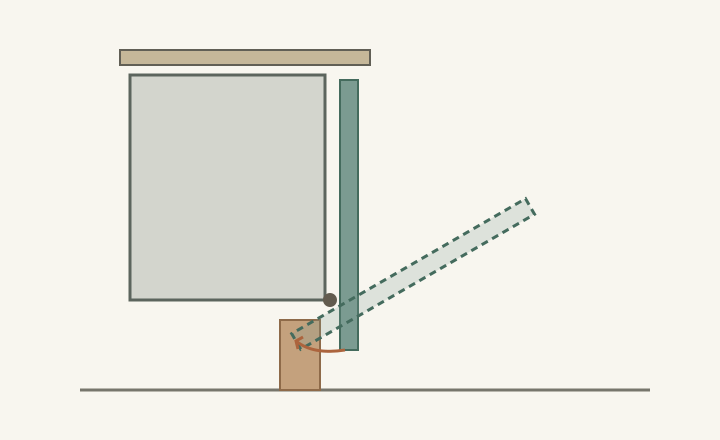
Diagram A hypothetical simple pivot illustrates why a closed gap does not prove moving clearance. This is not the hinge path, panel dimension or required toe kick detail of an actual dishwasher.
A
The closed front may align with cabinetry.
B
The pivot and panel edge are different references.
C
Opening changes the panel position.
D
The lower extension enters the toe kick area in this example.
Review the toe kick while the panel is moving
The cited Fisher & Paykel installation guide relates toe kick recess and panel extension to door travel. It also calls for unobstructed swing at the completed toe kick. Use the applicable installation detail; this is not a universal instruction to cut a particular notch.
In a hypothetical kitchen, the designer extends the dishwasher panel downward to align with neighboring doors. The closed elevation gains a continuous lower line. During opening, however, the extended edge meets the planned toe kick. The visual improvement altered the moving geometry, even though the appliance body stayed in the same cavity. The panel and toe kick arrangement must be reconsidered together.
Choose a supported resolution before fabricating the front
Compare the permitted panel length, appliance position and toe kick arrangement as a coordinated set. If the desired elevation cannot be achieved with the selected mechanism, revise the visible detail or select an appropriate alternative before committing to the panel. Do not treat cutting the toe kick, shortening a support or altering the appliance hinge as an automatic on-site remedy.
Check the upper edge and neighboring fronts as well as the lower conflict. A change that clears the toe kick may affect the top reveal, handle alignment or access to the appliance controls. Keep functional seams distinct from purely decorative lines, and confirm how any proposed divided-looking front is actually attached and moves with the door.
Verify the final assembly, not only a temporary panel
Have the installer check the completed panel and intended handle through the manufacturer’s required installation checks. Observe ordinary door movement and confirm that it does not contact surrounding cabinetry. A successful check with a lighter temporary panel does not establish the behavior of the final assembly. Any specified balancing or adjustment belongs to the applicable installation procedure.
Retain the exact appliance identity, panel specification, alignment references and agreed toe kick detail. Revisit the movement check if the handle, panel profile or lower trim changes. The intended result is a front that follows the kitchen’s visual lines while remaining a properly coordinated part of the selected dishwasher.
Pure White
Cream White
Light Warm Gray
Gray
Navy
Black
Oak Tone
Dark Walnut Tone
Design study These finish studies are design references, not a list of currently orderable colors. Screens and lighting change the appearance; compare a physical sample before choosing.See all finish options →
Raising the appliance changes more than access to the lower basket. Test the upper levels, open door, controls and transfers to neighboring work surfaces before choosing the support height.
Compare a stacked double appliance with appropriately specified single-drawer locations through real loads, clean-dish turnover and cupboard access. Drawer count alone does not describe useful capacity.
The sample shows the door frame, a separate center panel, the face frame and the cabinet box. Each component has its own place in this Shaker construction.
Shaker construction: door frame, center panel, face frame and cabinet box. The cutaway helps locate these parts; confirm each material in the specifications for the selected cabinet.
01 / Door frame
The Shaker door has rails and stiles around a separate center panel. The frame and center panel are different components; confirm their materials in the specifications for the selected cabinet.
02 / Face frame
The face frame surrounds the opening at the front of the cabinet box and sits behind the doors. The face frame, door frame and cabinet box are separate parts.
03 / Cabinet box
The sample exposes the cabinet sides, interior surfaces and layered edges. The image does not establish the wood species or material specification of a selected cabinet.