Mixing cabinet knobs and pulls: make a hardware map before drilling
Choose the complete pattern of hardware, not a favorite handle in isolation. Start with the busiest cabinet run, then resolve upper doors, drawers and appliance panels.
Knobs on doors and pulls on drawers can be a useful starting point, but it is not a rule that should override how the kitchen works. An all-pull arrangement can be equally coherent, and a mixed arrangement does not have to alternate hardware at every opening. Choose a pattern across the actual cabinet elevation, then test its exceptions before any new fronts are drilled.
Begin with the run used most often
Take the elevation containing the everyday utensils, cookware and dishes. Mark which fronts swing and which pull out. A tall face that looks like a door may operate a pull-out unit, so its shape alone should not decide the handle. Record the action and the person standing there before placing decorative symbols on the drawing.
Sketch an all-pull version and a mixed version over that same arrangement. Keep the cabinet finish, door profile and surroundings fixed. On the mixed version, use knobs where you genuinely want a small visual point and pulls where you want a line or a particular grip. The exercise is to find a workable repeated pattern, not to prove that one category belongs on every door.
Now look at the whole run from the normal approach. Pulls can emphasize horizontal drawers or vertical doors; knobs punctuate a front without creating the same line. A busy drawer bank with varying lengths may already supply plenty of rhythm. Adding a different knob shape to every adjacent door can make the elevation harder to read rather than more personal.
A related family simplifies the visual choice
Top Knobs presents mixed knobs and pulls within its collections as a way to combine different shapes while keeping a related appearance. That is a useful option, not a requirement to buy every piece from one collection or a guarantee that every possible combination will suit a room.
Find the feature linking the actual pieces: a softened corner, a squared foot, a repeated curve or the finish. It need not be every feature at once. A quiet knob can sit comfortably beside a more visible pull when the two seem deliberately related. Two ornate pieces that share only a color name may still compete when mounted together.
Put the actual samples beside the proposed door finish. The word brass, black or nickel does not settle tone and sheen, particularly across manufacturers. A visual mix is allowed; an unintended near-match is the problem. If different finishes are part of the design, make that choice visible in the full elevation rather than discovering it during installation.
Do not insist that cabinet hardware exactly imitate every faucet and light fixture. Those objects occupy different parts of the room. Compare their visible relationship from the positions where they are seen together. The purpose is a coherent kitchen, not an inventory in which all metal names happen to match.
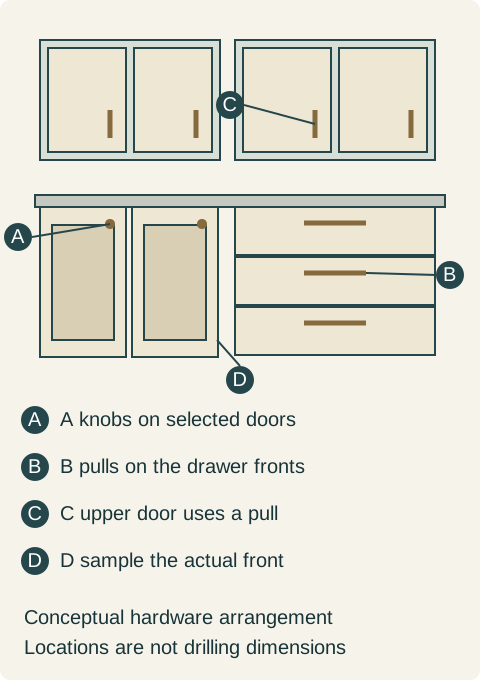
Teaching example A hypothetical mixed arrangement uses knobs on some lower doors, pulls on drawers and pulls on upper doors. Letters identify choices to test on actual fronts. This is not a recommended mounting height, hole pattern or universal assignment rule.
Test the upper doors independently
An upper-cabinet knob and a lower-cabinet knob are not used from the same position. Try the intended grip at a representative installed height and orientation on a suitable sample. A loose knob held in the palm cannot tell you whether the person will approach it comfortably on a tall or overhead door.
Test the drawer pull in the same way. The useful gripping space is not its overall decorative length. Let the regular users open a representative front, move their hands away and repeat the action. A comfortable larger pull does not automatically prove that the smaller member of the same collection feels equally good.
These trials are personal-use checks, not an accessibility certification or a universal minimum-size rule. If a user needs a particular accessibility arrangement, have that requirement reviewed within the complete cabinet design. Decorative consistency should not force a regular user to accept a grip that does not work for them.
For new fronts, use removable templates or an appropriate sample board rather than trial drilling. A small hardware foot can sit awkwardly across a shaped profile or narrow frame. The chosen position must suit the actual front and its construction, not simply line up attractively with the neighboring symbol.
Let a useful exception belong to the pattern
Consider a hypothetical kitchen with framed lower doors, a bank of everyday drawers and upper cabinets used by household members of different heights. The owners begin with knobs on every door and pulls on every drawer because that combination looks familiar in photographs.
On the actual sample arrangement, they like the small knobs on the lower doors but prefer a pull on the upper doors. The latter provides the grip they accept from their normal standing position. The selected drawer pulls already belong to the same visual family, so the upper-door pull does not introduce an unrelated design.
They revise the map to use knobs on the chosen lower swing doors, pulls across the drawer bank and vertical pulls on the upper doors. The pull-out waste front gets the grip accepted for its pull-out action rather than inheriting a knob solely because it resembles a door. Each exception has a reason the owner can explain.
The owners then review the whole wall. Instead of adding extra knob shapes to make the exception look decorative, they repeat the accepted upper-door treatment consistently. They choose the mixed map because it suits their use and looks deliberate. An all-pull version would also have been reasonable if it had won the same comparison.
Count the physical pieces, not the cabinet boxes
Make the purchase list from the approved fronts. A double-door cabinet may need separate hardware on each active door; a drawer bank contains several independently operated fronts. A false front should not silently receive an operating handle merely because it resembles a drawer. If a decorative handle is intentionally wanted there, identify that as a separate choice.
Resolve wide drawers and unusual fronts explicitly. The drawing should show the accepted number and location of handles, based on the actual drawer operation and sample review. Do not let the installer guess from an incomplete bag of hardware whether a wide front was intended to have a single pull or a paired arrangement.
Appliance panels need their own compatible handle selection. A cabinet pull that shares the desired finish is not automatically approved for the selected refrigerator or dishwasher panel assembly. Keep the appliance-related requirement visible while coordinating its appearance with the cabinet hardware around it.
Freeze the map before the hole pattern
For every selected piece, retain its identity, finish, size, orientation and front location. Overall pull length and mounting-hole spacing are different dimensions. The responsible installer needs the actual hardware and approved placement information, not a picture of a similar pull with a guessed hole pattern.
Review the completed drawing from both the kitchen entrance and the main work area, then repeat the relevant sample actions. In the hypothetical kitchen, the mixed pattern survives both checks: the lower-door knobs are intentional, the drawers have comfortable pulls, and the upper doors use the grip the family actually prefers. That complete map is what gets ordered and installed. Mixing hardware works when the choices are resolved together, before the first permanent hole makes an unresolved decision harder to change.
Pure White
Cream White
Light Warm Gray
Gray
Navy
Black
Oak Tone
Dark Walnut Tone
Design study These finish studies are design references, not a list of currently orderable colors. Screens and lighting change the appearance; compare a physical sample before choosing.See all finish options →
Hardware controls how a cabinet opens, what you can reach and where your hand goes. Compare the complete operating arrangement, then record the actual parts.
Choose antiqued mirror for the reflected scene and concealed storage you want. Compare the full door group, its patterned surface and the view when it opens before replacing transparent glass.
The sample shows the door frame, a separate center panel, the face frame and the cabinet box. Each component has its own place in this Shaker construction.
Shaker construction: door frame, center panel, face frame and cabinet box. The cutaway helps locate these parts; confirm each material in the specifications for the selected cabinet.
01 / Door frame
The Shaker door has rails and stiles around a separate center panel. The frame and center panel are different components; confirm their materials in the specifications for the selected cabinet.
02 / Face frame
The face frame surrounds the opening at the front of the cabinet box and sits behind the doors. The face frame, door frame and cabinet box are separate parts.
03 / Cabinet box
The sample exposes the cabinet sides, interior surfaces and layered edges. The image does not establish the wood species or material specification of a selected cabinet.