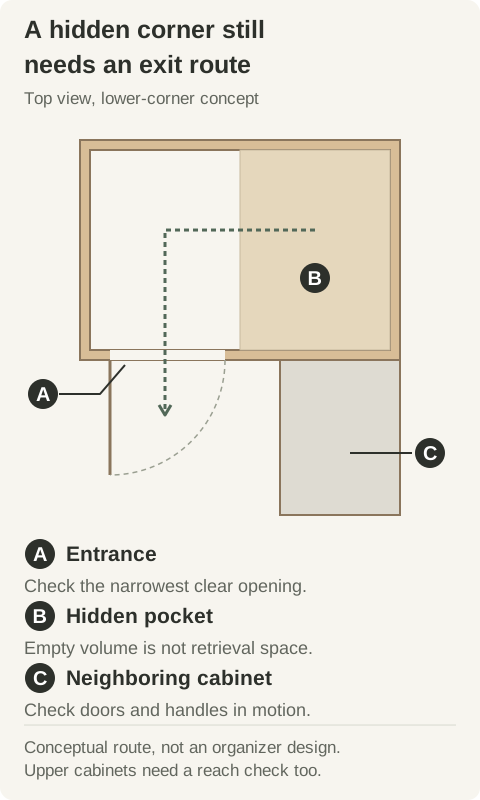
A useful corner cabinet is one whose contents can reach the opening without a struggle. For a lower corner, compare the entry, the motion of any trays and the neighboring cabinet doors before comparing claimed storage volume. For an upper corner, reach height and the path of a plate or container matter as much as shelf area. You can keep a corner simple, buy a compatible moving system, or leave a difficult pocket unused and improve the cabinets beside it. None is automatically the best choice for every kitchen.
Identify the corner on the plan
A blind corner extends behind a neighboring run, leaving some of its interior out of the direct view through the door. A diagonal corner presents an angled front to the room. Other corner layouts use an opening around the inside turn. These are different cabinet arrangements, not names for interchangeable accessories. Mark which side has the opening, where the hidden pocket lies and which adjacent front can swing across it. If the quote only says “corner cabinet,” ask for the plan view before selecting an organizer.
KraftMaid lists swing-outs, easy-reach lazy Susans and corner drawers among its corner options. These examples show why a corner needs a specific configuration. A rotating shelf, a tray that comes out through a door and a corner drawer do not follow the same route. The photograph of a clever mechanism does not establish that it fits your cabinet or that it is included in a cabinet-only price. Compare the exact interior drawing and hardware selection.
Choose a lower-corner strategy around real objects
For pots or small appliances used often, try the complete lifting motion in a display cabinet: open the door, bring the tray out and lift the object clear. A turning tray may make rear items easier to reach, but the item still has to remain stable while moving. A fixed blind shelf can work for a seldom-used object if you can get it in and out without unloading everything in front. Some households are better served by leaving the deepest corner pocket empty and using more accessible drawers next to it. Count usable assignments, not only empty cubic space.
Check the whole mechanism rather than its visible tray. The Rev-A-Shelf Cloud manual distinguishes left-door/blind-right and right-door/blind-left layouts and addresses the mounting plane in face-frame cabinets. That is a useful warning against ordering by a similar-looking picture. Have the seller or installer confirm the selected model, opening direction and mounting conditions for your exact cabinet. The manual is an external example; it does not establish that usaKT.com supplies that accessory or that a generic corner can accept it.
Measure what has to move, not just the empty pocket
Draw both cabinet runs from above. Mark the corner opening, fixed stiles, the hidden side and the neighboring fronts with handles. State left and right from a clearly labeled viewing direction.
Measure the narrowest clear entrance with the door in its required operating position. Include hinge projections. Record usable internal width, depth and height separately, along with any pipes or fixed shelves.
On the hardware drawing, trace the complete swept area of each tray. Check the object and its handles against the opening, the door and the adjacent cabinet throughout that route.
Test the intended load: a pot with its lid, a mixer with attachments or a filled basket. Record the complete system load rating, support requirements and whether access for adjustment remains after installation.
Diagram This lower-corner concept distinguishes hidden area from the entrance and the retrieval route. It does not draw a specific organizer or prove that a tray fits. Upper-cabinet reach needs a separate check.
An upper corner adds a reach problem
Do not transfer a lower-corner solution to a wall cabinet just because the outline is similar. Stand where you would normally reach and try the highest shelf you expect to use. A wide shelf is not helpful for daily dishes if you cannot see what is behind the front row or lift a filled container without brushing the door. For a diagonal upper cabinet, check the opening and shelf depth along the actual hand path. For a folding or paired-door arrangement, test the complete door movement near the adjacent handle and your head.
Assign light, occasional items to the hardest-to-reach positions if those locations are useful at all. Put everyday cups and dishes where you can retrieve them without climbing on a countertop. If an upper-corner accessory is proposed, obtain its own compatibility and load information; a base-cabinet mechanism is not evidence for a wall-cabinet installation. It is reasonable to prefer a simpler upper corner when a display demonstration reveals an awkward lift. Photograph the door fully open so that the quote discussion concerns the same arrangement.
Catch the mistakes before the cabinet list is final
An adjacent handle can stop a door before the organizer has room to travel. A filler or spacer may be part of the approved layout, so keep it on the cabinet drawing rather than treating it as leftover wood that can be deleted. Ask what the quoted corner consumes along both walls; the front door width alone does not describe that footprint. Keep the cabinet, organizer and surrounding fillers together when comparing proposals. Do not cut away a fixed stile or change support pieces to imitate an online installation.
Record the decision in the cabinet notes
Identify the corner type, the labeled opening direction and the adjacent cabinets. Keep a plan-view image with the quote.
List what will be stored there and which items are daily-use versus occasional. Check their loaded size and lifting path.
Specify fixed shelves, rotating shelves, swing-outs or another exact system, with its model and required clearances. Confirm what the price includes.
Ask the designer to compare the complete corner solution with a simpler corner and more accessible neighboring storage. Compare the same surrounding cabinet layout.
Save those measurements and the selected arrangement on the project-notes page. Keep the unanswered fit questions visible when requesting a cabinet layout. Copy or download your notes before leaving; this preparation does not send an inquiry or upload your photographs.
Choose the finish after the corner works
A matching door finish can make a corner look continuous with the rest of the kitchen, while the interior remains a separate decision. These finish studies are for appearance; confirm the chosen sample, cabinet configuration and accessory in the same quote.
Pure White
Cream White
Light Warm Gray
Gray
Navy
Black
Oak Tone
Dark Walnut Tone
Design study These finish studies are design references, not a list of currently orderable colors. Screens and lighting change the appearance; compare a physical sample before choosing.See all finish options →
Buy a coordinated suite when every included appliance earns its place. Mix brands when a specific everyday task justifies the difference, after comparing the visible fronts and the complete installed purchase.
Compare the offered wood drawers by required length, opening method and complete construction. MOVENTO is not an automatic upgrade for every drawer, and one runner family need not serve every location in the kitchen.
Choose the dispenser package with your everyday glasses, bottles and ice routine. A plain refrigerator front can still conceal a water outlet, while a door dispenser changes access without creating a separate drinks station.
The sample shows the door frame, a separate center panel, the face frame and the cabinet box. Each component has its own place in this Shaker construction.
Shaker construction: door frame, center panel, face frame and cabinet box. The cutaway helps locate these parts; confirm each material in the specifications for the selected cabinet.
01 / Door frame
The Shaker door has rails and stiles around a separate center panel. The frame and center panel are different components; confirm their materials in the specifications for the selected cabinet.
02 / Face frame
The face frame surrounds the opening at the front of the cabinet box and sits behind the doors. The face frame, door frame and cabinet box are separate parts.
03 / Cabinet box
The sample exposes the cabinet sides, interior surfaces and layered edges. The image does not establish the wood species or material specification of a selected cabinet.