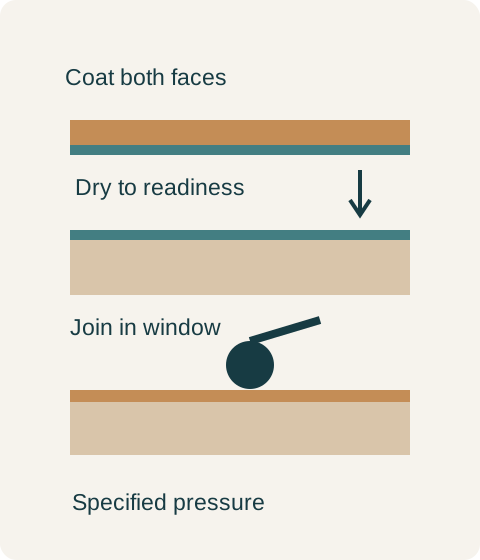
For contact adhesive, open time describes an opportunity to make the bond before assembly, not an allowance to move the sheet after the surfaces touch. Read it alongside drying requirements and the selected product instructions. A long open time does not mean wet adhesive can be closed immediately or that a misaligned sheet will remain adjustable.
Use the manufacturer’s definition
Wilsonart defines the open interval as beginning when adhesive is dry enough to bond and ending when it is too dry. Its brochure notes that temperature and humidity affect timing. This is a manufacturer-defined process term, not a universal clock for every glue.
Application starts the drying stage. Reaching the specified bonding condition opens an assembly opportunity. Bringing the surfaces together creates a different state. A production note that says assemble within the open time is therefore incomplete unless the team knows the product definition and how readiness is established. Do not treat the window as a countdown from an assumed event, and do not substitute a wet-glue clamping routine for the selected contact-adhesive process.
For a shop reviewing a lamination problem, retain adhesive identity, substrate, application sequence, conditions and the assembly method. A label that merely says contact cement cannot explain whether the intended window was respected. The record should also say which manufacturer instruction governed pressure and coverage. The article does not supply spray settings, pressure values or chemical handling directions; those belong to the exact professional process and its safety documentation.
Teaching example Conceptual contact-bond sequence. The figure supplies no timing, pressure or application recipe; use the selected adhesive’s documented process.
A completed production decision after an interruption
Consider a hypothetical batch of cabinet end panels. The operator prepares the coated parts, but a stoppage interrupts assembly. On return, the batch cannot be shown to meet the adhesive’s permitted bonding condition. The supervisor separates it from the ready batch and follows the product’s documented recovery procedure or remakes the affected bonding preparation. The shop does not press the parts together simply because the work order remains open. It also does not invent a fresh time allowance by resetting the timer. Only the parts returned to a documented bonding condition rejoin production.
If a laminated part later develops an open edge, the timing record is one line of investigation. It is not enough to conclude that the adhesive was too old or that more pressure would solve everything. Material identity, surface preparation, application and assembly conditions still matter. Keep the failed part identifiable and let the fabricator review the whole sequence before an attempted repair destroys useful evidence.
For a documented fabrication exception, record which panel was reworked, replaced or held and the result of its inspection. The buyer can then accept a defined finished component. A work order closed in the office is not evidence that an interrupted bonding step recovered correctly; the disposition has to follow the physical part.
Pure White
Cream White
Light Warm Gray
Gray
Navy
Black
Oak Tone
Dark Walnut Tone
Design study These finish studies are design references, not a list of currently orderable colors. Screens and lighting change the appearance; compare a physical sample before choosing.See all finish options →
Thin banding covers a panel edge; solid lipping adds a separately specified wood member. Compare the finished outline, profile and assembly before treating thicker edging as an upgrade.
The sample shows the door frame, a separate center panel, the face frame and the cabinet box. Each component has its own place in this Shaker construction.
Shaker construction: door frame, center panel, face frame and cabinet box. The cutaway helps locate these parts; confirm each material in the specifications for the selected cabinet.
01 / Door frame
The Shaker door has rails and stiles around a separate center panel. The frame and center panel are different components; confirm their materials in the specifications for the selected cabinet.
02 / Face frame
The face frame surrounds the opening at the front of the cabinet box and sits behind the doors. The face frame, door frame and cabinet box are separate parts.
03 / Cabinet box
The sample exposes the cabinet sides, interior surfaces and layered edges. The image does not establish the wood species or material specification of a selected cabinet.