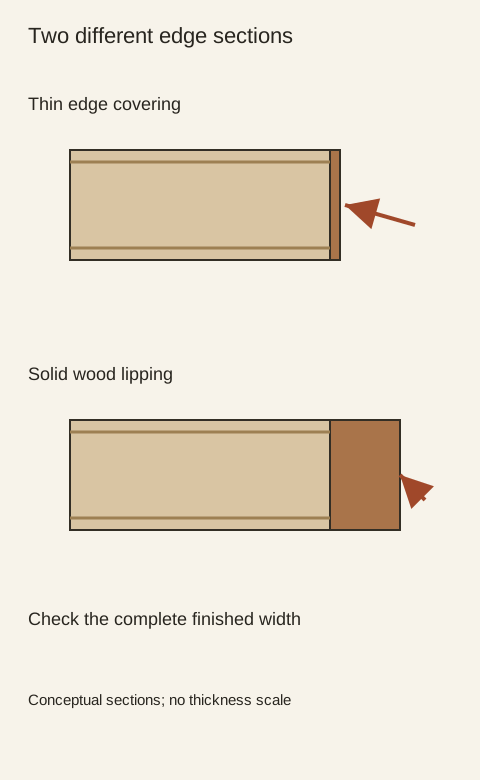
Thin edge banding or solid wood lipping: specify what the edge must do
Thin banding covers a panel edge; solid lipping adds a separately specified wood member. Compare the finished outline, profile and assembly before treating thicker edging as an upgrade.
Choose thin edge banding when its specified material and profile meet the edge's job. Consider solid wood lipping when the design calls for a separate wood edge that can accommodate a particular shape or construction detail. Neither term establishes a finished cabinet's strength by itself. Compare what the strip is made from, how it meets the face, which dimensions it changes and how it is bonded to the panel.
An edge covering and a wood member are different descriptions
Edge banding is a broad category. It can include wood veneer and several manufactured materials, and it need not be solid lumber. Lipping usually describes a separately attached strip of solid wood, but terminology varies by shop. Ask for a section if a quote uses wood edge without explaining the material. A narrow strip with wood grain could be veneer tape or a thicker wood member.
AWI's casework requirements distinguish solid wood, veneer and veneer tape as possible wood edge treatments. They also treat the order of applying edges and faces as a separate issue. Those distinctions provide useful vocabulary; they do not make an unverified cabinet compliant with an AWI standard. For your project, identify the actual edge construction and the agreed finished appearance.
Diagram The different widths make the constructions visible. They are not specified material thicknesses, a durability ranking or instructions for modifying a shelf. Prepare and save project notes →
The profile needs material in the right place
A rounded or shaped edge must be compatible with the panel and the material covering it. Thin veneer at an edge provides little wood depth before machining reaches the core. A separately specified solid strip can provide material for a profile, but its size, grain, bond and intersection with the face still need review. Do not assume any radius can be cut merely because the quote says solid edge.
Look at a section through the intended finished profile. Identify where the broad face veneer stops and where the edge strip begins. A curve that runs into the decorative face can expose a different material even when the front of the strip looks substantial. For a replacement or a field adjustment, obtain the maker's instructions before trimming; the visible thickness of an edge is not a universal sanding allowance.
Edging can change the finished size
Establish whether a drawing dimension describes the core before edging or the completed component. That distinction matters beside another panel, inside a framed opening or at a fitted cover. Edging may be added, machined flush or let into the panel. A note giving the overall finished size should not be interpreted as permission to add strips outside that size.
In a hypothetical arithmetic example, a core 24 inches wide receives a 1/4-inch strip on each side. Before final machining, the total is 24.5 inches. If the intended finished width is 24 inches and the strips remain that width, the core would need to be 23.5 inches before any additional machining allowance. These assumed dimensions explain the drawing question; they are not a fabrication specification for a usaKT.com component.
The face can cover the edge joint or stop beside it
In one construction the decorative face stops at a visible solid strip. In another, a solid edge is installed first and the face veneer extends across the joint. The latter can hide the strip from the front while retaining wood at the edge. A front photograph can therefore fail to reveal the actual construction. Ask the fabricator to mark the face-to-edge sequence on the section.
Where veneer crosses between different underlying materials, compatibility and preparation matter. Uneven thickness, movement or a poorly prepared connection can affect the surface above it. The USDA's bonding discussion explains the importance of sound surfaces, fit and moisture conditions. It does not provide a blanket guarantee against a visible line, and a concealed strip should not be sold as one.
A hypothetical shelf and a decorative side need different answers
Imagine an open shelf that needs a modest finished edge and a cabinet side with a specified shaped front. The shelf may be well served by an appropriate thin covering, while the shaped side may need a separately detailed wood strip. Compare each against its purpose. Choosing the same edge everywhere for consistency can be reasonable, but it should follow the required section rather than substitute for it.
Now suppose the shelf has a deep-looking front strip. Ask whether that strip is decorative or designed and bonded to participate in the shelf's structural behavior. Appearance alone cannot establish reinforcement. A strip added after a shelf begins to sag is not automatically an approved repair. The panel, strip connection and supports need a complete assessment before a load decision changes.
Repair possibilities depend on the whole surface
More solid wood at an edge may offer different repair options, but it does not guarantee an invisible repair. A dent can cross the seam into thin face veneer. A replacement strip may differ in grain, finish or profile. Ask the maker what can be repaired on the specific component and which changes would require replacing it. Do not sand through a face while trying to remove an edge mark.
A loose strip also raises a bonding question, not just a cosmetic one. Record the affected length and location without prying it open. Keep photographs of the whole part and its label with the detail. A household adhesive applied over an unknown glue line can make later assessment harder; obtain a product-specific repair method before changing the observed condition.
Approve a section and a finished sample together
Record the core, face, edge material, profile, finished dimensions and edge-to-face sequence. A section explains construction while a completed sample shows the transition you will see and touch. If the shop proposes an alternative edge, compare its final outline and material boundaries as well as its color. Similar-looking samples can have different machining and service limits.
Finish references
Pure White
Cream White
Light Warm Gray
Gray
Navy
Black
Oak Tone
Dark Walnut Tone
Design study These finish studies are design references, not a list of currently orderable colors. Screens and lighting change the appearance; compare a physical sample before choosing.See all finish options →
Check the edge-to-face transition, corners and visible match on a finished sample, and separate appearance questions from claims about hidden bonding quality.
Identify whether the visible cabinet end is an applied decorative panel, a finished structural side or a different construction option before approving the quote.
The sample shows the door frame, a separate center panel, the face frame and the cabinet box. Each component has its own place in this Shaker construction.
Shaker construction: door frame, center panel, face frame and cabinet box. The cutaway helps locate these parts; confirm each material in the specifications for the selected cabinet.
01 / Door frame
The Shaker door has rails and stiles around a separate center panel. The frame and center panel are different components; confirm their materials in the specifications for the selected cabinet.
02 / Face frame
The face frame surrounds the opening at the front of the cabinet box and sits behind the doors. The face frame, door frame and cabinet box are separate parts.
03 / Cabinet box
The sample exposes the cabinet sides, interior surfaces and layered edges. The image does not establish the wood species or material specification of a selected cabinet.