Choose a child latch that fits the cabinet and the adults using it
A latch occupies real space inside a door or drawer. Check its mounting and adult release sequence before choosing the cabinet interior or drilling a finished front.
Plan a kitchen child latch as part of the cabinet assembly, not as an accessory that will fit anywhere later. The door thickness, frame, interior drawer and adult release position can all affect the choice. Select a documented latch for the actual configuration, then demonstrate opening, use and reengagement before committing to its mounting details.
Reserve physical space for the device
Identify whether the device connects a door to the cabinet, joins paired doors or acts on a drawer. These are different mounting arrangements. A latch illustrated on a framed cabinet may not attach the same way to a frameless box. Use the installation sheet for the exact device and check that its mounting surfaces exist in the proposed cabinet.
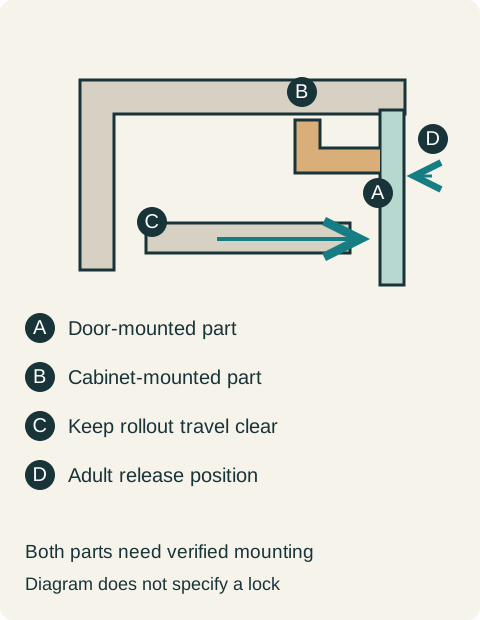
Plot the latch and receiving part beside hinges, shelf edges and rollout travel. Include the hardware projection inside the box. The space may look empty when the front is closed but be crossed by an inner tray during use. Do not shorten a latch, move a catch outside its specified position or alter a hinge to make an unexplained interference disappear.
Include the adult's release and reset
CPSC says safety devices need correct installation and reengagement after use; no device is completely childproof. Its guidance recommends cabinet latches and locks that adults can install and use readily. These statements do not endorse a particular device or cabinet.
Ask the adults who normally use the cabinet to try the intended release method. A method another person finds simple may be difficult with limited grip or reach. Record whether opening requires putting down the carried object and where that object can wait. Include closing and reengagement in the trial; a successful release alone leaves half the routine untested.
Diagram A conceptual section locates the latch, receiving part and nearby rollout. The selected product instructions determine actual mounting, engagement and release geometry.
Resolve an interior conflict before the order
In a hypothetical sink-side cabinet, a proposed latch mounts near the upper opening, where the planned inner tray passes. The closed-door drawing hides the conflict. The designer compares the latch installation envelope against the tray travel and rejects that combination. The decision is to retain the required protective function, choose a documented compatible arrangement and revise the interior only after its storage consequences are understood.
The adult trial then finds that a frequently used ordinary dish is behind the same latch. The household moves that dish to a separate everyday cabinet, keeping the protected storage assigned to its intended contents. The revised routine reduces unnecessary openings without disabling the device. Each adult completes release, retrieval, return and reengagement on the candidate assembly before its installation detail is accepted.
Preserve the accepted combination
Record the cabinet construction, front, exact device and installation instructions together. Identify who installs it and who checks the completed arrangement against those instructions. A hardware replacement or shifted rollout can invalidate the fit previously demonstrated. An unexplained partial closure should be investigated, not overcome by pushing harder.
Keep device instructions and product identification with the cabinet records so maintenance and any relevant recall check can identify the actual part. Adult convenience does not justify leaving a protective device disengaged. If a candidate cannot support the adults' ordinary routine, resolve that incompatibility through an appropriate alternative and storage arrangement before treating the cabinet as ready for use.
Pure White
Cream White
Light Warm Gray
Gray
Navy
Black
Oak Tone
Dark Walnut Tone
Design study These finish studies are design references, not a list of currently orderable colors. Screens and lighting change the appearance; compare a physical sample before choosing.See all finish options →
Hardware controls how a cabinet opens, what you can reach and where your hand goes. Compare the complete operating arrangement, then record the actual parts.
Start with an agreed task and a small selected dish set. Place it outside active cooking movements and make both taking and putting away understandable.
Separate daily supplies, reserve packages and objects that belong elsewhere. Cabinet size should reflect a usable inventory, not everything temporarily piled in the laundry room.
The sample shows the door frame, a separate center panel, the face frame and the cabinet box. Each component has its own place in this Shaker construction.
Shaker construction: door frame, center panel, face frame and cabinet box. The cutaway helps locate these parts; confirm each material in the specifications for the selected cabinet.
01 / Door frame
The Shaker door has rails and stiles around a separate center panel. The frame and center panel are different components; confirm their materials in the specifications for the selected cabinet.
02 / Face frame
The face frame surrounds the opening at the front of the cabinet box and sits behind the doors. The face frame, door frame and cabinet box are separate parts.
03 / Cabinet box
The sample exposes the cabinet sides, interior surfaces and layered edges. The image does not establish the wood species or material specification of a selected cabinet.