When does an island vanity make sense in a bathroom layout?
An island works only when its washing position, rear route, end turns and storage openings have separate room to function. Compare those areas explicitly, and select a fixture designed for placement away from a wall rather than assuming any freestanding vanity can be moved into the center.
An island wash area can preserve a window wall or let another person use a separate route behind the cabinet. It also occupies space on several sides and needs a complete support, service and mirror arrangement away from the wall. Choose it for a demonstrated room benefit, not simply because the center of a large floor plan looks empty.
Center-room placement is a product configuration
Falper's Eccentrico collection is a real example of a manufacturer describing center-room washbasin placement. That establishes the design possibility. It does not establish that an ordinary wall-adjacent vanity has the finished back, support or connection arrangement needed to serve as an island.
For the actual candidate, ask for its intended installation position and drawings of every exposed side. Identify where the basin user stands, where storage opens and how the proposed mirror is supported. Access from both sides of a cabinet does not mean its drawers open from both sides or that either side is a suitable washing position.
Count the front and rear spaces separately
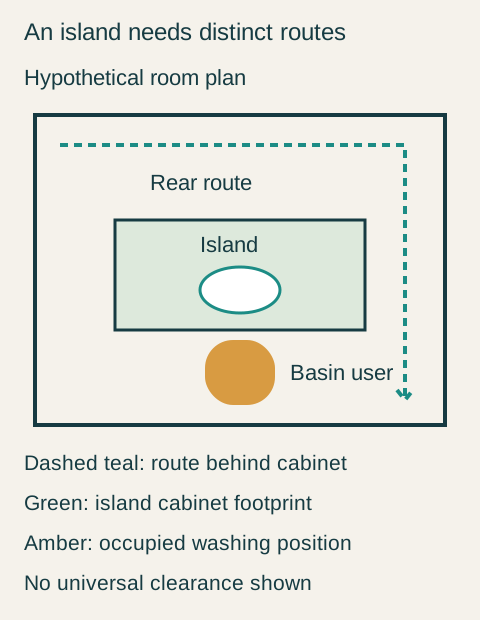
In a hypothetical transverse room section, the available width is 96 inches and the island body is 24 inches deep. Subtracting the body leaves 72 inches. Centering it produces 36 inches on each side. These are invented planning dimensions, not minimum clearances or a product specification; the arithmetic only locates the remaining floor.
Suppose the washing activity in that hypothetical layout occupies a 24-inch-deep area on the front side. Only 12 inches of that side's original 36-inch strip remains behind the person in this simplified sketch. It would be misleading to describe the full front strip as simultaneously available for passage. The separate rear strip is the route to test for someone moving through the room.
Teaching example Hypothetical plan of the island choice. The basin user stands in the amber area on the front side; the dashed teal path passes along the rear side. Green is the island cabinet footprint. These areas must be tested separately with the actual fixture and people; the sketch does not establish clearance standards or installation details.
Test that rear route from entrance to destination, including turns around the island ends. A generous transverse gap can lead to a blocked end where a tub, door or open drawer occupies the connection. Mark which cabinet side has storage and test the relevant fronts open. Do not count space occupied by retrieval as an uninterrupted route at the same time.
Compare what the wall layout actually does
A wall vanity concentrates the fixture depth at the perimeter and leaves a broad area in front. In some rooms that is the better arrangement. In others, the only path to the shower passes directly behind the person washing, whereas a properly located island offers a separate route on the other side. Compare the same people and destinations in both proposals.
The mirror can determine whether the proposed island orientation has value. Facing a window may provide a pleasant view but does not provide a mirror for grooming. Show the actual mirror and lighting arrangement, its supports and the sightline from the working position. A large decorative outline drawn above the basin is not a resolved mirror installation.
Choose the island only when the separate route earns its space
In the hypothetical room, a wall-based proposal places the basin user in the preferred shower route and covers part of the window wall. The island proposal is tested with the actual intended movements: the washing position stays on its front side, while another person reaches the shower by the rear route and turns around the clear end. Drawer use is assigned to the front side, so it does not interrupt that rear passage.
A fixture intended for the proposed island position supplies the required daily storage in its own front compartments. The project team resolves its support, exposed-back treatment, connections and a mirror arrangement that serves the chosen orientation. The owner accepts the necessary service work as part of the remodel and chooses the island because it preserves the window wall and separates those concurrent activities.
This decision would reverse if the rear route narrowed at the end, storage opened into it or the mirror solution blocked the intended benefit. A wall arrangement remains the alternative in that case; the island should not survive simply because it was the original visual idea.
Carry the service scope with the layout comparison
Away from the wall, the routes for supply, waste and any required electrical services must be shown in the project design. Do not assume existing wall connections can remain without a reviewed means of reaching the selected fixture. Floor attachment and any penetrations also need coordination with the actual floor assembly.
The selected scheme is therefore a complete room arrangement: washing in front, a usable route behind, accessible storage on its assigned face and resolved fixture support and services. Its value comes from those relationships, rather than from an empty outline around a centerpiece.
Pure White
Cream White
Light Warm Gray
Gray
Navy
Black
Oak Tone
Dark Walnut Tone
Design study These finish studies are design references, not a list of currently orderable colors. Screens and lighting change the appearance; compare a physical sample before choosing.See all finish options →
Separate sink stations can give each person a defined area, but facing drawers and crossing routes need more attention than a symmetrical floor plan suggests.
Consider a separate area when a defined group of grooming steps can be completed there with its own working surface, view and supplies, while the route to any required basin use remains practical. An empty counter elsewhere is only a candidate until the complete task has been tested.
The sample shows the door frame, a separate center panel, the face frame and the cabinet box. Each component has its own place in this Shaker construction.
Shaker construction: door frame, center panel, face frame and cabinet box. The cutaway helps locate these parts; confirm each material in the specifications for the selected cabinet.
01 / Door frame
The Shaker door has rails and stiles around a separate center panel. The frame and center panel are different components; confirm their materials in the specifications for the selected cabinet.
02 / Face frame
The face frame surrounds the opening at the front of the cabinet box and sits behind the doors. The face frame, door frame and cabinet box are separate parts.
03 / Cabinet box
The sample exposes the cabinet sides, interior surfaces and layered edges. The image does not establish the wood species or material specification of a selected cabinet.