Integrated extractor cooktop or a separate rising downdraft?
A central intake and a vent that rises behind a separate cooktop create different purchases. Compare the cooking layout, rear countertop allocation and complete equipment package before choosing the cabinets below.
Choose an integrated extractor cooktop when its cooking layout and ventilation package both suit the kitchen. Choose a separate rising downdraft when a documented combination with a separate cooktop better serves the cooking task and the counter can accommodate the whole arrangement. Keeping the view above an island open is only one part of this decision. The two approaches allocate the cooking surface, rear counter and equipment below differently.
The intake occupies a different part of the purchase
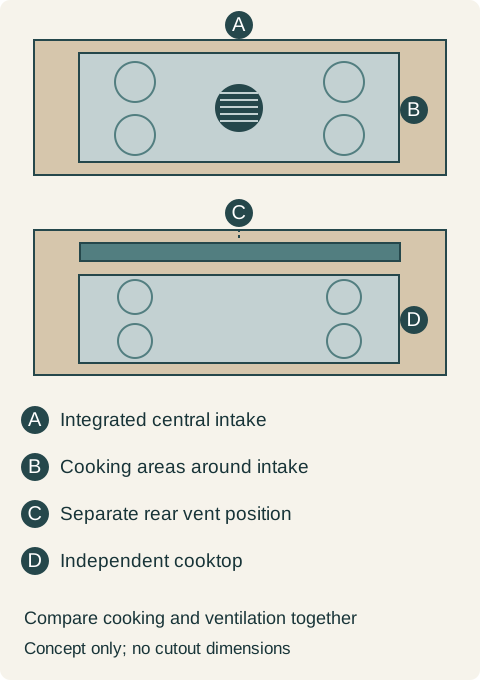
Fisher & Paykel's cited integrated induction model places a flush ventilation grille within the cooking surface. Its guide also describes a removable grease-filter tray. Cooking and extraction are functions of that appliance.
Wolf's cited DD36 is a separate rising downdraft behind a cooktop. Its guide identifies required blower options and shows a rear vent opening distinct from the cooktop opening. The quoted vent alone is therefore not the whole cooking-and-ventilation purchase.
These are named examples of the arrangements, not a recommendation that the products can be mixed. Nor does integrated mean that any cooktop can be fitted with a central grille later. The appliance's heating areas, intake, controls and underside belong to its own design. A separate vent also needs a supported appliance combination; it is not a universal accessory for whichever cooktop happens to be on sale.
Choose the cooking surface with the intake visible
Place the household's usual cookware against the actual selected cooking layout, using a suitable cold demonstration or the manufacturer's planning information. Include the wide pan used with another saucepan, not only an isolated small pot. Check the permitted heating positions, handles and controls. The appliance's outside width does not tell you whether those items work together on its assigned cooking areas.
With a central intake, do not mentally turn the middle of the appliance into an extra heating zone. A surface that looks continuous in a photograph can still assign that area to ventilation. Follow the selected appliance's instructions for cookware placement and movement; a diagram of the glass outline does not establish permitted use of the grille.
With a rear rising vent, assess the selected cooktop first, then include the vent's raised position behind it. Its location can affect the view and the arrangement of nearby items while cooking. Evaluating only the lowered position misses the state that attracted the buyer's attention to ventilation in the first place. Neither layout should depend on using the cooking surface as a permanent storage shelf.
Teaching example Conceptual plans. Above, the intake belongs within the cooking appliance. Below, a separate rising vent has its own rear position behind a cooktop. Rings symbolize cooking areas; they are not model dimensions or approved pan positions. The dashed leader identifies the rear vent position, not an airflow path.
A separate vent needs a place behind the cooktop
The rear component changes the countertop proposal as well as the cabinet interior. Compare the actual combined opening drawing with the wall, raised ledge or island edge behind it. A kitchen planned for a cooktop alone cannot be approved for a rising vent by adding a thin line to the elevation. The drawing must resolve the complete assembly and the selected countertop material's fabrication requirements.
Do not automatically enlarge an island to rescue that extra reservation. First show what the deeper proposal changes in the room: the working aisle, seating position and the path past the island. If the proposed arrangement works within the existing boundary, keep that evidence. If it requires a larger top or different cabinets, include the consequence in the purchase comparison.
An integrated intake moves the ventilation function into the appliance outline, but it does not make the equipment beneath it disappear. The appropriate comparison is between completed systems, including their documented routing and access, rather than between a slim central grille and a tall rear housing seen in isolation. Useful storage is the result after those systems are placed.
Compare complete packages and future changes
List the cooking appliance, ventilation equipment, specified accessories and installation work for each alternative. If one quote includes a blower and another leaves it to be selected, their displayed totals describe different scopes. Identify the supported configuration and price it as a whole before deciding that integration costs more or less.
Separate equipment can allow the cooktop and ventilation to be identified independently, but that does not guarantee either can be replaced with an arbitrary future model. Their opening, interface and compatibility still matter. An integrated product also does not justify assuming that a fault in one function always requires discarding the entire appliance. Ask about service and parts for the actual proposal instead of using either slogan as a purchasing rule.
The same caution applies to ventilation performance. An intake's location and the largest airflow number do not establish that the system is suitable for every cooking routine or room. Have the actual ventilation arrangement assessed for the project. This cabinet comparison does not rank smoke capture, size ducts or establish an installation approval.
A cooking preference settles one family's choice
In a hypothetical renovation, a family compares an integrated induction model with a documented separate cooktop and rising-vent combination. The integrated model suits its preferred clean appearance, but the family is less comfortable with the way its usual wide pan and accompanying saucepan occupy that particular heating layout. Another cooktop offers the control positions and permitted cookware arrangement the family prefers.
The family selects the separate combination after the complete rear reservation fits within its accepted counter boundary. It accepts seeing the raised vent while cooking and includes the specified blower in the quote. Below the assembly, the revised cabinet plan keeps the remaining usable drawer and moves the displaced trays to an already assigned vertical cabinet. It does not preserve a fictitious full drawer stack merely because the front elevation looks better that way.
This decision trades the integrated model's appearance for a preferred cooking arrangement and an accepted rear component. If the separate combination instead required unacceptable room changes, or the integrated layout worked equally well with the family's cookware, the result could favor integration. The example depends on the actual offered products, not a claim that one layout always has more usable cooking area.
Keep ordinary care in the selection
Have the selected appliance's routine filter and spill-cleaning tasks demonstrated as its instructions permit. Decide where removed parts can be carried and cleaned, and keep the required access in the cabinet arrangement. A tidy surface should not depend on covering a necessary access point with fixed storage or treating removable components as permanently inaccessible equipment.
Approve the final cooking layout, ventilation configuration and cabinet allocation together. A later change to one can alter the other two. The useful outcome is a complete cooking station whose operating appearance, cookware arrangement and storage consequences are accepted before the countertop is fabricated.
Pure White
Cream White
Light Warm Gray
Gray
Navy
Black
Oak Tone
Dark Walnut Tone
Design study These finish studies are design references, not a list of currently orderable colors. Screens and lighting change the appearance; compare a physical sample before choosing.See all finish options →
Reserve equipment, the agreed route and access before counting cabinet capacity. The remaining volume matters only if real contents can enter, sit and be retrieved without occupying those reservations.
Choose the supported combination and its interface parts before defining the opening. Product width, finished assembly width and countertop cutout are different measurements.
Moving cooking to the island exchanges one working zone for another. Compare preparation, pan handling, storage and ventilation in both complete layouts before changing the cabinet order.
The sample shows the door frame, a separate center panel, the face frame and the cabinet box. Each component has its own place in this Shaker construction.
Shaker construction: door frame, center panel, face frame and cabinet box. The cutaway helps locate these parts; confirm each material in the specifications for the selected cabinet.
01 / Door frame
The Shaker door has rails and stiles around a separate center panel. The frame and center panel are different components; confirm their materials in the specifications for the selected cabinet.
02 / Face frame
The face frame surrounds the opening at the front of the cabinet box and sits behind the doors. The face frame, door frame and cabinet box are separate parts.
03 / Cabinet box
The sample exposes the cabinet sides, interior surfaces and layered edges. The image does not establish the wood species or material specification of a selected cabinet.