Calculate useful storage around the complete downdraft system
Reserve equipment, the agreed route and access before counting cabinet capacity. The remaining volume matters only if real contents can enter, sit and be retrieved without occupying those reservations.
Count storage below a downdraft installation only after the complete system has been placed in the cabinet plan. The visible vent at the countertop does not describe the equipment, route and access needed below. Start with the selected cooking appliance and ventilation configuration, then assess what useful storage remains around the verified installation rather than subtracting a single equipment box.
Identify the complete configuration before drawing drawers
Record the exact cooktop and downdraft models and any applicable blower or installation option. Obtain the corresponding documents and have their compatibility and installation conditions checked by the responsible installer. Different configurations may occupy different locations; do not assume that a remote-looking component in a brochure is available or suitable for the proposed arrangement.
KitchenAid’s cited retractable-downdraft guide includes a cabinet condition in which a drawer is removed and its front becomes fixed. This applies to the installations covered by that guide. It demonstrates why a drawer-shaped front on an elevation is not proof of working storage beneath a downdraft system.
Map equipment, route and access as separate reservations
Place the below-counter equipment in plan and section using the actual product information. Add the agreed route through or beyond the cabinet, together with any required access area. Mark cabinet partitions, supports and neighboring modules so a route leaving the main bay does not disappear from the storage calculation simply because it crosses a cabinet line.
Treat the route as an installation design to be confirmed, not as an arrow that can be bent anywhere to rescue a drawer. Use the applicable instructions for its components and configuration. The storage drawing can reserve that agreed space, but it cannot establish duct sizes, allowed turns or connection details by itself.
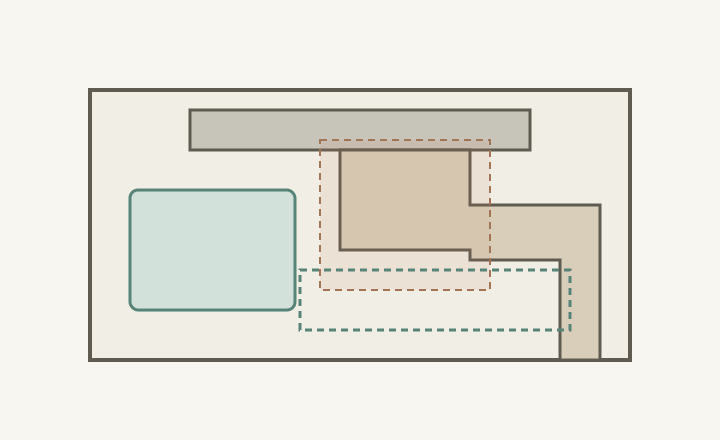
ABCD
Diagram Solid shapes reserve a hypothetical system and route; the brown dashed area represents an additional access reservation. The wide green dashed item conflicts with reserved space. This is not a duct design, actual product outline or required service clearance.
A
The countertop feature has equipment below it.
B
Access can occupy space beyond the equipment body.
C
The agreed route remains unavailable for storage.
D
This proposed wide item crosses reservations despite visible free areas nearby.
Test usable shapes instead of adding leftover volume
Place the actual pots, trays or containers intended for the cabinet into the remaining regions. Check their entrance, resting position and retrieval movement. Separated pockets of space cannot automatically serve a wide object, and a drawer needs its moving envelope as well as a closed position. Do not convert every empty patch in the section into usable capacity.
In a hypothetical cabinet, a basket fits in the clear area beside the equipment. A wide tray appears to fit across the lower part when only the blower box is shown. Adding the approved route and access reservation reveals that the tray occupies space the system still needs. The cabinet has free volume, but it does not have the continuous usable shape claimed for that tray.
Compare the storage arrangement after all reservations are included
Evaluate a shorter drawer, a different compartment arrangement or another installation option only where the selected system supports it. Record exactly which contents remain and which need another home. A change that preserves the look of a drawer stack may still remove the upper working drawer or reduce the depth of a lower compartment.
If a proposed route changes to preserve storage, have the responsible installer reevaluate the ventilation design before accepting the new cabinet capacity. Do not assume that moving a blower, shifting a connection or narrowing a route is a harmless furniture decision. Compare complete confirmed options, including the effect on neighboring cabinets, rather than choosing the arrangement with the largest empty area on paper.
Preserve the agreed installation during everyday use
Identify the access required for the selected system’s ordinary maintenance and service tasks, including how relevant panels or components are reached. Keep those areas separate from permanent storage assignments. A container that must occasionally be moved is a different proposal from a fixed shelf or drawer assembly blocking access; evaluate the actual method instead of labeling everything simply accessible.
Save the equipment configuration, route, access reservations and final storage assignment in the same drawing set. Check the completed cabinet against that set before filling it. Revisit the plan when the ventilation configuration or storage changes. The useful result is a cabinet whose promised capacity survives the complete installation and whose contents do not occupy space reserved for the system.
Pure White
Cream White
Light Warm Gray
Gray
Navy
Black
Oak Tone
Dark Walnut Tone
Design study These finish studies are design references, not a list of currently orderable colors. Screens and lighting change the appearance; compare a physical sample before choosing.See all finish options →
A drawer front fitting under the counter does not establish usable storage. Verify the supported installation, reserve the required underside space and check the highest stored item through the drawer’s movement.
Choose the supported combination and its interface parts before defining the opening. Product width, finished assembly width and countertop cutout are different measurements.
The sample shows the door frame, a separate center panel, the face frame and the cabinet box. Each component has its own place in this Shaker construction.
Shaker construction: door frame, center panel, face frame and cabinet box. The cutaway helps locate these parts; confirm each material in the specifications for the selected cabinet.
01 / Door frame
The Shaker door has rails and stiles around a separate center panel. The frame and center panel are different components; confirm their materials in the specifications for the selected cabinet.
02 / Face frame
The face frame surrounds the opening at the front of the cabinet box and sits behind the doors. The face frame, door frame and cabinet box are separate parts.
03 / Cabinet box
The sample exposes the cabinet sides, interior surfaces and layered edges. The image does not establish the wood species or material specification of a selected cabinet.