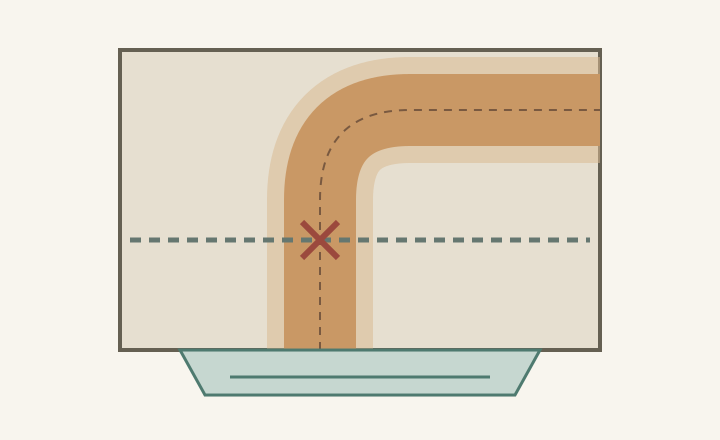
Reserve the hood duct route before counting the upper cabinet as storage
A duct centerline does not describe the space occupied by connectors, bends and installation access. Draw the complete verified route, then decide what storage remains usable.
Treat the hood duct route as occupied space before assigning shelves to the cabinet above it. A line pointing toward the ceiling is only an intention. The selected hood outlet, connector, fittings and verified path to the outdoor termination must fit together. Once those are resolved, assess the remaining cabinet area as storage rather than promising its full nominal volume.
Start with the actual outlet and destination
Identify the exact hood and its permitted discharge arrangements in the applicable installation instructions. Mark the outlet position relative to the finished cabinet and wall, not simply the center of the decorative hood face. Ask the ventilation installer to verify where the route can actually pass and terminate. A connection drawn at the cabinet top does not prove that a usable path continues beyond it.
Broan-NuTone recommends short duct runs with few turns and following the hood manufacturer’s duct-size requirements. Its guidance also explains that allowable run length depends on the model, diameter, elbows and system design. Those principles support early coordination; they do not supply a universal duct diameter or length allowance for this cabinet.
Obtain the actual connector and fitting dimensions for the proposed arrangement. Show their outer shapes in the views needed to locate them: a front elevation alone can hide a rearward turn, while a plan can hide a vertical offset. Include the space required to make the approved connections and complete any instructed access. These needs must be established for the chosen assembly, not guessed as a standard extra gap.
A bend occupies an area around its centerline. Likewise, changing shape through a transition is not the same as placing a straight tube in a smaller slot. Do not approve a shelf merely because it misses the thin line on the drawing. The cabinet reservation should reflect the actual fittings and installation arrangement that the installer has checked.
ABCD
Diagram The shaded route distinguishes occupied volume from its dashed centerline. The crossed shelf is a conflict to resolve, not a cutting instruction. Duct shape, bend radius, clearance and termination are illustrative only; the actual system requires its own verified details.
A
Locate the selected hood outlet.
B
The turning fitting occupies volume around the route line.
C
This proposed shelf crosses the reserved area.
D
Verify the continuing path beyond the cabinet.
Resolve the shelf conflict before detailing the cabinet
Consider a hypothetical upper cabinet initially drawn with a straight vertical duct strip and full-width shelves beside it. A verified route later requires an offset near the cabinet top. Its fitting now crosses the upper shelf and occupies the space assigned to tall containers. The lower compartment may remain usable, but the original storage drawing is no longer accurate.
Revise the shelf layout or cabinet arrangement around a compliant route, or have another supported route evaluated. Do not squeeze, flatten or casually reduce the specified duct just to recover storage. Cutting a shelf or cabinet component also needs a suitable cabinet detail; a conflict mark is not permission to cut through structural parts or fastening areas.
Count only storage that can be reached and maintained
After the duct reservation is settled, test the remaining pockets through the real door opening. A jar that fits beside the duct on a section may not pass the hinge, shelf edge or front of the enclosure. Check placing and retrieving the intended items without moving ductwork, blocking required access or leaning stored objects against components that are not storage supports.
Distinguish a genuinely accessible shelf from enclosed leftover space. If the design covers the duct, incorporate the verified access arrangement instead of assuming every attractive cover can be permanent. This article concerns the route through cabinetry; service access within the hood enclosure still requires its own equipment-specific design.
Leave a cabinet drawing with a traceable reservation
Record the hood identification, applicable instructions, selected outlet arrangement, fitting information and the installer’s confirmed continuation beyond the cabinet. Mark which shelves remain, which areas are reserved and which questions are unresolved. Review the cabinet and ventilation drawings together before either trade works from them.
Recheck the reservation when the hood, outlet direction or route changes. A replacement with the same visible width can move the connector or require a different fitting. The storage plan remains valid only while the installation arrangement it was checked against remains valid.
Pure White
Cream White
Light Warm Gray
Gray
Navy
Black
Oak Tone
Dark Walnut Tone
Design study These finish studies are design references, not a list of currently orderable colors. Screens and lighting change the appearance; compare a physical sample before choosing.See all finish options →
Design around the actual insert and the tasks that remain after installation. A component can fit inside the enclosure yet lack the movement needed for cleaning or service.
A dishwasher can open on its own yet block the storage used while unloading. Check the door, neighboring fronts, rack positions and actual unloading sequence before fixing the corner layout.
The sample shows the door frame, a separate center panel, the face frame and the cabinet box. Each component has its own place in this Shaker construction.
Shaker construction: door frame, center panel, face frame and cabinet box. The cutaway helps locate these parts; confirm each material in the specifications for the selected cabinet.
01 / Door frame
The Shaker door has rails and stiles around a separate center panel. The frame and center panel are different components; confirm their materials in the specifications for the selected cabinet.
02 / Face frame
The face frame surrounds the opening at the front of the cabinet box and sits behind the doors. The face frame, door frame and cabinet box are separate parts.
03 / Cabinet box
The sample exposes the cabinet sides, interior surfaces and layered edges. The image does not establish the wood species or material specification of a selected cabinet.