Check a French-door refrigerator beside a wall for food access and drawer removal
A door can open enough to reach food while leaving an inner drawer difficult to remove. Check the wall, hinge path, door bins and the selected model’s separate use and cleaning tasks.
Verify a French-door refrigerator beside a wall through separate tasks: reaching food, opening each interior drawer and removing the specified parts for cleaning. A door that avoids the wall during ordinary access has not necessarily created the opening needed for the other tasks. Use the selected refrigerator’s instructions and actual movement, with the wall and cabinet arrangement included.
Record the wall’s projection as well as its side distance
Locate the finished wall face and where it ends relative to the refrigerator body, doors and handles. Include trim or other projections at the heights where they matter. A short side panel ending behind the door and a wall extending into the room are different conditions, even when the measured side gap is the same.
Use the manufacturer’s drawing for the chosen model to establish the hinge movement and required clearances. Do not copy a simple pivot from another refrigerator. The door thickness, handle and hinge path are part of the moving outline. Also retain the intended front position; moving the body forward changes its relationship to the room and neighboring cabinets.
Separate the opening tasks before evaluating the gap
GE’s refrigerator door-swing support page connects the intended door travel with normal pan removal. That reinforces the need to check the removal task, while the selected model’s own documents must establish the applicable movement and requirements.
List the interior pieces that must be accessed or removed according to those documents. Test a narrow food item, the normal drawer opening and the full removal sequence separately. A wide interior pan may depend on the positions of both doors and their bins. Do not assume opening the unobstructed door farther compensates for the wall-side door in every task.
ABCD
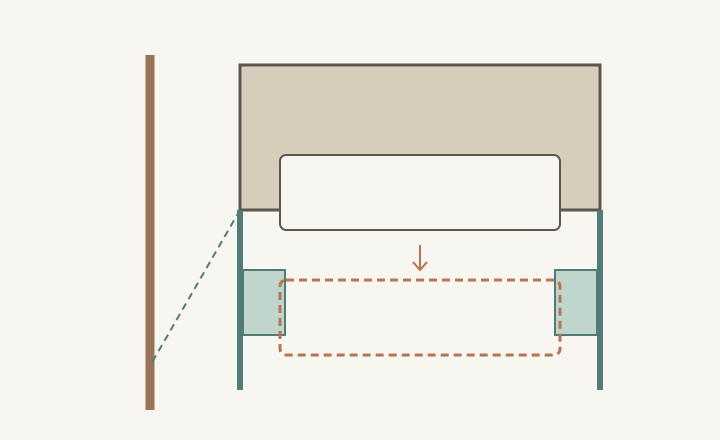
Diagram This simplified pivot diagram is not a refrigerator specification. The lower dashed pan outline intersects the illustrated door bins, while the upper position remains accessible. The dashed door position reaches the wall. Actual removal may involve a different path and must follow the selected model’s instructions.
A
The wall extends beyond the refrigerator front.
B
The wall-side leaf has a limited range in this concept.
C
An accessible pan position does not demonstrate full removal.
D
The proposed straight extraction crosses the illustrated door-bin projections.
Follow the prescribed removal and replacement sequence
Confirm whether the relevant component slides, lifts, tilts or requires another removable piece to be taken out first. Use the procedure for that refrigerator rather than improvising around the wall. Include the space for hands and the removed part, and check the reverse sequence. A pan that can be freed but cannot be comfortably replaced is not a completed cleaning arrangement.
Check at the actual installed height, with normal door bins and nearby counters present. Do not omit a door bin from the fit demonstration unless its removal is part of the manufacturer’s applicable procedure and has been included in the task. An empty showroom interior can hide an obstruction that returns with the normal equipment fitted.
Recognize a layout that passes daily access but fails removal
In a hypothetical kitchen, the wall-side door opens enough to retrieve a carton and use a produce drawer. During the documented cleaning sequence, the wider removable pan needs a route that the door bin still occupies. The adjacent wall limits the door movement needed by that particular arrangement. The ordinary shopping demonstration therefore gave an incomplete picture of fit.
Compare a different supported refrigerator position, a revised neighboring cabinet arrangement or another model with verified behavior for the same tasks. Keep its complete installation requirements and the effect on aisle space. Do not assume the remedy is simply pulling the refrigerator out whenever cleaning is needed; any such access approach must be suitable for the actual installed appliance and connections.
Save results by task, not a single pass label
Record the model, applicable documents, wall outline, installed front position and the result for each interior piece. Mark ordinary access, drawer use, removal and replacement individually. If a task is unresolved, identify precisely which part and movement remain unverified rather than describing the refrigerator as fitting without qualification.
Repeat the check after a wall-panel, handle or refrigerator change. The useful outcome is a cabinet layout that supports the intended use and upkeep of the selected appliance. A photograph of an open door is only a starting observation; the decision rests on the complete tasks that door position must allow.
Pure White
Cream White
Light Warm Gray
Gray
Navy
Black
Oak Tone
Dark Walnut Tone
Design study These finish studies are design references, not a list of currently orderable colors. Screens and lighting change the appearance; compare a physical sample before choosing.See all finish options →
Door clearance is only the mechanical part of the check. Add the standing position, reaching task, transfer to a counter and route out before judging the aisle usable.
An open-depth dimension may start at the appliance back, while the aisle starts at its closed front. Reconcile the reference points before testing full drawer travel and retrieval.
The sample shows the door frame, a separate center panel, the face frame and the cabinet box. Each component has its own place in this Shaker construction.
Shaker construction: door frame, center panel, face frame and cabinet box. The cutaway helps locate these parts; confirm each material in the specifications for the selected cabinet.
01 / Door frame
The Shaker door has rails and stiles around a separate center panel. The frame and center panel are different components; confirm their materials in the specifications for the selected cabinet.
02 / Face frame
The face frame surrounds the opening at the front of the cabinet box and sits behind the doors. The face frame, door frame and cabinet box are separate parts.
03 / Cabinet box
The sample exposes the cabinet sides, interior surfaces and layered edges. The image does not establish the wood species or material specification of a selected cabinet.