A flush ceiling hood or a suspended island canopy: which fits the whole room?
A ceiling hood clears the view by moving equipment into the ceiling. Compare the cooking-to-hood distance, concealed cavity, filter access and completed ceiling work before removing a suspended canopy from the plan.
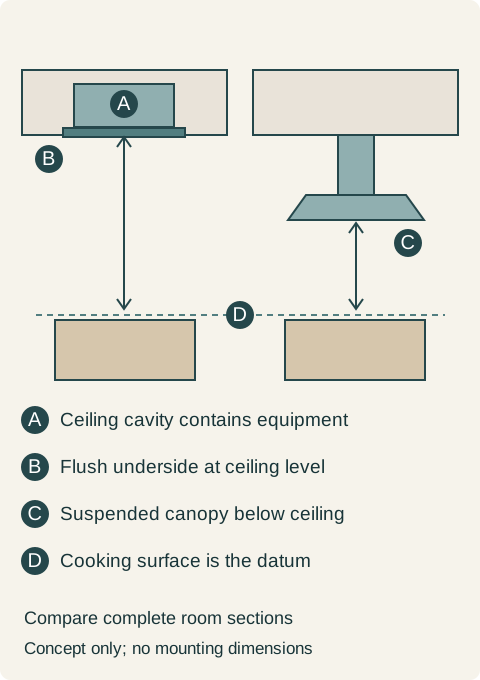
Choose a flush ceiling hood when an open view over the cooking island is worth the required ceiling construction and the selected equipment fits that room. Choose a suspended canopy when a visible appliance is acceptable and keeping its underside below the ceiling gives the project a more workable arrangement. A flush appearance does not eliminate the hood body, blower, duct or maintenance tasks. It relocates them, and that relocation can decide whether the island layout is feasible.
The visible face is only the bottom of the assembly
Zephyr describes Lux as a ceiling-mounted hood. In the room proposal, show more than its visible face: the complete equipment, its support and the route onward from it need real places. A blank area above a ceiling line is not evidence that the assembly fits there. Include that volume in the design comparison before choosing the appearance.
A room elevation can conceal this distinction. Draw the island, cooking surface and finished ceiling in section, then include the equipment above the visible face. A beam, existing service route or shallow cavity may occupy the very volume that the selected hood needs. Moving the island sideways to avoid that conflict also moves the cooktop relative to seating, preparation space and the surrounding cabinet runs. Treat it as a kitchen-layout change rather than a ceiling detail to solve afterward.
A suspended canopy has its own support, duct and connection requirements. It does not make overhead coordination disappear. The difference is that more of its assembly is deliberately visible below the ceiling, so the room does not depend on hiding the same shape within a shallow void. Compare the actual products rather than assuming that either category has a standard concealed depth.
Measure from the cooking surface, not from the floor alone
The cited Lux guide specifies 30 to 72 inches from cooking surface to hood underside, subject also to the cooking appliance's requirements. This is a model-specific range, not a preferred height or approval of the complete kitchen.
Consider a hypothetical room with its finished ceiling 120 inches above the floor and its cooking surface 36 inches above that same floor. A hood underside exactly flush with that ceiling would be 84 inches above the cooking surface: 120 minus 36. That exceeds the cited model's maximum by 12 inches. Calling the appliance a ceiling hood does not resolve the mismatch.
Lowering a local ceiling feature could change that distance, but it creates a different room design. Its finished plane, internal cavity, support, duct route and maintenance arrangement all need to work together. A thin decorative border cannot stand in for the volume required by the appliance. Nor should the drawing simply choose the maximum permitted height because that creates the smallest visible drop.
Teaching example Conceptual room sections. Left: a flush hood occupies a concealed ceiling cavity above the island. Right: a suspended canopy places its underside below the room ceiling. The dotted line marks the cooking surface. No mounting height, structural support or ventilation performance is specified.
A lowered ceiling feature can cost the view you were buying
There are several distinct visual outcomes: a hood flush with the main ceiling; a hood flush within a lower soffit over the island; and a canopy suspended in the room. The middle option still removes an exposed appliance body from view, but the soffit remains visible. Its edges may cross a window sightline or make the island feel more enclosed. Judge the whole feature from the dining table and the main room entrance, where the change matters most.
In the hypothetical high-ceiling kitchen, the household initially wants a flush hood to preserve the uninterrupted ceiling. It rejects that exact flush proposal after the height comparison. It also rejects a newly lowered soffit because preserving the existing ceiling plane matters more than concealing the hood housing. The selected direction is a suspended island canopy, with a model and mounting arrangement suited to the cooktop and room. The household accepts the visible housing and keeps the ceiling construction allowance for the cabinet storage it uses daily.
That choice does not establish the canopy's ventilation performance or installed price. It resolves the furniture and room-design preference before appliance selection is finalized. If an unobstructed eye-level view were the overriding priority instead, the lower soffit could remain a serious option; its size and finish would belong in the proposal from the start.
Remote controls do not provide remote cleaning
The Lux guide shows perimeter panels opening and grease filters leaving downward. That cleaning movement still needs physical access in the completed room. It does not establish access to every component above the ceiling.
Consider the island below that opening as well as the ceiling above it. A fixed decorative shelf, suspended lighting arrangement or tall accessory could complicate the approach. The household should understand how routine cleaning will be carried out safely in the completed room. Do not assume that standing on the countertop is the intended method, or that a removable filter establishes access to every service component.
This is also a reason to avoid treating the ceiling drawing as merely a lighting layout. Coordinate the hood's working underside with lighting, the cooking position and the actual maintenance approach. A remote handset can have a convenient home in a nearby drawer without changing any of those physical requirements.
Compare the installed assemblies and the storage consequences
Zephyr's current Lux page lists multiple blower options and a remote control. Identify the selected equipment and its actual quoted inclusions. A photograph or a hood-body description alone does not settle what the completed proposal supplies.
For either direction, include the appliance, its required equipment, support, duct and electrical work, ceiling alterations, finishing and the planned access arrangement. Add only the work that the respective design actually needs. A flush model can be attractive in a new ceiling being built for it; the same choice can be much more disruptive where an existing ceiling must be opened and reconstructed. There is no reliable category-wide price winner.
Keep the cabinet consequences visible in that comparison. A changed island location may alter aisle use, seating ends or drawer assignments. A new soffit may require different relationships to tall cabinet tops. Once the room section, appliance arrangement and storage plan agree, the clear view has a defined cost and purpose instead of depending on equipment that has disappeared from the drawing.
Pure White
Cream White
Light Warm Gray
Gray
Navy
Black
Oak Tone
Dark Walnut Tone
Design study These finish studies are design references, not a list of currently orderable colors. Screens and lighting change the appearance; compare a physical sample before choosing.See all finish options →
Moving cooking to the island exchanges one working zone for another. Compare preparation, pan handling, storage and ventilation in both complete layouts before changing the cabinet order.
A duct centerline does not describe the space occupied by connectors, bends and installation access. Draw the complete verified route, then decide what storage remains usable.
Design around the actual insert and the tasks that remain after installation. A component can fit inside the enclosure yet lack the movement needed for cleaning or service.
The sample shows the door frame, a separate center panel, the face frame and the cabinet box. Each component has its own place in this Shaker construction.
Shaker construction: door frame, center panel, face frame and cabinet box. The cutaway helps locate these parts; confirm each material in the specifications for the selected cabinet.
01 / Door frame
The Shaker door has rails and stiles around a separate center panel. The frame and center panel are different components; confirm their materials in the specifications for the selected cabinet.
02 / Face frame
The face frame surrounds the opening at the front of the cabinet box and sits behind the doors. The face frame, door frame and cabinet box are separate parts.
03 / Cabinet box
The sample exposes the cabinet sides, interior surfaces and layered edges. The image does not establish the wood species or material specification of a selected cabinet.