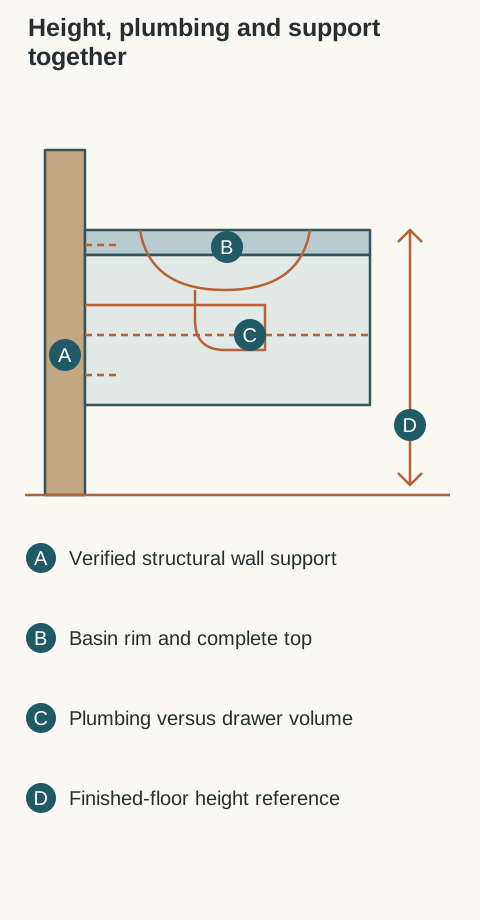
A floating vanity leaves the floor visible, but its weight still needs an approved path into the building. The chosen height also affects the basin, faucet, mirror and plumbing. Start with the complete assembly and its actual installation instructions. A photo of a suspended cabinet cannot supply a mounting height or a fastening design.
Set the height from the task and finished floor
Identify the people using the basin and compare a comfortable rim and faucet position. Include the top thickness and any vessel basin above it. Mark the proposed finished floor rather than measuring from a surface that will be removed. A cabinet-body height is not the same as its installed position.
Use a stable mockup to discuss reach and splash behavior without placing loads on an uninstalled cabinet. Check drawers, mirror and lighting in the same section. If the project has accessibility requirements, the responsible professional must evaluate the complete approach, knee space and controls under applicable rules; floating construction alone does not establish compliance.
Verify the structural support before choosing fasteners
Identify the actual wall construction and the attachment system specified for the selected vanity. The finish covering the wall is not evidence of structural backing behind it. Keep the load path through the cabinet attachment components and into suitable building support explicit. Do not choose anchors solely because their packaging lists a large load.
Kohler's cited vanity installation guide distinguishes the wall-hung installation and requires attachment to the indicated framing or backing. Its construction and hardware provisions apply to products covered by that guide. Have a qualified installer follow the selected vanity's own instructions and assess the actual wall. This article does not transfer Kohler's fastener sizes or loads to another cabinet.
Diagram Conceptual section separates support, basin, drawer and floor references. The drawn connection is illustrative and gives no bracket design, fastener schedule, mounting height or load capacity.
Put plumbing inside the allowed service volume
Overlay basin, drain outlet, trap, supply valves and drawers in plan and section at the proposed installed height. Check the full fitting volume and the drawer travel. A higher cabinet can change whether an existing drain lines up with the designed rear opening. Record existing and proposed positions separately.
Have the plumber define any required relocation before closing the wall. Keep access for shutoffs and servicing and coordinate penetrations with the cabinet design. Do not notch hanging rails, brackets or drawer boxes on the assumption that they are expendable. If the plumbing and support compete for space, revise the assembly with both trades before fabrication or installation.
Define the work on each side of the finished wall
State who verifies the wall, adds backing if required, makes good the wall finish and installs the cabinet attachment system. Include who supplies and installs the top and basin, who connects plumbing and who completes the electrical work around lights or receptacles. Cabinet supply and installation are separate scopes unless the written agreement combines them.
The installer needs the model instructions early enough to coordinate concealed work. Keep photos and a record of the completed backing or attachment preparation before it is covered, as appropriate to the project. A finished tiled wall should not be treated as proof that the hidden work matches the vanity design. Resolve unknown support rather than hiding it behind a finish decision.
Compare wall-hung and floor-supported choices honestly
Compare the open floor and cleaning access of a floating design with its reduced interior or wall-preparation needs as applicable to the selected model. A floor-standing vanity still needs the attachment required by its instructions, but its support arrangement differs. Neither choice should be described as universally simpler without inspecting the room.
Approve installed rim position, cabinet and top models, mounting details and plumbing drawings together. Confirm final alignment and operation after installation before loading storage. If the wall condition is unsuitable for the chosen floating system, compare an approved support alternative or another vanity rather than improvising a concealed brace from a decorative panel.
A floating vanity order should end with a coordinated assembly and named installation responsibilities. Choose the height after the user test and choose the mounting system from the selected product and actual wall conditions.
Pure White
Cream White
Light Warm Gray
Gray
Navy
Black
Oak Tone
Dark Walnut Tone
Design study These finish studies are design references, not a list of currently orderable colors. Screens and lighting change the appearance; compare a physical sample before choosing.See all finish options →
Combine a dressing mirror with storage when the same location works for both looking and retrieving. Keep them separate when one person needs the mirror while another opens the cabinet, or when the stored contents need a different cabinet form.
Buy voice operation for a task the household wants to perform, with its account and service requirements understood. Keep local lighting control when that already serves the bathroom; a connected mirror is not automatically a better mirror, light or storage solution.
Choose which storage should require a key before choosing the lock. Compare a locked mirror door with a separate interior box, including shared shelf access, lost storage and who should hold each key.
The sample shows the door frame, a separate center panel, the face frame and the cabinet box. Each component has its own place in this Shaker construction.
Shaker construction: door frame, center panel, face frame and cabinet box. The cutaway helps locate these parts; confirm each material in the specifications for the selected cabinet.
01 / Door frame
The Shaker door has rails and stiles around a separate center panel. The frame and center panel are different components; confirm their materials in the specifications for the selected cabinet.
02 / Face frame
The face frame surrounds the opening at the front of the cabinet box and sits behind the doors. The face frame, door frame and cabinet box are separate parts.
03 / Cabinet box
The sample exposes the cabinet sides, interior surfaces and layered edges. The image does not establish the wood species or material specification of a selected cabinet.