Exposed plywood cabinet edges or matching edge bands?
A visible plywood edge can be an intentional finished detail. Choose the actual panel and completed perimeter, then decide where the layered line belongs in the cabinetry.
The striped edge of a plywood door can be a deliberate part of a kitchen, rather than a defect to hide. But specifying an exposed edge is more than deleting the edge band from a conventional door order. The panel must suit the intended visible treatment, the cut edge still needs its specified completion, and the corner must look right when the door opens. Start with a finished corner sample that shows both the broad face and the layered edge.
Read the sample from face to edge
Identify the decorative face first, then the core visible at the cut. The face species need not describe the layers you see around it. A dark wood face beside a pale layered edge may be exactly the intended contrast. If you instead expect the face color to continue uninterrupted around the perimeter, a matching edge treatment is a different design. Turn the sample rather than deciding from its front view alone; the open-door angle reveals the line that will be present in daily use.
Columbia Forest Products describes Europly as decorative plywood intended where a high-quality visible edge is wanted. Its DesignEdge range is also developed for exposed-edge applications, including versions with decorative hardwood faces. These are specified panel choices, not permission to leave any plywood edge unfinished.
Exposed means visible, not automatically ready to use
Separate the material purchase from the finishing work. A sheet can have an attractive core while its newly cut edges still need the fabricator’s preparation and specified finish. If the face arrives factory finished, that fact alone does not finish a later cut. The order should describe the final edge appearance and touch, including the corner, rather than just saying no banding. The desired result is an intentionally completed edge that remains visible.
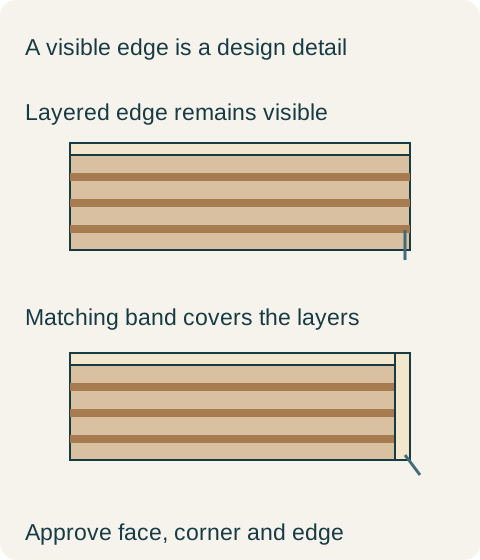
Teaching example Hypothetical sections of two completed front treatments. The layered lines explain visible versus covered core; their number and thickness are not a panel grade, product specification or cabinet-strength rating.
Trace the detail around an actual door
Follow the proposed edge around the top, handle side, bottom and hinge side. Then view the back. Check where any grip detail, hardware preparation or adjoining component changes what is visible. A small rectangular chip can show the material but cannot demonstrate the finished perimeter of a routed door. Ask for the representative finished detail needed to decide, without requiring a full kitchen mockup just to understand a single corner.
Compare the edge at the distance where it will be noticed. On a closed run, narrow gaps may reveal only a small part of it; opening the door exposes more. On shelves, the front edge may remain prominent all the time. The same layered treatment can therefore play a different role on a door and on an open shelf. Select its locations deliberately instead of applying a material slogan to every cabinet component.
Keep the stripe on the island, cover it elsewhere
In a hypothetical design, light-colored slab doors on the island show a contrasting plywood perimeter, while nearby tall cabinetry is intended to read as a quiet continuous color. The buyer selects a specified exposed-edge panel and clear completed edges for the island doors. The tall fronts retain their matching edge bands. Both treatments are shown in the approved corner samples, and the order assigns each to its actual fronts. The buyer does not ask one generic white panel to satisfy both designs.
That split preserves the feature where it is wanted. It also avoids a common comparison error: assuming that a covered edge conceals an inferior product or that an exposed layered edge proves superior construction. Neither conclusion follows from appearance alone. The interior material, assembly and hardware still need their own specification. A panel chosen for an attractive visible edge is solving a design requirement; it is not rating the whole cabinet.
A matching edge is a separate component decision
If the continuous-color option wins, compare the actual finished junction between face and band. The edge can differ in texture, sheen or color even when it is described as matching. Conversely, an intentionally contrasting band can be a valid design of its own. Keep the accepted treatment specific. This prevents a later replacement from keeping the broad face while changing the small perimeter detail that made the original choice work.
Price the completed fronts on the same basis. Removing banding may also change the panel selected and introduce different edge preparation and finishing. Adding a band may change the fabrication route. Neither operation has a universal saving. Include the agreed face, back, corner treatment and prepared hardware details in each quote so the buyer compares delivered fronts, not a raw panel price on one side and a finished component on the other.
Inspect the delivered edge as a finished design feature
At receipt, compare the actual exposed edges with the approved material and finish reference before installation. Distinguish the accepted appearance of the layered core from a chipped face, unfinished cut or different edge treatment. Keep the panel identity and finishing record for replacement parts. An attractive visible stripe is the beginning of this design choice; the completed corner and the assigned locations are what make it a coherent cabinet purchase.
Pure White
Cream White
Light Warm Gray
Gray
Navy
Black
Oak Tone
Dark Walnut Tone
Design study These finish studies are design references, not a list of currently orderable colors. Screens and lighting change the appearance; compare a physical sample before choosing.See all finish options →
Compare the actual countertop products, heat-source routine and fabrication proposal. A fired porcelain slab and resin-bound quartz are different materials, but neither label replaces a complete kitchen specification.
The sample shows the door frame, a separate center panel, the face frame and the cabinet box. Each component has its own place in this Shaker construction.
Shaker construction: door frame, center panel, face frame and cabinet box. The cutaway helps locate these parts; confirm each material in the specifications for the selected cabinet.
01 / Door frame
The Shaker door has rails and stiles around a separate center panel. The frame and center panel are different components; confirm their materials in the specifications for the selected cabinet.
02 / Face frame
The face frame surrounds the opening at the front of the cabinet box and sits behind the doors. The face frame, door frame and cabinet box are separate parts.
03 / Cabinet box
The sample exposes the cabinet sides, interior surfaces and layered edges. The image does not establish the wood species or material specification of a selected cabinet.