Separate the refrigerator opening, side panel and neighboring cabinet in the width plan
A side panel consumes space outside a clear opening, but may already be included in an outside allocation. Label those boundaries before judging the adjacent cabinet’s usable storage.
Keep the refrigerator’s reserved opening, the separate side panel and the neighboring cabinet as distinct parts of the plan. Then label which parts each dimension includes. A panel can be omitted when a clear opening is mistaken for an outside allocation, or counted again when it is already included. Either error distorts the space available to the cabinet beside it before its interior is even considered.
Name both endpoints of every width
Start with the actual run available between fixed finished references. Mark the refrigerator opening between the faces that define it, each separately required panel and any separation beside the adjacent cabinet. Obtain the selected appliance’s installation requirements and the cabinet system’s complete arrangement. A side panel’s appearance does not establish the appliance opening or ventilation provisions that must be preserved.
Distinguish a decorative or enclosure panel from the neighboring cabinet’s own side. They may be separate components or part of a specific integrated arrangement; verify the chosen construction. Do not add an extra panel by habit if the drawing already includes it, and do not remove a required component simply because the fronts look continuous.
Use a width ledger with explicitly defined inputs
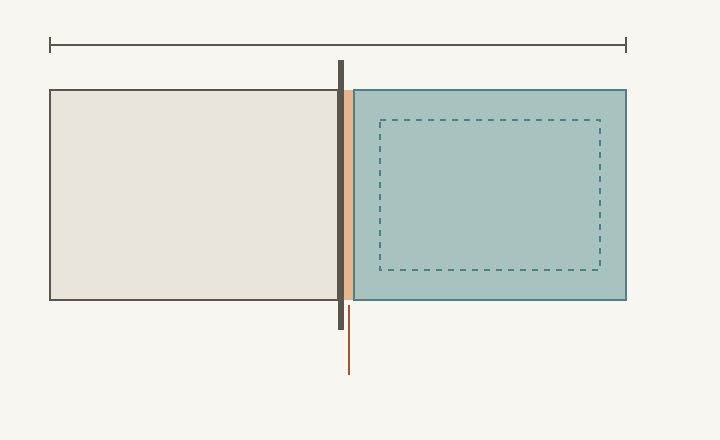
In a hypothetical run measured in inches, the total is 72. Reserve 36 clear for the appliance, a separate side panel of 0.75 and a neighboring separation of 1.25. The remainder is 72 − 36 − 0.75 − 1.25 = 34 for the cabinet exterior. These invented inputs demonstrate accounting; they are not stock sizes, a recommended separation or appliance installation requirements.
ABCD
Diagram Widths follow the hypothetical accounting example. Depths and the dashed interior are conceptual; they do not establish appliance clearances, cabinet construction or usable interior dimensions.
A
The clear appliance reservation excludes the separate panel.
B
The side panel occupies its own width.
C
The neighboring separation is another allocation.
D
The cabinet exterior still needs an independent interior check.
In the same hypothetical example, an outside allocation of 36.75 already includes the 36 opening and 0.75 panel. Subtracting 36.75 and 1.25 from 72 still leaves 34. Subtracting the panel’s 0.75 again would leave 33.25, a double-counting error. The arithmetic is only meaningful when the endpoints and included components are named consistently.
Check the neighboring cabinet after its exterior is established
Use the actual proposed cabinet’s clear interior and opening rather than treating its outside width as storage width. Include its frame, sides, front and hardware. Test the intended contents through the opening with the refrigerator panel present. A cabinet can occupy its assigned footprint while a panel extension or the selected door arrangement affects how it is used.
Draw the panel’s full depth and height, including how far it extends in front of the neighboring cabinet. Test the adjacent front and handle through the movement required by the contents. Use a height view where needed: a panel may affect an upper door and a lower drawer differently. The panel’s thickness alone does not describe all possible interference.
Keep the appliance and storage checks separate
Verify the refrigerator’s required door movement and access using the exact model documentation. Separately verify the neighboring cabinet’s operation. Success for the cabinet does not prove the refrigerator works, and a correctly reserved appliance opening does not prove the adjacent storage is usable. Keep model requirements distinct from the hypothetical width calculation on this page.
If the neighboring cabinet needs a different offset or front arrangement, recalculate the full run with that change included. Do not borrow an appliance-required space to make the cabinet work. Likewise, increasing the panel depth for a desired appearance requires another check of the nearby opening and the installed appliance relationship; the width ledger alone cannot approve that revision.
Save the component boundaries with the access results
Before approving the drawing, trace each width label to the physical faces it describes. A note that says refrigerator width may refer to the appliance body, a clear opening or an enclosure allocation. Rewrite an ambiguous label rather than selecting whichever interpretation makes the cabinets fit.
Use the same boundary names on the elevation, plan and component list. If a panel moves from a separate line item into an assembled-unit dimension, show that change explicitly. The total may remain correct while the intended clear opening changes; matching a total is therefore necessary but does not replace checking its parts.
Keep a dimensioned plan that identifies clear openings, outside allocations and separate components. Add the selected panel depth, cabinet interior information and the door or drawer positions that were checked. Revisit the plan after any appliance, panel or cabinet change. The useful outcome is a complete allocation whose arithmetic agrees with the physical parts and whose neighboring storage still performs its assigned task.
Pure White
Cream White
Light Warm Gray
Gray
Navy
Black
Oak Tone
Dark Walnut Tone
Design study These finish studies are design references, not a list of currently orderable colors. Screens and lighting change the appearance; compare a physical sample before choosing.See all finish options →
A filler can preserve room for a door and its handle to move. Define the opening needed by the cabinet contents, then test the actual front, hinge and wall relationship.
On an island that also seats people, deeper rear storage uses space beneath the same top. Compare the actual stored group with the seated position and the complete depth arrangement.
The sample shows the door frame, a separate center panel, the face frame and the cabinet box. Each component has its own place in this Shaker construction.
Shaker construction: door frame, center panel, face frame and cabinet box. The cutaway helps locate these parts; confirm each material in the specifications for the selected cabinet.
01 / Door frame
The Shaker door has rails and stiles around a separate center panel. The frame and center panel are different components; confirm their materials in the specifications for the selected cabinet.
02 / Face frame
The face frame surrounds the opening at the front of the cabinet box and sits behind the doors. The face frame, door frame and cabinet box are separate parts.
03 / Cabinet box
The sample exposes the cabinet sides, interior surfaces and layered edges. The image does not establish the wood species or material specification of a selected cabinet.