Can a countertop microwave go inside a cabinet? Start with the exact installation option
A cabinet opening that accepts the microwave body is not proof of an approved enclosure. Verify the model, any required matched kit and the complete airflow and opening details first.
Enclose a countertop microwave only through an installation arrangement supported for that exact model, using the specified kit where one is required. A roomy cabinet, open front or decorative grille does not establish permission on its own. Find the appliance’s model identification and current applicable instructions before designing the niche around its outside dimensions.
Separate physical fit from a supported installation
Read what the appliance instructions allow: countertop placement, a particular built-in arrangement or another expressly described option. Match the model designation completely. Similar capacity, brand name or cabinet width is not enough to transfer permission from a different microwave. If the proposed enclosure is not covered, resolve that question with the manufacturer before approving the cabinet detail.
Panasonic states that each of its trim-kit models is designed for a designated microwave model and directs readers to the kit’s own instructions and cabinet requirements. This is a concrete example of matched components, not evidence that every countertop microwave can be converted or that any visually similar frame is suitable.
Treat the kit as an installation system, not just a border
Identify all parts required for the approved arrangement and the space they occupy. Keep the appliance body, required cabinet opening and visible trim face as separate outlines. The frame can extend beyond the opening, while other kit components need space inside it. Replacing that system with a homemade border does not establish the same installation conditions.
For the specific kit discussed in Panasonic’s ventilation answer, supplied duct components direct air toward the front. That model-specific example explains why a trim kit can do more than hide a gap. Do not copy its air path, omit its components or assume another microwave vents in the same way.
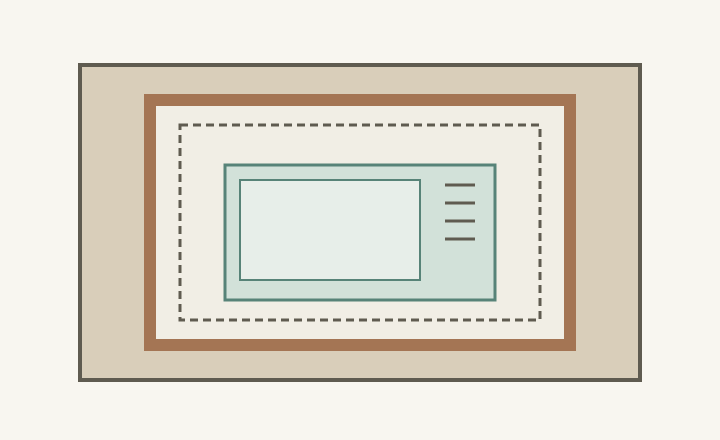
Diagram The nested outlines identify different measurement subjects. They are not scaled product dimensions, required gaps or a ventilation diagram. Obtain the actual opening, trim and component information for the matched appliance and installation system.
A
The outer trim face can cover area beyond the opening.
B
The required opening is a separate outline.
C
The body alone does not describe the complete installation.
Check the existing niche against the complete arrangement
Measure the finished width, height and depth at the relevant locations, including the actual shelf, face frame, rear surface and nearby front edges. Then compare the approved assembly at its intended position. Do not use the apparent empty volume of an unfinished cabinet as the available space after lining, trim and required components are included.
In a hypothetical kitchen, the countertop microwave body fits a retained niche. Its matched installation kit needs a different opening, and the visible frame would extend across a neighboring drawer front. The original body-only test missed both conflicts. Resolve the cabinet design or choose another supported appliance arrangement rather than trimming kit parts merely to preserve the old niche.
Preserve the actual airflow and operating conditions
An open-front cubby still has surrounding surfaces. Review their relationship to the appliance’s specified air openings and the installation option being used. Do not treat added holes, an open cabinet door or extra empty space somewhere else as substitutes for the documented arrangement. A temporary demonstration that the microwave turns on cannot verify enclosure suitability.
If the design includes a furniture door in front of the microwave, establish whether the complete arrangement is permitted and what operating state is required. Do not assume opening that door makes an otherwise unsupported enclosure acceptable. Keep the appliance’s door swing, controls and instructed ventilation areas clear in the proposed operating configuration.
Test use and record the exact combination
After confirming installation support, rehearse loading and unloading with a cold, suitable vessel at the planned height. Include the open appliance door, a usable landing and the actual user’s approach. This use trial answers a different question from installation compatibility: an authorized built-in arrangement can still be inconvenient for the person who must lift food in and out.
Save the appliance model, kit identification, applicable instructions, complete opening and trim outlines, required operating state and agreed access for service. Recheck if either appliance or kit changes. A future microwave with a similar body may require another installation system, so retain the combination that was actually verified rather than describing the cabinet as universally microwave-ready.
Pure White
Cream White
Light Warm Gray
Gray
Navy
Black
Oak Tone
Dark Walnut Tone
Design study These finish studies are design references, not a list of currently orderable colors. Screens and lighting change the appearance; compare a physical sample before choosing.See all finish options →
The drawer must open, but the person must also see, load and lift the vessel from above. Check the countertop projection, controls and transfer to a real landing together.
Set out the cooking surface, microwave and upper cabinet together. The mounting arrangement, permitted vent route and both appliances’ instructions determine whether the proposed position works.
The sample shows the door frame, a separate center panel, the face frame and the cabinet box. Each component has its own place in this Shaker construction.
Shaker construction: door frame, center panel, face frame and cabinet box. The cutaway helps locate these parts; confirm each material in the specifications for the selected cabinet.
01 / Door frame
The Shaker door has rails and stiles around a separate center panel. The frame and center panel are different components; confirm their materials in the specifications for the selected cabinet.
02 / Face frame
The face frame surrounds the opening at the front of the cabinet box and sits behind the doors. The face frame, door frame and cabinet box are separate parts.
03 / Cabinet box
The sample exposes the cabinet sides, interior surfaces and layered edges. The image does not establish the wood species or material specification of a selected cabinet.