Eased, bullnose or ogee: choose the countertop edge beside the cabinet door
A quiet edge, a continuous round and an ornamental curve create different lines above the cabinetry. Compare finished profiles at the intended thickness, then mark exactly where each one belongs.
Start with an eased edge if you want a largely straight front line, a full bullnose if you prefer a continuous rounded face, or an ogee if you want the edge itself to contribute an ornamental curve. Then compare samples beside the actual cabinet door. None of these names alone determines whether the countertop looks right in the room, and a beautiful slab viewed from above does not show the edge you will live with.
The edge is especially visible from the adjoining dining area and at an island where people sit. From those positions, the front silhouette, cabinet profile and pull can occupy the same view. A choice that seems insignificant on a small loose sample can become a repeated line across the entire kitchen. Approve that line while the cabinet and countertop selections can still be coordinated.
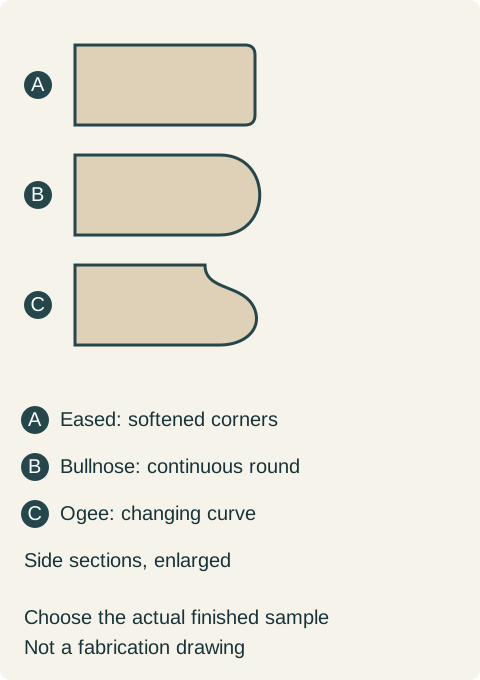
Cambria describes eased edges with softened corners, full bullnose edges rounded across their face, and ogee edges combining concave and convex curves. These describe different outlines; they are not interchangeable finish names.
Ask to see the section rather than relying on a name
Request the fabricator's drawing or finished sample of the proposed profile in the selected surface. Names used in a showroom are not a substitute for the shape that will actually be cut. Confirm whether the illustrated outline represents the proposed finished thickness and whether the sample uses the same fabrication method as the order.
An eased edge can look quite square from across the room while its corners feel softened close up. A full bullnose removes the long flat face in favor of a continuous round. An ogee changes direction along its curve, creating a more articulated silhouette. Compare the completed objects in front of you instead of assuming that every example carrying the same general name has identical proportions.
Do not confuse the side section with the plan-view corner. A rounded edge profile does not tell you how the countertop turns at the end of an island. The drawing must separately show that outside corner and any transitions. Equally, an eased edge does not require an unsoftened, knife-like corner. The fabricator should resolve the complete edge and corner for the selected material.
Teaching example Conceptual side sections: A shows an eased edge with softened corners, B a full rounded bullnose, and C an ogee with a concave-to-convex curve. These enlarged silhouettes describe shape, not fabrication dimensions. They do not show the countertop corner as seen from above.
Keep thickness and construction in the comparison
Place the samples so their top surfaces align. Otherwise a thicker or differently mounted sample may appear more substantial for reasons unrelated to its profile. Keep the proposed cabinet door below them and look from the seated and standing positions that matter in this kitchen. The useful comparison is the finished assembly, not a lineup of disconnected decorative fragments.
Ask how each available edge is made in the selected thickness. A profile may be formed in the working material, while another proposed appearance may involve a built-up assembly. Do not assume an ornate face means a uniformly thick slab. Conversely, do not reject a documented built-up edge simply because it contains a joint. Its appearance, fabrication and fit should be assessed as the complete proposal.
The visible pattern can also change around a shaped edge. Inspect the actual surface and finished section, especially where strong veining or particles meet the front. A small face sample cannot promise the appearance of a newly exposed curve. If the edge example comes from another design, treat it as an outline demonstration until the selected material is reviewed.
Let the cabinet detail participate without matching every curve
Hold the door, pull and edge together. A slab door with a shaped counter is not inherently a mismatch, and a raised-panel door does not require an ornate top. The question is which element should lead in this particular room. Test the relationship with the backsplash and other fixed finishes visible, rather than choosing from a style label alone.
If the door already has several profile lines, try a quieter edge before adding another decorative band. If the cabinets are restrained and the island is intended as a furniture-like focal piece, a curved edge may supply a detail that would otherwise require more decoration elsewhere. These are composition choices, not rules assigning a profile to a particular home or customer.
Use the proposed finish samples rather than an image filter. Reflections along a polished curve and the shadow beneath the top are part of what you are judging. Move to the room's ordinary viewing positions; an edge selected only while held at eye level may have very little effect from the places where people actually see it.
An island edge earns its place in a complete proposal
In a hypothetical kitchen, the owners have chosen simple framed doors and a patterned backsplash on the wall run. They are drawn to an ogee sample for the island because it gives the otherwise restrained piece a furniture-like outline. When the same profile is placed against the wall-run door and backsplash, the added curve competes with details they already want to keep.
They compare a consistent eased treatment throughout with a mixed proposal: eased edges at the wall run and ogee around the island's exposed perimeter. The island is a physically separate top, so the design does not require an abrupt profile change halfway along a continuous edge. The fabricator confirms the proposed shape in the selected material and resolves its outside corners as part of that separate piece.
The owners choose the mixed proposal after viewing finished samples beside the approved doors. They accept the island's additional fabrication cost in the actual quote and keep the simpler edge elsewhere. Their purchase does not depend on an assumed universal upgrade price or on a promise that the decorative shape adds resale value. It pays for a specific visible result they prefer.
The quote needs an edge map
Mark exposed edges on the countertop plan, including short returns and ends visible from another room. Identify which treatment applies to each separate piece. A note saying only “ogee upgrade” leaves the extent unclear, particularly when the wall runs and island use different details. Confirm what happens where a visible edge meets a wall, appliance opening or adjacent top.
Keep the sink-opening treatment separate from the outside perimeter. Choosing a decorative external profile does not instruct the fabricator to reproduce that same shape around the bowl. The sink detail and its compatibility with the surface remain a separate approval. Do not let a salesperson's single sample stand in for every condition on the plan.
The final record should contain the selected profile drawing or sample identity, finished thickness, construction, exposed-edge map and price for the completed scope. Check that these match the cabinet and top drawings before fabrication. You should be able to point to an edge in the room and know which approved detail belongs there, without reopening a vague discussion about whether it was meant to be square, rounded or traditional.
Pure White
Cream White
Light Warm Gray
Gray
Navy
Black
Oak Tone
Dark Walnut Tone
Design study These finish studies are design references, not a list of currently orderable colors. Screens and lighting change the appearance; compare a physical sample before choosing.See all finish options →
A patterned surface and a patterned slab body are different features. Compare an actual cut edge and sink opening before choosing the fabrication detail.
The sample shows the door frame, a separate center panel, the face frame and the cabinet box. Each component has its own place in this Shaker construction.
Shaker construction: door frame, center panel, face frame and cabinet box. The cutaway helps locate these parts; confirm each material in the specifications for the selected cabinet.
01 / Door frame
The Shaker door has rails and stiles around a separate center panel. The frame and center panel are different components; confirm their materials in the specifications for the selected cabinet.
02 / Face frame
The face frame surrounds the opening at the front of the cabinet box and sits behind the doors. The face frame, door frame and cabinet box are separate parts.
03 / Cabinet box
The sample exposes the cabinet sides, interior surfaces and layered edges. The image does not establish the wood species or material specification of a selected cabinet.