A mirrored room drawing does not automatically create a correct mirrored cabinet order. Some components remain identical, some require a different option and others need a new configuration check. Build a transformation record for the selected package before multiplying it across dwellings. State the viewing direction used for handing and retain the supplier's own meaning for every ordered option. A familiar left or right label is not enough.
Begin with an actual configured package
Use the accepted package drawing and its exact product selections as the starting point. List cabinets, separate panels, accessories and relevant preparation. A generic room outline cannot tell you whether a drawer bank is symmetrical, whether a door can be rehung or whether an exposed side is supplied as an option. Those questions belong to the actual product. Keep unverified attributes pending rather than treating symmetry in the drawing as product evidence.
Assign different room-variant names to the standard and mirrored layouts. Connect each dwelling to one variant and retain its own location labels. Do not reuse a label in a way that makes “sink-left” mean left on the page in one drawing and left while facing the cabinet in another. If a label describes a position, define the viewpoint; if it is an arbitrary identifier, keep it stable and describe position separately.
Decide what mirrors and what stays the same
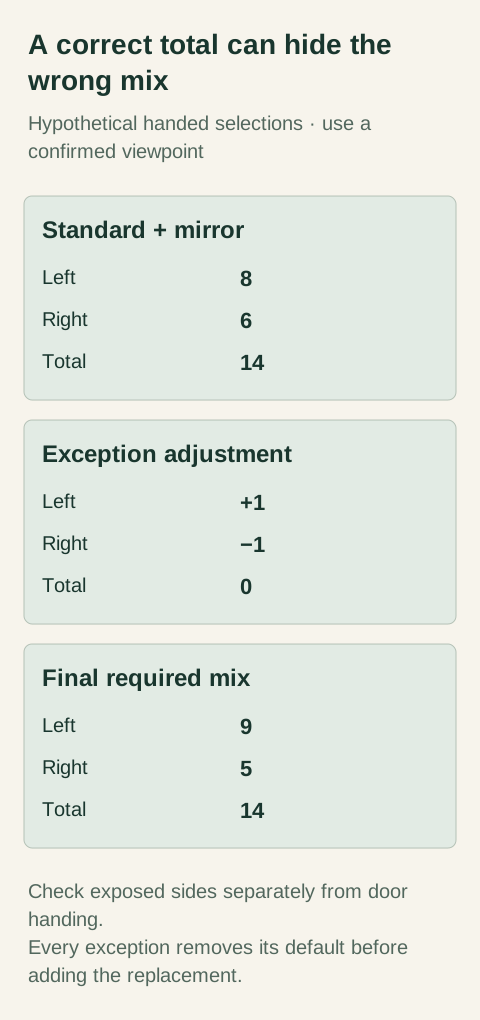
Diagram Hypothetical counts only. Left and right refer to confirmed project selections, not a universal supplier convention.
For each product, classify its attributes as invariant, reversed or requiring review. An identical shelf may remain invariant. A preselected hinged front may need the opposite handing, subject to the supplier's definition. A corner accessory or asymmetrical internal mechanism may require a distinct product configuration. This classification is an estimating aid; it does not establish that any specific item is reversible or interchangeable.
Keep exposed-side treatment separate from door handing. A cabinet can need a left finished side and a right-hinged door, or another combination, depending on the actual layout. Changing the door option does not necessarily change the panel order. Show the relevant face on the plan or elevation and link it to the supplied component. Do not rely on a single “mirror” checkbox to encode every physical difference.
Blum's Product Configurator provides configuration-specific parts lists and planning drawings. That is a useful example of checking a hardware assembly as a defined configuration. It does not show that your cabinets use Blum products or that a copied hardware list remains valid after mirroring. Review the selected manufacturer's documentation for the actual assembly.
Draw the door's intended opening direction from the stated viewpoint. Mark the approach and the adjacent cabinet or wall that makes the handing important. Then compare that intention with the supplier's order description. If their terminology differs, preserve both descriptions in the cross-reference and obtain confirmation of the intended result. Translating the letter on a plan without confirming its meaning is a common way to create a consistent-looking but wrong order.
For internal accessories, check whether the mirrored arrangement changes access to the mechanism or its service side. The planning question is whether the selected configuration still serves the intended opening. Leave physical clearance and installation decisions to the product-specific review. Purchasing should retain the resulting accepted configuration and its documentation, not try to solve an unfamiliar hardware system by reversing its part numbers.
Count normal variants before applying exceptions
In a hypothetical project, 8 standard dwellings each use a selected left-handed cabinet and 6 mirrored dwellings each use its confirmed right-handed counterpart. The initial demand is 8 left and 6 right, or 14 cabinets. A documented exception in 1 mirrored dwelling retains the left-handed selection. The corrected demand becomes 9 left and 5 right. The total remains 14, so checking only the grand total would miss the wrong handed mix.
Keep the exception attached to its dwelling and cabinet location. Remove the mirrored default before adding the accepted exception. Do not leave both lines active. Recheck the exposed-side and accessory selections independently; the exception may change the door handing while retaining the mirrored room's panel condition. The quantity ledger should explain that combination rather than forcing the dwelling back into the entire standard package.
Test the aggregation against the locations
Aggregate only identical confirmed configurations. Matching width and finish are not enough if the order options differ. Retain a destination breakdown behind each combined quantity. Then choose a standard dwelling, a mirrored dwelling and an exception dwelling and trace each relevant selection from plan to supplier code. The purpose is to test the transformation rules, not merely verify that the spreadsheet multiplication works.
Run the same check in reverse: each handed product quantity must be explained by a set of actual locations. No dwelling should appear in both variants. If a design change moves a dwelling to a different variant, retire its previous assignment and review its existing exceptions. An old exception may become unnecessary or may now duplicate a feature already included in the new default.
Give the supplier a configuration map
Issue the standard and mirrored drawings together with a concise comparison of changed options and unchanged components. Include the viewpoint definition, exact product selections and exception list. Ask the supplier to confirm how those variants appear in its acknowledgment. A grouped line with an unexplained handedness abbreviation is not enough to verify the intended mix, even when the overall quantity is correct.
If the supplier uses one product code with a separate option field, retain both in the purchasing identity. If it uses distinct codes, preserve the code pair and the confirmed meaning. Do not invent a coding rule from a neighboring product family. A repeatable project mapping should describe this supplier's actual selected configuration, including any limits on changes after acceptance.
Preserve the exception after the order is accepted
Keep the final dwelling assignments, variant revisions and exceptions with the purchase record. When a later replacement is requested, that record should identify what belongs at the specific location rather than what most dwellings received. Reuse the transformation rules only after checking that the product line and options are still the same. An old mirrored package is useful history, not automatic proof for a new selection.
Finish references
Pure White
Cream White
Light Warm Gray
Gray
Navy
Black
Oak Tone
Dark Walnut Tone
Design study These finish studies are design references, not a list of currently orderable colors. Screens and lighting change the appearance; compare a physical sample before choosing.See all finish options →
A note saying left or right is incomplete without a viewpoint. Mark the hinges, handle and intended standing position on the same cabinet, then verify the selected opening arrangement.
The sample shows the door frame, a separate center panel, the face frame and the cabinet box. Each component has its own place in this Shaker construction.
Shaker construction: door frame, center panel, face frame and cabinet box. The cutaway helps locate these parts; confirm each material in the specifications for the selected cabinet.
01 / Door frame
The Shaker door has rails and stiles around a separate center panel. The frame and center panel are different components; confirm their materials in the specifications for the selected cabinet.
02 / Face frame
The face frame surrounds the opening at the front of the cabinet box and sits behind the doors. The face frame, door frame and cabinet box are separate parts.
03 / Cabinet box
The sample exposes the cabinet sides, interior surfaces and layered edges. The image does not establish the wood species or material specification of a selected cabinet.