Record cabinet-door handing from a defined viewpoint and check the approach it creates
A note saying left or right is incomplete without a viewpoint. Mark the hinges, handle and intended standing position on the same cabinet, then verify the selected opening arrangement.
Record the hinge side using an explicit viewing convention, then show the handle and the place from which the cabinet will be used. A note saying left-hand door can be misunderstood if someone reads it from inside the cabinet, from a rotated plan or according to a different product convention. A labeled drawing of the actual arrangement is more useful than an unexplained abbreviation.
Define the viewing position before using left and right
For a project note, you can state that hinge left means the hinges are on the observer’s left while standing in the room facing that cabinet’s closed front. This is a defined convention for the drawing, not a claim that every manufacturer uses the same ordering term. Translate it into the selected supplier’s terminology only after confirming their definition.
Give the cabinet a stable name or mark and point the note to its actual face. On an island, left on the page can differ from left while facing the opposite side. Rotating a plan should not silently change the door assignment. Include a room-side viewing arrow when the face is not obvious from the drawing.
Show the hinges and handle as separate information
Mark the hinge edge, the actual handle position and the intended open state. Do not infer the hinge side from a decorative line or an ambiguous handle in a design rendering. For connected or paired fronts, identify each panel and how it operates; a single left-or-right note may not describe the whole assembly.
ABCD
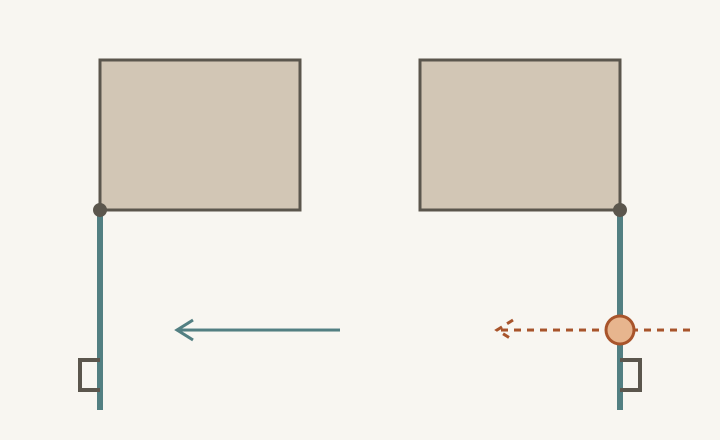
Diagram Both leaves preserve their closed width in the illustrated open state. The straight approach is clear in one diagram and intersects a front in the other. These are task concepts, not selected hinge specifications or guaranteed operating angles.
A
Hinge at the observer’s left in the left example.
B
A right-side approach remains beside the open leaf.
C
Hinge at the observer’s right in the right example.
D
The same straight approach crosses the illustrated open leaf.
Use the selected product’s available handing, front construction and hinge arrangement. Do not assume the door is reversible or that a hardware change is permitted because the elevation can be redrawn. Where a door must open far enough for an internal fitting, include that requirement in the same record. The label alone does not establish the usable position.
Test the approach that motivated the handing choice
Mark where the user arrives from, where they stand to grasp the contents and where the item goes next. Open the proposed front in the actual working state. Check whether the leaf sits between the user and the opening, changes the grip or requires walking around it. Keep the counter and neighboring fronts present; they may prevent a convenient change of standing position.
Also trace the return route after cleanup. A handing that suits taking an item toward the dining area may affect putting it away from the sink side differently. Compare the ordinary tasks and choose deliberately which arrangement serves them. A visually mirrored pair of doors is not automatically the best answer when the approach routes are not mirrored.
Resolve a viewpoint error before it becomes a different door
In a hypothetical plan, a serving cabinet is normally approached from the right while facing its front. The agreed sketch parks the open leaf on the left. A later note simply says left, and another reader interprets it from behind the cabinet. The resulting proposal puts the hinge on the opposite edge, changing the approach even though the cabinet location and contents remain the same.
Resolve the mismatch by returning to the cabinet mark, room-facing arrow, hinge mark and handle location. Check the requested product option against that drawing. Do not settle the issue by repeating the word left more emphatically. The important agreement is which physical edge carries the hinges and what the user must do when the front is open.
Keep the same assignment across the project documents
A useful note could read: serving cabinet; viewed from the room; hinges on the left edge; handle at the marked free edge; usual approach from the right. Add the selected mechanism and verified opening requirement separately. This describes the intended arrangement without pretending the wording itself is a universal ordering code.
Check that the plan, elevation and component selection describe that same physical door. Recheck after mirroring a layout, changing the cabinet face or selecting another front system. Save the task approach and return result with the final marks. Correct handing is a shared, verifiable arrangement, not merely a letter written beside a cabinet outline.
Pure White
Cream White
Light Warm Gray
Gray
Navy
Black
Oak Tone
Dark Walnut Tone
Design study These finish studies are design references, not a list of currently orderable colors. Screens and lighting change the appearance; compare a physical sample before choosing.See all finish options →
An open shelf removes a door but leaves the objects visible and within the end-of-run environment. Test the actual shelf shape, loaded outline and retrieval route before assigning it a job.
A continuous interior can sit behind divided openings. Identify the center member and verify the permitted construction before assuming a large item can enter or that the member can be removed.
The sample shows the door frame, a separate center panel, the face frame and the cabinet box. Each component has its own place in this Shaker construction.
Shaker construction: door frame, center panel, face frame and cabinet box. The cutaway helps locate these parts; confirm each material in the specifications for the selected cabinet.
01 / Door frame
The Shaker door has rails and stiles around a separate center panel. The frame and center panel are different components; confirm their materials in the specifications for the selected cabinet.
02 / Face frame
The face frame surrounds the opening at the front of the cabinet box and sits behind the doors. The face frame, door frame and cabinet box are separate parts.
03 / Cabinet box
The sample exposes the cabinet sides, interior surfaces and layered edges. The image does not establish the wood species or material specification of a selected cabinet.