Beaded or plain inset cabinets: choose the frame around the door
A beaded face frame adds a line outside the moving front. See how that line repeats across doors, drawers and exposed ends before choosing the whole inset package.
The small line around an inset door can belong to the cabinet rather than the door. That distinction is easy to miss in a photograph and expensive to leave unresolved in an order. If you like beaded inset cabinetry, select the fixed face-frame treatment as well as the moving front. A door with a decorative inside profile does not necessarily reproduce the look of a beaded cabinet opening.
Open the sample to find the detail
On an inset cabinet, look at the fixed frame surrounding the closed door. Then open the door and follow the edge of the opening. A face-frame bead remains with that fixed opening. The door's own frame and center-panel profile move away with the door. Looking at the sample open makes the location much clearer than studying a single straight-on photo.
Dura Supreme distinguishes plain and beaded face-frame options for its inset cabinetry. The beaded option places a decorative detail around the frame openings. That manufacturer example establishes a separate frame selection; it does not make the detail standard on every inset cabinet.
Do not confuse this with beadboard. Beadboard describes a repeated grooved or beaded surface treatment, often across a center panel or other broad face. The face-frame bead considered here traces the perimeter of the cabinet opening. A cabinet can have one feature without the other, and specifying only beaded doors leaves room for misunderstanding.
Also keep the fixed frame separate from the door's material specification. Adding a decorative line to the frame does not tell you what the center panel, cabinet sides or drawer box contain. It is an appearance and construction choice within the proposed cabinet package, not a material grade for everything behind it.
Compare the repeated lines across the elevation
A small bead can look delicate on a sample and become a strong pattern across a kitchen with many drawers. Copy the actual front arrangement into the comparison: shallow drawers, deep drawers, paired doors, tall cabinets and any framed appliance openings. Keep their sizes and the door profile unchanged between alternatives.
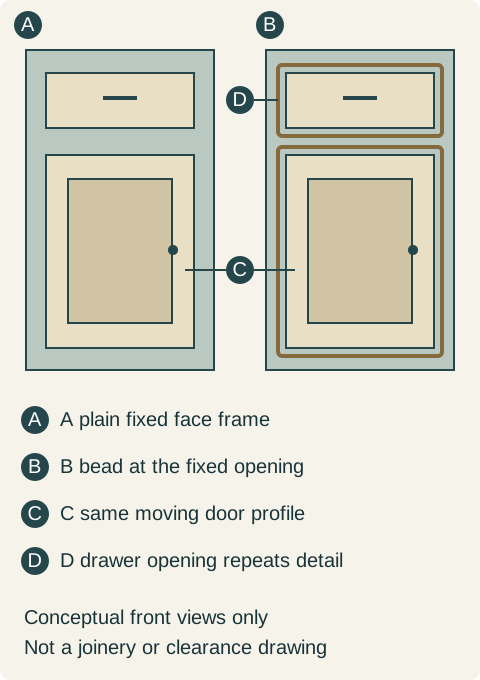
On the plain option, the exposed frame and the gap beside the moving front define the opening. On the beaded option, another shaped edge creates an additional light-and-shadow line. Judge whether that extra line helps the room. It might reinforce a furniture-like appearance, or compete with an already detailed door and patterned backsplash.
Stand back to the distance from which the kitchen is usually seen. A close-up helps identify workmanship and the intended profile; the room view shows its repeated rhythm. Neither view substitutes for the other. Do not choose an elaborate sample simply because its close-up seems more finished than a plainer one.
Include the drawer-front treatment. A catalog might combine a framed door with a plain slab drawer front. A bead around that slab front can be a deliberate part of the design. If the drawing instead shows framed drawer fronts as well, there may be another visible line inside the opening. The order must capture the combination you actually prefer.
Teaching example Conceptual inset elevations with the same door and drawer profiles. A has a plain fixed frame; B adds a bead at the fixed openings. C identifies the moving door and D the repeated detail around the drawer. No joinery method, clearance or exact bead shape is specified.
Check where the frame pattern ends
An exposed cabinet side can be plain, paneled or treated as a decorative end. The face-frame bead on the front does not automatically continue around that side. Show the end seen from the adjoining dining room and decide how its design relates to the fronts. Matching color alone does not establish a matching pattern.
Likewise, a refrigerator or dishwasher panel may have different construction and operating requirements from an ordinary cabinet door. Ask for the actual finished elevation at that location. It should not be illustrated as a standard beaded opening unless the proposed assembly really supplies that appearance and remains compatible with the appliance.
At adjoining cabinets, review the combined fixed members rather than imagining every narrow sample repeats without a joint. The actual cabinet construction determines the transitions. A designer can draw the intended visible result and the supplier can confirm how the selected line achieves it. This article does not specify a universal frame width or bead size.
A plain door with a beaded opening can be enough
Consider a hypothetical renovation with a modest inset door, a quiet countertop and an older dining-room hutch visible through the kitchen doorway. The owners want a furniture-like cabinet wall, but dislike the heavily shaped raised-panel door shown in their first proposal. Removing the raised panel should not force them to abandon every detail they liked.
They compare the same simpler door in a plain frame and in a beaded frame. The beaded version supplies a narrow repeated outline without adding another profile to the center panel. In the full elevation, it has enough detail to relate to the hutch while allowing the door faces to stay restrained. The owners choose that combination.
Before ordering, they also see its shallow drawer fronts and the exposed end of the island. They retain plain drawer faces within the beaded openings and approve a deliberately quieter island end. The supplier confirms that those pieces belong to the offered construction. The result is a complete selection rather than a request to make everything look like the favorite door photograph.
Another kitchen might already have strongly veined surfaces, decorative tile and shaped fronts. There, the plain frame could be the better choice. Neither decision depends on declaring beaded inset universally more traditional or more valuable. The practical question is whether the extra perimeter line improves the actual composition.
Price and care follow the selected assembly
Compare the frame treatments with the same cabinet quantities, front design, finish and interior arrangement. If an alternate quote also changes the door profile or cabinet line, the full price difference is not the cost of beading. Ask which parts and work change, and review that difference before removing useful storage to pay for decoration.
Look at the finished corners and how the profile meets neighboring parts on a representative sample. Ask how the supplied assembly is made if its joint appearance matters to you. A photograph cannot establish whether the detail is formed in the frame or assembled by another method, and the preferred construction should not be inferred from the word beaded alone.
Try the normal cleaning route on a permitted sample. The additional shaped edge needs to be reachable with the care method appropriate to the finish. Do not use a sharp tool to clean or test a profile. This is a small recurring ownership detail, not a reason to reject every shaped edge.
Record the face-frame option, door style, drawer-front combination and exposed-end treatment together. Keep the agreed elevation with the sample identification. When the cabinets arrive, the fixed openings should carry the treatment you selected, while the moving fronts should match their separate selection. That is the difference between buying beaded inset cabinetry and buying a door that merely resembles it in a close-up.
Pure White
Cream White
Light Warm Gray
Gray
Navy
Black
Oak Tone
Dark Walnut Tone
Design study These finish studies are design references, not a list of currently orderable colors. Screens and lighting change the appearance; compare a physical sample before choosing.See all finish options →
Choose antiqued mirror for the reflected scene and concealed storage you want. Compare the full door group, its patterned surface and the view when it opens before replacing transparent glass.
The sample shows the door frame, a separate center panel, the face frame and the cabinet box. Each component has its own place in this Shaker construction.
Shaker construction: door frame, center panel, face frame and cabinet box. The cutaway helps locate these parts; confirm each material in the specifications for the selected cabinet.
01 / Door frame
The Shaker door has rails and stiles around a separate center panel. The frame and center panel are different components; confirm their materials in the specifications for the selected cabinet.
02 / Face frame
The face frame surrounds the opening at the front of the cabinet box and sits behind the doors. The face frame, door frame and cabinet box are separate parts.
03 / Cabinet box
The sample exposes the cabinet sides, interior surfaces and layered edges. The image does not establish the wood species or material specification of a selected cabinet.