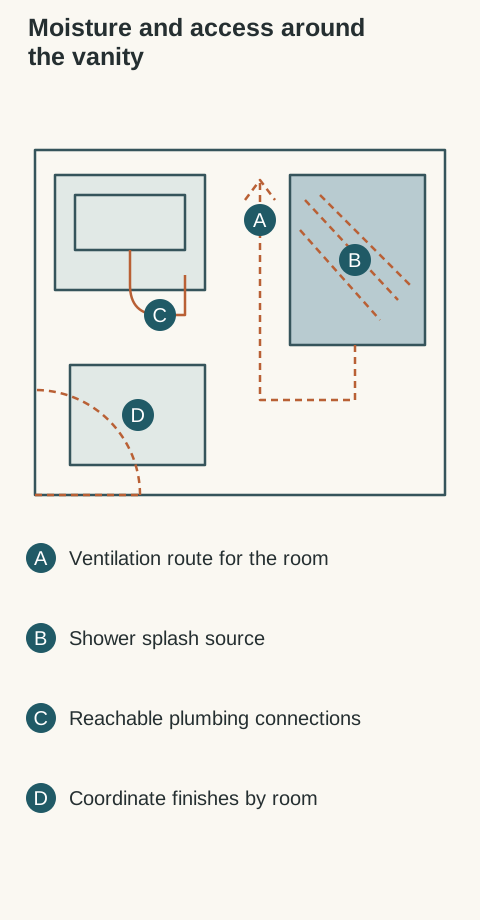
Matching cabinets can connect a bathroom to the kitchen or laundry, but each room still has its own moisture and service conditions. Start with where water comes from, how damp air leaves and how the plumbing can be reached. Then choose a coordinated appearance that does not conceal a maintenance problem.
Map splash, leaks and damp air separately
Mark the basin, shower or tub, plumbing connections and the surfaces likely to receive splashes. Inspect an existing cabinet for signs of leakage or persistent dampness before replacing it. Distinguish an occasional surface splash from water entering behind the unit. A new front can hide a continuing problem without solving it.
EPA's moisture guide advises controlling moisture sources and improving bathroom ventilation. Apply that principle to the room: use the intended ventilation system, address leaks and investigate recurring dampness. A cabinet finish is not a substitute for those measures. Do not describe an ordinary cabinet as waterproof or assume a tray under the sink makes a leak harmless.
Show where shutoffs, trap connections and any required access panels can be reached with storage in place. Check the hand and tool path, not just whether a valve appears on a photograph. A removable basket can help access; a fixed divider in front of a connection may make an otherwise tidy interior difficult to service.
Kohler's cited vanity guide coordinates plumbing with the cabinet openings and basin location. Use the real cabinet, bowl and plumbing arrangement in the review. Have the responsible trades confirm permitted openings and attachment zones. Do not cut a support member or remove a drawer structure simply to gain access after the purchase.
Diagram Conceptual room plan separates ventilation, wet area, service access and finish coordination. It does not specify fan sizing, waterproofing construction or a plumbing layout.
Plan daily cleaning without trapping moisture
Leave practical access beside and beneath the selected cabinet, including the space needed to wipe the basin edge and hardware. Compare a tight wall junction with a deliberately detailed finish condition. An unexplained narrow gap can be harder to clean than either a properly finished joint or a reachable open space.
Follow the selected cabinet manufacturer's cleaning and care instructions. Wipe up water and keep the area observable rather than sealing every seam with an unspecified product. Adhesives, sealants and cut-edge treatments need compatibility with the actual materials and assembly. Their use should follow the applicable product instructions and installation scope, not a generic promise of water protection.
Coordinate the whole home through actual samples
Compare physical samples for the bathroom, kitchen and laundry under the lighting used in each room. Shared color names do not establish identical appearance across finishes or materials. You can repeat a door profile, hardware family or finish tone without requiring every room to use the same cabinet depth, interior or mounting method.
Keep the design-reference finish grid separate from actual sample approval. Its images help discuss a palette; they do not establish exact color, material species or product availability. Record the selected product and finish identifiers by room, then confirm that matching trim and exposed panels belong to the same intended combination. A screen comparison alone is insufficient for color-critical approval.
Hand off the room conditions with the order
Attach a room list naming cabinet, top and basin choices, finish sample, plumbing scope, ventilation coordination and installation responsibility. Include existing-condition photographs where they explain a leak or access restriction. Distinguish work needed before cabinet placement from adjustments completed during installation.
After installation, check that doors and drawers work, the required service points remain reachable and the cabinet can be cleaned. Have the appropriate trade verify connections and any ventilation work. If dampness or a leak persists, address the source before treating the cabinet appearance as complete. Matching the rest of the home is useful only when this room also works on its own terms.
The finished decision should pair a coordinated look with clear moisture control and service access. Keep the room-specific requirements even when the doors and finish repeat elsewhere in the home.
Pure White
Cream White
Light Warm Gray
Gray
Navy
Black
Oak Tone
Dark Walnut Tone
Design study These finish studies are design references, not a list of currently orderable colors. Screens and lighting change the appearance; compare a physical sample before choosing.See all finish options →
Combine a dressing mirror with storage when the same location works for both looking and retrieving. Keep them separate when one person needs the mirror while another opens the cabinet, or when the stored contents need a different cabinet form.
Buy voice operation for a task the household wants to perform, with its account and service requirements understood. Keep local lighting control when that already serves the bathroom; a connected mirror is not automatically a better mirror, light or storage solution.
Choose which storage should require a key before choosing the lock. Compare a locked mirror door with a separate interior box, including shared shelf access, lost storage and who should hold each key.
The sample shows the door frame, a separate center panel, the face frame and the cabinet box. Each component has its own place in this Shaker construction.
Shaker construction: door frame, center panel, face frame and cabinet box. The cutaway helps locate these parts; confirm each material in the specifications for the selected cabinet.
01 / Door frame
The Shaker door has rails and stiles around a separate center panel. The frame and center panel are different components; confirm their materials in the specifications for the selected cabinet.
02 / Face frame
The face frame surrounds the opening at the front of the cabinet box and sits behind the doors. The face frame, door frame and cabinet box are separate parts.
03 / Cabinet box
The sample exposes the cabinet sides, interior surfaces and layered edges. The image does not establish the wood species or material specification of a selected cabinet.