Bathroom vanity storage: where towels, toiletries, and refills actually fit
Start with the sink locations, then plan drawers for daily items, door bays for tall refills, and towel storage you can reach without unpacking the cabinet.
Choose vanity storage by what needs to fit: everyday toiletries in easy-to-open drawers, tall refills in a clear part of the cabinet, and towels where you can lift them out without moving everything in front. Sink locations matter because the bowl and plumbing occupy some of the space behind the fronts. Counting doors and drawers alone won't tell you how much storage you can use.
ABC
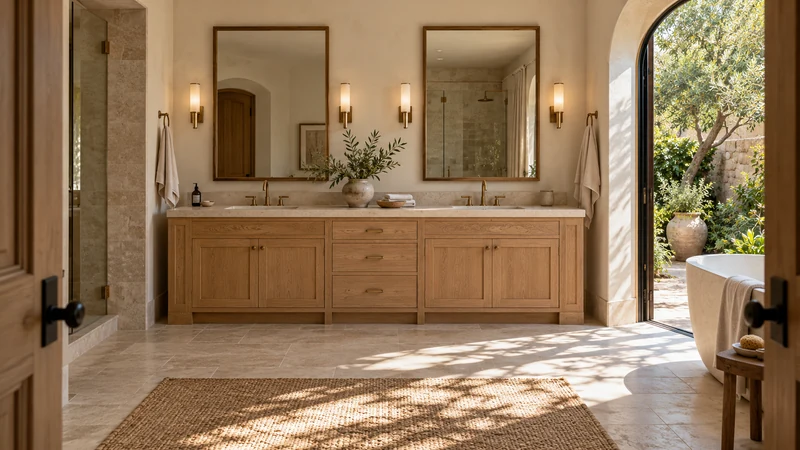
Design study The basins sit above the side door bays; the center drawer fronts are between the sinks. This room illustration shows the layout and wood-tone appearance. It does not show the plumbing, drawer interiors, or a supplied countertop.
A
Left sink and door bay.
B
Center drawer fronts between the basins.
C
Right sink and door bay.
Read the front before choosing the storage
In this design, the doors sit below the sinks and the drawers occupy the middle. That arrangement gives the sink areas cabinet access while keeping a drawer stack away from the basins themselves. The practical question is what is behind each front. A wide panel directly below a sink may be a fixed false front rather than a working drawer. A drawer between the sinks may still need to clear pipes or other fittings at the back.
For a replacement vanity, open the existing cabinet and photograph the drain, shutoff valves, and where the pipes enter the wall or floor. On the proposed cabinet drawing, locate the sink centers and the drawer boxes. Have your plumber compare those positions before you approve the layout. The room picture helps you choose an arrangement; an interior drawing is what tells you whether that arrangement works with your plumbing.
Apply it to the vanity shown
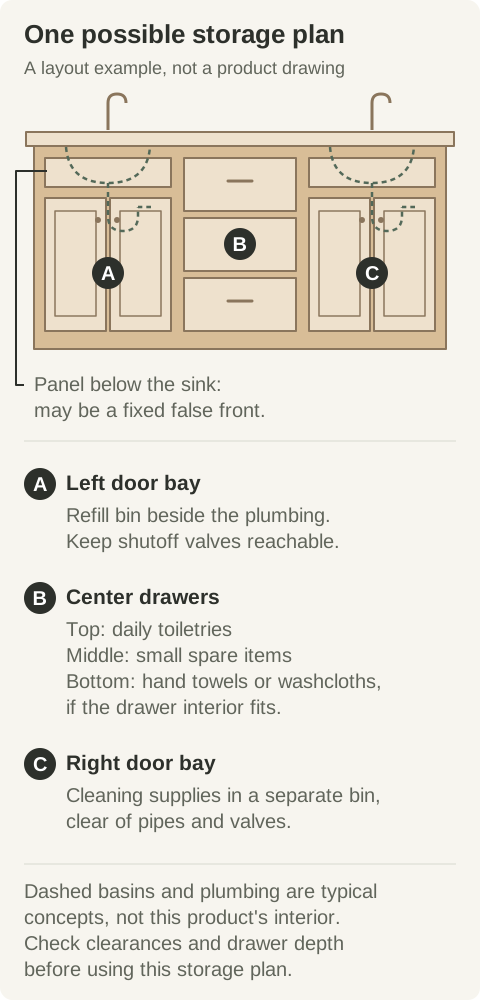
Here is one storage plan for the pictured double vanity. A is the left door bay, B is the center drawer stack, and C is the right door bay in both illustrations. Treat this as a proposed assignment: the room image does not reveal the interiors, and the diagram's basins and pipe paths are illustrative. Check the cabinet drawing before buying bins.
B, upper drawer: keep toothpaste, floss, a comb, and small daily skincare items in a shallow tray. These belong near the top because you reach for them each morning. Lay down anything that cannot clear the drawer's closing path.
B, middle drawer: group spare toothbrush heads, unopened soap, and small refills. Keep daily items above and backups here so opening the drawer does not turn into a search through both.
B, lower drawer: try a shallow stack of hand towels and washcloths. Check the inside height and opening first; a taller front alone does not prove a deeper box. If the stack catches, move the excess towels to a linen cabinet.
A, left door bay: place a lift-out bin of shampoo and soap refills beside the trap, in whichever side has a clear path. The bin must pass through the door opening without tipping and leave the shutoff valves reachable.
C, right door bay: keep bathroom cleaning supplies in a separate, upright caddy, away from toiletries. Use this bay only if it can provide the storage required by the cleaner's label, including being out of children's reach. Otherwise choose suitable storage elsewhere.
Keep the washcloths and hand towels you use at the sink within easy reach. If a stack of large bath towels needs to be folded tightly or unpacked to get one out, use a linen cabinet for clean spares and a bar or hook for the towel in use. That frees the vanity for the smaller items it handles well.
Diagram A proposed allocation for the same A/B/C zones as the room image. Dashed basins and traps show typical hidden obstructions, not a view of this cabinet's interior. Door-top panels may be false fronts.
Give the daily drawer the easiest job
Arrange the daily drawer in a single visible layer. Test a shallow tray with the things you actually use before adding dividers. A deep drawer full of small loose items can hold a lot and still be frustrating to use.
Measure from the inside bottom of the drawer to the lowest obstruction above it with the drawer on its closing path. A tall drawer front does not guarantee the same clear height inside. The box sides, the opening, a rail, or the underside of the top may reduce the usable space. If you use a pump bottle upright, measure it with the pump extended as you normally use it. Try the tray and bottle together; the tray's base takes up some of the height too.
Before buying an organizer, make a paper outline of its outside footprint and lay your daily items on it. Compare that outline with the drawer's inside width and depth, not the width printed on the cabinet order. Leave a place to get your fingers around the items; a tight packing exercise is rarely a pleasant morning routine.
Use the clear space beside the plumbing for refills
Door bays are useful for tall bottles and backup supplies when there is a clear route around the plumbing. Group shampoo refills, soap, and spare toiletries in a lift-out bin that passes through the opening. Put the items you replenish most often toward the front. Keep shutoff valves reachable and leave enough room to remove the bin without catching a hose or trap.
Measure the route into the cabinet as well as the space inside it. Hinges and a face frame can narrow the entrance. A bin may fit on the cabinet floor but fail to pass through the door opening without tipping. For a double-door bay, check whether there is a fixed center stile and whether both doors need to open to take the bin out. The useful test is a loaded bin traveling in and out, not an empty box squeezed into place.
A sink drawer needs a different shape
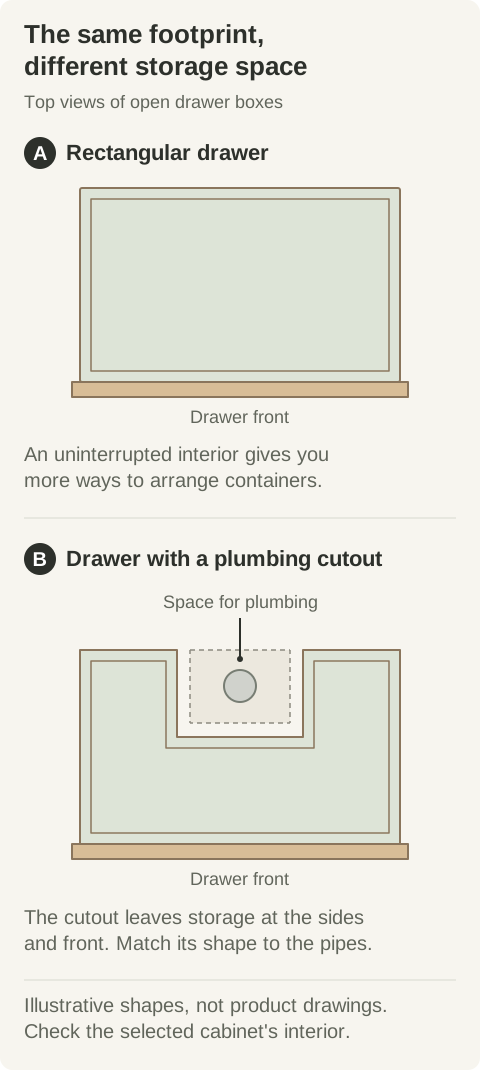
A U-shaped drawer fits around the basin or plumbing, but the notch costs usable floor space. Blum's sink-cabinet examples show how the remaining space can be used. In a bathroom, the cutout still has to match the bowl, trap, pipe locations, and drawer system.
Diagram Compare usable floor area, not just the drawer front. The cutout is illustrative; its position and size must suit the selected sink and plumbing.
Small toiletries can fit along the side channels of a U-shaped drawer, but a wide towel stack or a rigid organizer may not. Ask to see the drawer fully open and a top-view drawing with usable internal dimensions. Do not plan a plumbing cutout by trimming an existing drawer on the assumption that the slides and joints will still work.
Will the towels fit—and come back out?
About 21 inches is a common nominal vanity depth; 18-inch-deep cabinets are another common option for tighter bathrooms. Those are planning references, not the inside depth of a drawer and not a specification for the vanity in this illustration. The cabinet back, fronts, drawer construction, and plumbing can all reduce the space available for towels.
Fold a towel the way you actually put it away, then measure the stack's footprint and height. Check the clear shelf or drawer area and the opening through which the stack must pass. If you like bulky bath sheets, test those rather than a small hand towel. A shelf can have enough area for the stack while a narrow opening makes taking it out awkward.
If the rear towels require removing the front stack every time, use the back for less-used spares or choose a different arrangement. A full-extension drawer may bring the rear items closer to you, but the usable depth and extension of the selected drawer still matter. A shallow, easy-to-reach stack can be more useful than a deeper cabinet packed solid.
Bring the storage plan to the cabinet discussion
A useful starting note is specific: daily toiletries in the center drawers, tall refills beside the plumbing, and hand towels and washcloths in the lower drawer if they fit. Keep bath towels in a linen cabinet if they do not come out easily. Add the largest bottle and towel-stack measurements. That gives the cabinet seller and your installer something to check against a drawing instead of a vague request for more storage.
Record the available cabinet width, depth, and height in inches. Note any door swing that crosses the cabinet area.
Photograph the existing vanity with its doors open, plus a close view of the pipes and shutoff valves. Keep the photos with your project notes.
Measure your largest daily bottle and a folded towel stack. Note whether the bottle must stand upright.
On the proposed drawing, confirm which fronts open, the drawer interiors, the door opening, and any plumbing cutout. Check sink and countertop selection separately.
Use the project-notes page to save your measurements and questions before discussing a cabinet layout. Copy or download the notes before leaving the page; it does not send your information or upload photos.
Finish options
Pure White
Cream White
Light Warm Gray
Gray
Navy
Black
Oak Tone
Dark Walnut Tone
Design study These finish studies are design references, not a list of currently orderable colors. Screens and lighting change the appearance; compare a physical sample before choosing.See all finish options →
Combine a dressing mirror with storage when the same location works for both looking and retrieving. Keep them separate when one person needs the mirror while another opens the cabinet, or when the stored contents need a different cabinet form.
Buy voice operation for a task the household wants to perform, with its account and service requirements understood. Keep local lighting control when that already serves the bathroom; a connected mirror is not automatically a better mirror, light or storage solution.
Choose which storage should require a key before choosing the lock. Compare a locked mirror door with a separate interior box, including shared shelf access, lost storage and who should hold each key.
The sample shows the door frame, a separate center panel, the face frame and the cabinet box. Each component has its own place in this Shaker construction.
Shaker construction: door frame, center panel, face frame and cabinet box. The cutaway helps locate these parts; confirm each material in the specifications for the selected cabinet.
01 / Door frame
The Shaker door has rails and stiles around a separate center panel. The frame and center panel are different components; confirm their materials in the specifications for the selected cabinet.
02 / Face frame
The face frame surrounds the opening at the front of the cabinet box and sits behind the doors. The face frame, door frame and cabinet box are separate parts.
03 / Cabinet box
The sample exposes the cabinet sides, interior surfaces and layered edges. The image does not establish the wood species or material specification of a selected cabinet.