A baking layout needs more than a cabinet for flour and a place to park the mixer. Follow a recipe you actually make and identify where ingredients are measured, mixtures are prepared, dough is shaped and trays wait. Then place storage to support those transitions. The key question is whether the next task can begin while the previous task’s equipment is still present, or whether the surface can be cleared through a practical, repeatable action.
Use a familiar recipe to expose the work sequence
Lay out the tools and ingredient containers normally used, including the scale, bowls, utensils and pans. Record which items appear together and which are finished before another stage begins. A large mixing bowl may remain on the counter while portions are transferred to a tray. An ingredient container can return to its cabinet earlier. These differences determine what needs a nearby permanent home and what only needs a temporary staging position.
Include the route to the oven and the place where finished trays will be handled. Use the actual appliance and surface requirements when deciding those locations; a storage sketch is not an approval to place hot equipment anywhere convenient. Keep the path and receiving position available in the working arrangement rather than assuming they will be cleared at the last moment.
Put storage where it supports the next action
Place measuring tools and frequently used ingredients near the measuring surface. Locate bowls and attachments so they can be retrieved without dismantling another active setup. For a mixer kept in a cabinet, test the whole move to its working position with the intended user. A nearby low shelf may look efficient while still making retrieval awkward. If a lifting mechanism is considered, its compatibility and operating conditions need their own product check.
Tray storage should connect to where trays are loaded and returned, not merely occupy the nearest narrow gap. Keep the often-used shapes identifiable without removing every pan. Reserve occasional large equipment elsewhere if it crowds out daily tools. The aim is not to put everything for baking in a single cabinet, but to make each relevant transition understandable.
ABCD
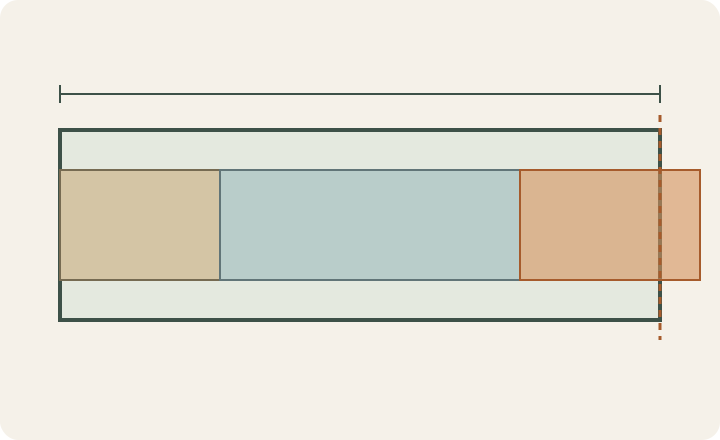
Diagram The task rectangles represent assumed simultaneous use along a shared strip. The final rectangle passes the counter boundary. They are not equipment dimensions or a recommended arrangement.
A
Mixing-task footprint.
B
Shaping-task footprint.
C
Tray footprint in the same work strip.
D
The arrangement extends beyond the available counter boundary.
Check which footprints must exist at the same time
In a hypothetical setup, a continuous work strip is 60 inches long. The assumed mixing footprint uses 16 inches, shaping uses 30 inches and a tray uses 18 inches. Side by side, 16 + 30 + 18 = 64 inches, exceeding the strip by 4 inches. Those teaching footprints are not standard working dimensions. The calculation identifies a conflict only if the tasks must occupy that strip together; a different sequence or verified second surface could change the result.
Do not automatically solve the conflict by shrinking the shaping area on paper. Try the actual rolling mat, bowl and tray. Determine whether the mixer can be put away before shaping or whether the recipe still needs it. If a separate surface receives the tray, check the transfer and the activities already assigned there. A dining surface used for another task is not permanently available simply because it appears empty in the plan.
Make cleanup and return possible without blocking the next stage
Identify where used tools wait for the normal cleanup routine and where cleaned pieces return. An open dishwasher should not trap the drawer needed for the next part of the recipe. Large bowls and attachments need a return route that matches their storage opening, not just enough space once inside. Test the arrangement after a busy session, when several items are out, rather than only with neatly closed cabinets.
Record the workable sequence beside the cabinet layout
Keep a simple recipe-stage sketch showing active items, temporary surfaces, storage homes and transfers. Mark the tasks that overlap and the action that clears each surface. This lets a designer compare cabinet choices against your actual baking routine. Final appliance details and surface suitability remain tied to the chosen products. Once the workflow is coherent, the small finish reference can support the appearance of the cabinets serving it.
Pure White
Cream White
Light Warm Gray
Gray
Navy
Black
Oak Tone
Dark Walnut Tone
Design study These finish studies are design references, not a list of currently orderable colors. Screens and lighting change the appearance; compare a physical sample before choosing.See all finish options →
Give each cook a useful dry position and a clear handoff surface, then test the moments when both need the sink. More counter space alone does not remove that shared demand.
The sample shows the door frame, a separate center panel, the face frame and the cabinet box. Each component has its own place in this Shaker construction.
Shaker construction: door frame, center panel, face frame and cabinet box. The cutaway helps locate these parts; confirm each material in the specifications for the selected cabinet.
01 / Door frame
The Shaker door has rails and stiles around a separate center panel. The frame and center panel are different components; confirm their materials in the specifications for the selected cabinet.
02 / Face frame
The face frame surrounds the opening at the front of the cabinet box and sits behind the doors. The face frame, door frame and cabinet box are separate parts.
03 / Cabinet box
The sample exposes the cabinet sides, interior surfaces and layered edges. The image does not establish the wood species or material specification of a selected cabinet.