A professional film wrap can retain useful fronts while changing their appearance. Decide whether the old surface, door shape and finished edges justify that choice, and do not assume the original finish can be recovered afterward.
Consider architectural film when the existing cabinet doors are worth retaining and the desired change is their visible surface. Treat the work as a lasting alteration to those doors, not as a temporary disguise that necessarily peels away without consequence. The useful purchase is a completed resurfacing package with accepted corners, rear edges and companion surfaces. A roll of attractive film does not settle whether the existing fronts are good candidates.
A defined cabinet application
3M identifies cabinets among the surfaces that can be refreshed with DI-NOC Architectural Finishes. That is a named architectural resurfacing application, not evidence that every self-adhesive decorative film is suitable for every cabinet.
Its technical sheet identifies permanent pressure-sensitive acrylic adhesive, requires excellent bonding of the existing finish and warns that removal can damage the substrate or finish. A promise of easy restoration is therefore not inherent in this product description.
Keep the existing door only if its shape is still wanted
Look beyond the current color. Trace the door’s outline, center profile, handle position and relationship to neighboring drawers. A wrap changes the surface of that existing object; it does not automatically produce a new slab front from a raised-panel door. If the shape itself is the problem, price a different completed front rather than asking the film installer to make the old geometry disappear.
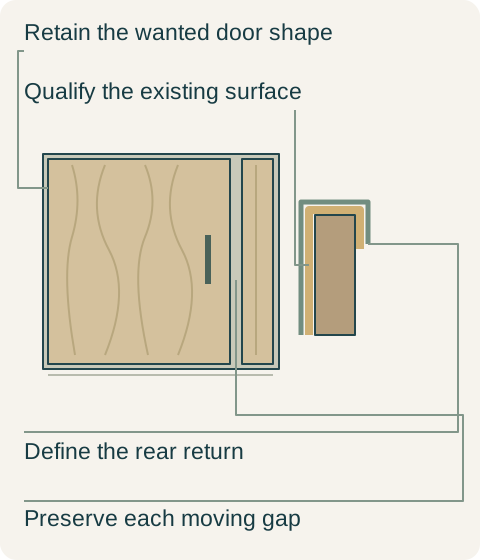
Teaching example Hypothetical flat cabinet front, enlarged layered corner and adjacent door gap. The film return is one proposed detail to review, not a universal installation method. Layer thicknesses and colors are exaggerated for explanation.
Open the doors and use the drawers before discussing film patterns. Record rubbing, misalignment, a damaged corner or a loose handle separately from the cosmetic work. Retaining a useful front can be sensible; retaining a troublesome front solely because its new surface looks attractive can preserve the very problem the project should solve. Any accepted mechanical correction belongs in the scope before the finished appearance is judged.
The old finish is part of the attachment
The new adhesive contacts the old surface, so a loose coating cannot become a sound attachment merely because it is covered. Have the professional qualify the actual existing finish and proposed preparation. A successful demonstration on a loose new board cannot establish the result on the installed cabinetry. The trial should represent the proposed work, including the locations that are difficult to reach or finish.
Agree what that qualification allows the installer to alter. If preparation requires changing the old surface, document that work before committing to a restoration expectation. A household that needs the original finish to remain intact should not approve this route on the strength of a removable-looking sample. It can instead retain the original doors unchanged or evaluate a separate set of compatible fronts, keeping the originals for the purpose the household has identified.
Draw where the film stops
Mark the face, outer edges, rear returns and any fixed visible parts on a representative door drawing. Include the area around a pull and any planned change in hardware. This exposes differences between offers that both say wrap the cabinets. One may cover only the visible closed face; another may include a different finished treatment when the door is open. Decide which result is actually wanted before comparing their totals.
Treat each moving component as its own part. The drawing should preserve the existing door and drawer separations rather than showing one uninterrupted decorative skin across the cabinet run. Follow the selected pattern over the actual pieces and inspect where adjoining fronts meet. A dramatic wood or stone image can look convincing on a sample yet produce an unwanted interruption at a busy cluster of small drawers.
Review a finished corner from the front and the reverse, in the room’s normal light. Accept the specific visible termination or seam arrangement offered by the installer rather than requesting an undefined seamless result. Keep the exposed cabinet end, filler and trim in that same review. Replacing the appearance of the door alone can leave a conspicuous older surface beside it, even when the film itself has been applied well.
A useful flat-front cabinet receives a complete surface update
In a hypothetical home, an existing built-in has flat fronts, suitable interior storage and acceptable operation. The owners dislike its dark exterior but want to keep its current shape. The installer’s representative existing-door trial passes the agreed preparation, adhesion and appearance review. The proposed light wood-look film is shown with completed edges, a defined rear return and the adjacent fixed end panel.
The owners choose that professional resurfacing package and retain the usable doors and interiors. They accept the documented change to the original surface and do not plan to remove the film later to reveal an untouched dark finish. They also keep the accepted corner detail rather than substituting a cheaper face-only offer. The purchase changes the appearance they dislike while preserving the functions they already use.
Compare the completed work and its future care
Obtain the total for the agreed preparation, removal and refitting of affected parts, applied surfaces and final operating review. Compare a repaint or replacement-front proposal against the same finished scope. Do not assign a universal saving or shorter schedule merely because one method uses film. The amount of preparation and the parts being retained are project facts, not attributes that can be priced from the finish name alone.
Keep the exact film identity and accepted care instructions with the completed-door record. If a later blemish appears, the original installer can assess it against the actual finish and termination details rather than guessing from a photograph. A future repair may be another defined surface job; it should not be sold today as a guaranteed invisible patch. The reason to choose film is the approved finished result on useful existing doors, with its limitations understood.
Pure White
Cream White
Light Warm Gray
Gray
Navy
Black
Oak Tone
Dark Walnut Tone
Design study These finish studies are design references, not a list of currently orderable colors. Screens and lighting change the appearance; compare a physical sample before choosing.See all finish options →
Refacing can change the visible kitchen while retaining its cabinet structure. Decide whether that retained interior and layout still solve the household’s storage problem before buying the new appearance.
A wrapped film and an applied paint coating can produce similar colors through different constructions. Choose the actual profile, completed surfaces and acceptable upkeep, not a promise that either label is always better.
Compare the actual countertop products, heat-source routine and fabrication proposal. A fired porcelain slab and resin-bound quartz are different materials, but neither label replaces a complete kitchen specification.
The sample shows the door frame, a separate center panel, the face frame and the cabinet box. Each component has its own place in this Shaker construction.
Shaker construction: door frame, center panel, face frame and cabinet box. The cutaway helps locate these parts; confirm each material in the specifications for the selected cabinet.
01 / Door frame
The Shaker door has rails and stiles around a separate center panel. The frame and center panel are different components; confirm their materials in the specifications for the selected cabinet.
02 / Face frame
The face frame surrounds the opening at the front of the cabinet box and sits behind the doors. The face frame, door frame and cabinet box are separate parts.
03 / Cabinet box
The sample exposes the cabinet sides, interior surfaces and layered edges. The image does not establish the wood species or material specification of a selected cabinet.