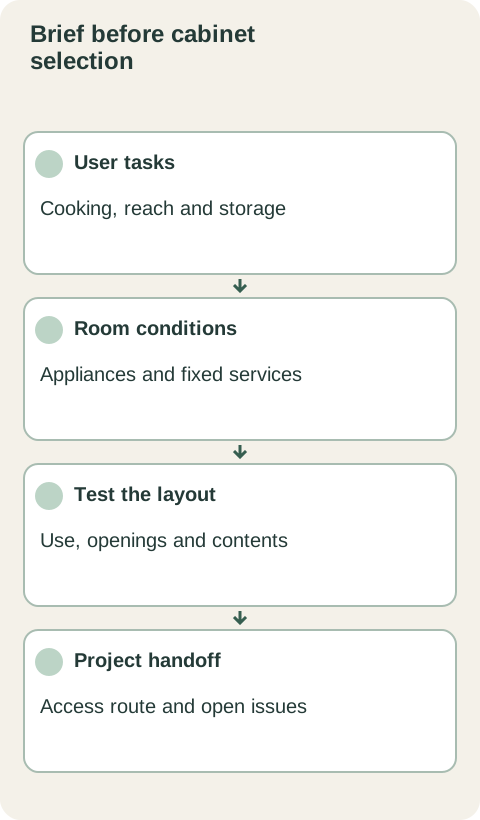
Small and shared kitchens need more than a shortened cabinet list. An accessory dwelling unit, condo, employee breakroom and kitchen adapted for a particular user can have very different routines. Start with a project brief that explains those routines and the fixed conditions. The brief helps the designer and installer develop the right plan; it does not certify a design or supply universal clearance dimensions.
Describe the people and daily tasks
Write down who uses the room and what they actually do there. An ADU resident may cook complete meals, while a breakroom may mainly handle drinks and reheating. Record storage needs, cleaning routines and who replenishes supplies. For a person with reach, grip or mobility needs, document the tasks they want to perform and involve them in evaluating the layout. A generic accessible label cannot substitute for understanding the user. Start with the measuring workflow to gather a consistent room record.
Mark doors, windows, columns, service locations and existing appliances. Identify items that must remain and those that could change, with the responsible project professional evaluating the wider scope. KraftMaid’s scope guide helps distinguish a cabinet replacement from a larger renovation. For a condo, include building management’s access and work arrangements in the brief. For an ADU or breakroom, establish who will review the intended room use and the project-specific requirements. Cabinet selection alone does not resolve those questions.
Diagram A project brief connects individual use with physical access; it is not a clearance standard.
Plan the route from truck to room
A condo delivery may need a loading reservation, elevator access and protection of shared areas. An ADU may be reached through a side gate or a path too tight for boxed cabinets. Measure the actual route and provide photos of turns, stairs and thresholds. FedEx Freight service levels show why delivery to a building and delivery inside it are separate scopes; this is a carrier example, not an offer for this order. Confirm the purchased endpoint and arrange the remaining handling before release.
Use a safe mock-up or marked drawing to test storage locations and door swings with the intended user. Consider approach, opening a drawer, reaching contents and carrying items to the work area. Do not copy a dimension from a photograph or select hardware only for appearance. Handle shape, opening effort and interior arrangement should be evaluated together. Have the project team resolve actual clearances and installation details from the applicable project requirements and selected products, rather than treating this planning exercise as a dimensional rule.
Choose storage around the room’s routine
In a breakroom, separate shared dishes from cleaning supplies and assign a place for waste and replenishment stock. In a compact residence, prioritize items used daily and preserve appliance operation rather than filling every wall with cabinets. For an adapted kitchen, locate needed contents where the person can use them and verify any special mechanism with its instructions. Keep optional accessories as identified alternatives so the basic cabinet order stays understandable. Record maintenance and restocking responsibilities where multiple people use the space.
Hand off unresolved issues without hiding them
The final brief should include the measured room, appliance models, proposed cabinet schedule, intended tasks, access route and open design questions. Name who reviews each unresolved item before the order is released. Preserve the accepted revision with the installation scope and product instructions. If conditions change in the field, update the brief and affected items together. A useful outcome is a plan that the actual user can evaluate and the project team can check, without relying on an untested label or a rendering alone.
Test a full task rather than one cabinet
Pick an ordinary activity, such as taking a cup, filling it and putting it away. Follow the route with the intended user and note which doors, appliances or other people interrupt it. In a shared room, also consider how supplies arrive and where cleaning equipment is returned. Record the findings as questions for the design team, not automatic instructions to change dimensions. Review the revised plan with the same task so the change can be evaluated. A detailed task record is useful even when the final cabinet configuration has not yet been selected.
Before you release the order
Describe tasks and users before choosing cabinet types.
Record fixed room conditions and appliance models.
Verify the boxed-cabinet delivery route.
Assign project-specific review of unresolved design issues.
Finish references
Pure White
Cream White
Light Warm Gray
Gray
Navy
Black
Oak Tone
Dark Walnut Tone
Design study These finish studies are design references, not a list of currently orderable colors. Screens and lighting change the appearance; compare a physical sample before choosing.See all finish options →
Choose the service that covers the decisions your remodel actually needs. Compare product choices, room coordination, drawings and compensation before paying for overlapping work.
A microwave on a table is not a complete meal arrangement. Decide what you will prepare, where the supplies will live and how cleanup works before the old kitchen is removed.
A smaller first order is useful only if it leaves a finished, usable kitchen and does not force expensive work to be repeated. Separate genuinely independent additions from connected cabinet and countertop work.
The sample shows the door frame, a separate center panel, the face frame and the cabinet box. Each component has its own place in this Shaker construction.
Shaker construction: door frame, center panel, face frame and cabinet box. The cutaway helps locate these parts; confirm each material in the specifications for the selected cabinet.
01 / Door frame
The Shaker door has rails and stiles around a separate center panel. The frame and center panel are different components; confirm their materials in the specifications for the selected cabinet.
02 / Face frame
The face frame surrounds the opening at the front of the cabinet box and sits behind the doors. The face frame, door frame and cabinet box are separate parts.
03 / Cabinet box
The sample exposes the cabinet sides, interior surfaces and layered edges. The image does not establish the wood species or material specification of a selected cabinet.