Adjustable cabinet shelves: identify retention before lifting the shelf
Some supports do more than carry weight. Determine whether the shelf rests on pins or engages a retaining feature before changing its height or ordering replacement parts.
Before moving an adjustable kitchen shelf, identify how the shelf is retained as well as how it is supported. A shelf that will not lift may be engaged with a clip or connector rather than simply stuck. Do not force it upward or assume a visually similar loose pin is an equivalent replacement. The cabinet and hardware documentation should establish what releases and what remains structural.
Weight support is only one function
A plain support carries the shelf from below. A retaining feature can constrain another direction of movement. Those jobs are different: a shelf can resist downward load yet move when an object catches its front edge. Conversely, a retained shelf can still have a separate load limit. Neither appearance nor the effort needed to lift it measures its rated capacity.
Hettich describes shelf-support options that prevent accidental lifting, forward pulling, tipping or slipping. That confirms these functions exist, not that every shelf support provides all of them. The selected part still needs its own compatibility and installation information.
Hettich identifies Sekura 1.1, article 19557, as having a 5 mm cabinet pin and an additional pin for the shelf. Its technical data marks removal protection as present.
Hettich lists Sekura 2.1, article 9134679, with the same 5 mm pin diameter but marks removal protection as absent. Equal hole diameter therefore does not establish equal retention.
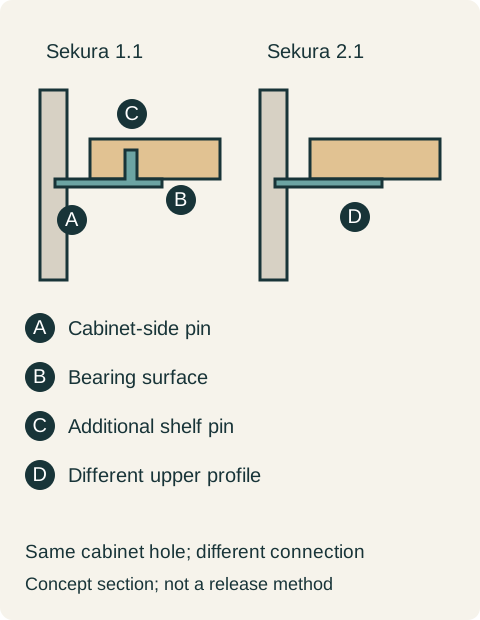
The manufacturer section shows why the parts differ. In Sekura 1.1, the horizontal pin enters the cabinet side, a bearing surface sits under the shelf, and an additional pin projects upward into the shelf. In Sekura 2.1, the shown support has a different upper profile without that shelf-engaging pin. This is a connection difference, not a color difference.
Read those directions separately. The cabinet-side pin locates the support; the bearing surface accepts the shelf from below; an upward pin engaged in a matching shelf hole constrains lateral movement while engaged. It is not the same mechanism as a clip folded over the top edge. Do not infer that the upward pin itself clamps the shelf downward, or use this section to invent a release motion.
For a retained shelf with the additional pin, inspect the matching shelf preparation as well as the cabinet hole. If a replacement shelf has no corresponding preparation, matching its width and thickness alone leaves the connection unresolved. Conversely, replacing the original support with a plain bearing pin removes part of that connection even if the cabinet-side hole still fits. The comparison should name what changes, then verify the intended full assembly.
Identify the assembly before changing height
Empty the shelf and examine the accessible support locations without prying. Photograph the underside, cabinet holes, part markings and any feature engaging the shelf. Distinguish a removable adjustable shelf from a fixed member that helps assemble the cabinet. Rows of unused holes beside a panel do not prove that particular panel should be removed.
Obtain the cabinet's instructions or the exact hardware drawing. Check shelf material, thickness, edge preparation, support positions and the intended release method. A peg that fits the same hole can still have a different bearing surface or lack the original retention. Do not combine unmatched replacements simply because their exposed color is similar.
Diagram Simplified sections based on the Hettich drawing: Sekura 1.1 includes a pin engaging the shelf; Sekura 2.1 has no such pin in the shown profile. Neither diagram is a drilling template or removal instruction.
Resolve a replacement decision
In a hypothetical pantry, a shelf supports lightweight containers but does not lift when the owner tries to raise it. A photograph reveals a feature over the shelf edge. The owner stops and obtains the cabinet part information, which identifies a retaining support. The accepted plan follows that model's release instructions with the shelf empty; it does not use a screwdriver as an improvised lever.
After relocation, one support is found damaged. A loose pin fits the hole, but it would change the documented arrangement by removing retention at that position. The decision is to obtain the specified compatible replacement and keep the shelf unloaded until the assembly is restored and checked. Moving taller containers to another confirmed space temporarily avoids turning a storage preference into an unverified hardware substitution.
Specify retention when comparing cabinets
Ask the supplier to identify the shelf supports in the proposed cabinet and explain adjustment with the actual shelf construction. Request the relevant instructions, not merely a description such as adjustable shelves. If frequent height changes matter, consider the access needed to release each support and remove the shelf through the opening.
Keep support identification, shelf details and any stated assembly load limits with the cabinet record. Do not infer a larger capacity from adding a clip, nor treat a retaining support as a general furniture anchor. Before loading a relocated shelf, verify the complete installation against its instructions. The useful outcome is a known, serviceable assembly rather than a shelf that happened to remain level when empty.
Pure White
Cream White
Light Warm Gray
Gray
Navy
Black
Oak Tone
Dark Walnut Tone
Design study These finish studies are design references, not a list of currently orderable colors. Screens and lighting change the appearance; compare a physical sample before choosing.See all finish options →
The sample shows the door frame, a separate center panel, the face frame and the cabinet box. Each component has its own place in this Shaker construction.
Shaker construction: door frame, center panel, face frame and cabinet box. The cutaway helps locate these parts; confirm each material in the specifications for the selected cabinet.
01 / Door frame
The Shaker door has rails and stiles around a separate center panel. The frame and center panel are different components; confirm their materials in the specifications for the selected cabinet.
02 / Face frame
The face frame surrounds the opening at the front of the cabinet box and sits behind the doors. The face frame, door frame and cabinet box are separate parts.
03 / Cabinet box
The sample exposes the cabinet sides, interior surfaces and layered edges. The image does not establish the wood species or material specification of a selected cabinet.