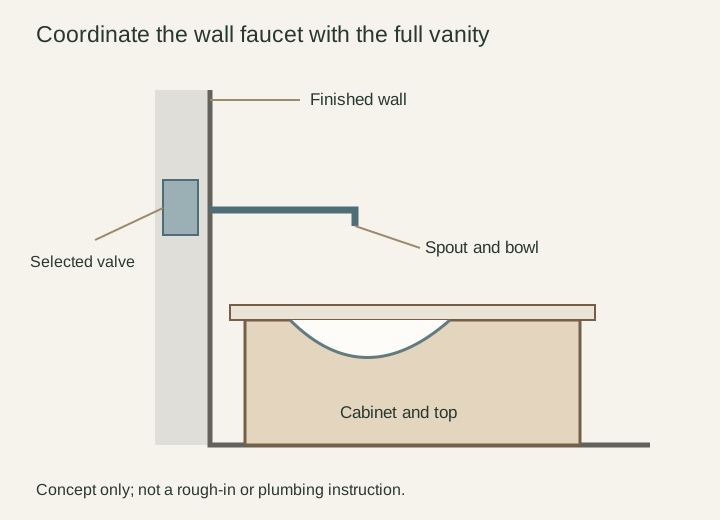
A wall faucet makes the relationship between the room and the vanity especially important. The spout remains attached to the wall while cabinet position, top thickness and basin shape may still be changing. A visually attractive faucet cannot compensate for an unresolved bowl location or an unsuitable component combination. Establish the selected assembly and its references before the project team commits to the concealed work.
Select the complete faucet arrangement
Identify the spout, controls, trim and concealed components that belong together. A photograph of the visible faucet does not necessarily describe everything needed. The cited Kohler handle-trim specification lists a separate required valve and compatible spout choices. That is a product-specific example of why the selection must identify the whole arrangement, not just a decorative handle finish.
Keep each component's model and applicable installation information in the project record. Confirm compatibility through the responsible supplier and plumber. If a proposed substitution changes only the visible piece, it still needs review against what is already selected or installed behind the wall. Do not assume visually similar trim fits an existing concealed body.
Diagram The wall finish, faucet components and cabinet assembly share a placement review. The schematic does not specify valve depth, outlet height or a connection method.
Establish the finished surfaces used for placement
Draw a section through the wall, top and basin, with the finished floor as the vertical reference and the finished wall face as the horizontal reference. Include the actual wall-finish buildup in the coordination information. A setting described from the open framing is not automatically the same setting relative to the final surface. The plumber should use the selected product's instructions to resolve its required placement.
Confirm the installed cabinet position rather than only its catalog dimensions. Include any rear condition that moves it away from the wall, as well as the selected top and basin position. For a suspended cabinet, establish its elevation as part of the same review. A later change in the furniture can alter the relationship with a faucet whose concealed position is already fixed.
Test the washing relationship with the selected bowl
Use the basin's real interior outline and the chosen spout geometry to understand where hands will work. Check the reach to the controls from the normal standing position and whether the rim or a nearby wall feature obstructs that movement. A safe mockup can reveal awkward posture or a control that requires leaning across the bowl. It should represent the actual assembly, not a generic faucet symbol.
A dry test does not prove water behavior. Review the relevant fixture information and, where possible, inspect the intended combination in use. Avoid a universal promise that centering the outlet on the drain eliminates splashing. Bowl shape, outlet characteristics and the user's task belong in the assessment; the drawing alone cannot verify all of them.
Follow a cabinet change back to the wall
In a hypothetical project, the original cabinet sits close to the finished wall and the faucet is coordinated to that basin position. A replacement cabinet later needs to sit farther forward because of a rear service condition. The spout has not moved, but the basin has. The earlier approval can no longer be assumed to describe the new arrangement.
Return the revised section to the project team before accepting the substitution. Compare resolving the rear condition, choosing another cabinet or reconsidering the faucet-and-basin arrangement. Do not try to preserve the old drawing by ignoring the change. The same principle applies if a different top or basin alters the rim or interior position after the wall layout was selected.
Confirm access and record the agreed assembly
Ask the plumber to explain how the selected components will be serviced according to their instructions, including which parts are reached from the front and what other access is needed. Review nearby mirrors, backsplashes and cabinetry against that requirement. Do not presume that removing the vanity will provide access to every concealed faucet component, or that a decorative panel is a suitable service opening.
Keep the final product identities, finished-wall condition, cabinet position, basin section and unresolved access questions together. Identify who confirms the coordinated placement and make substitutions trigger another review. This gives the cabinet purchase a clear dependency: the whole washing arrangement must work with the selected wall system before the final positions are committed.
Pure White
Cream White
Light Warm Gray
Gray
Navy
Black
Oak Tone
Dark Walnut Tone
Design study These finish studies are design references, not a list of currently orderable colors. Screens and lighting change the appearance; compare a physical sample before choosing.See all finish options →
The sample shows the door frame, a separate center panel, the face frame and the cabinet box. Each component has its own place in this Shaker construction.
Shaker construction: door frame, center panel, face frame and cabinet box. The cutaway helps locate these parts; confirm each material in the specifications for the selected cabinet.
01 / Door frame
The Shaker door has rails and stiles around a separate center panel. The frame and center panel are different components; confirm their materials in the specifications for the selected cabinet.
02 / Face frame
The face frame surrounds the opening at the front of the cabinet box and sits behind the doors. The face frame, door frame and cabinet box are separate parts.
03 / Cabinet box
The sample exposes the cabinet sides, interior surfaces and layered edges. The image does not establish the wood species or material specification of a selected cabinet.