A deck-mounted soap pump frees the vanity surface from a loose bottle by placing part of the dispenser below the top. Before choosing that arrangement, compare the complete bottle with the drawer box, basin rim and mounting rail. A small pump head on the counter does not mean a small footprint inside the cabinet.
Refill access and bottle space are different questions
The cited Kallista dispenser instructions show a bottle threaded onto the shank below the mounting surface, while routine refilling is done by lifting the pump above. This illustrates one product's arrangement; top filling does not remove the bottle from the cabinet interior.
For the model you intend to use, obtain the bottle outline and installation requirements. Locate its outermost shape, not just the hole through the top. Review access to its attachment and any intended removal procedure with the installer. A bottle that can remain in place for refilling may still need access for replacement or other documented service.
Check the relationship at the actual proposed pump location. An attractive position beside the basin can put the bottle over a drawer side or behind a cabinet rail. Move the bottle outline along with the pump on every drawing revision. Sliding only the visible head across an elevation can conceal the new conflict below it.
A complete decision before drilling
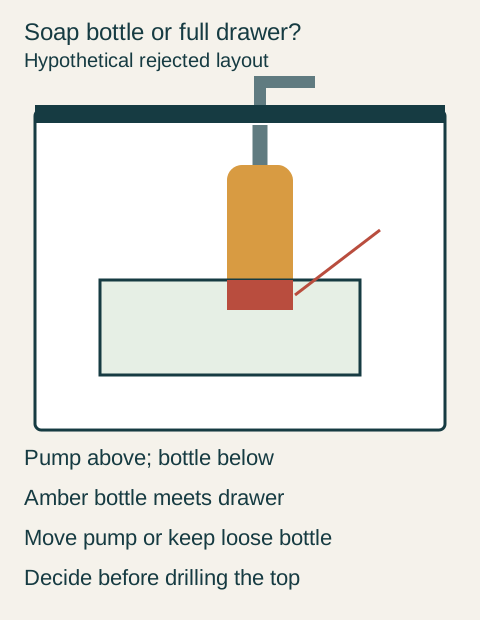
Imagine a hypothetical vanity with a wide grooming drawer and a proposed built-in soap pump to the right of the basin. The pump head is comfortable to reach, but the supplied bottle intersects the drawer box. The household does not want to lose the drawer because it holds a grooming tray used every morning.
Teaching example Rejected hypothetical layout: the amber soap bottle intersects the green drawer at the red area. The example chooses a freestanding dispenser to retain the drawer, and removes the proposed hole before top fabrication.
The team compares moving the pump to a location above the door compartment with keeping a freestanding dispenser on the top. The first option clears the drawer, but a reach trial finds the new location inconvenient for the intended user. The homeowner chooses the freestanding dispenser and keeps the full drawer. The fabricator removes the extra hole from the approved top drawing before fabrication.
That result is not a failed design simply because the built-in accessory was omitted. It preserves the daily tasks the household values. If another household accepts the alternative location, it can choose the built-in option after both the upper use position and lower bottle access are confirmed.
Compare the whole accessory
Do not assume a smaller replacement bottle or an extension tube will solve the conflict. Those changes need support for the selected dispenser and its intended liquid. The useful comparison is between complete compatible arrangements, not a pump head from one product and a guessed reservoir from another.
Where the bottle is compatible with a drawer beside it, check the drawer in motion. Include the box sides, hardware and stored contents that project upward. A bottle located outside the drawer's storage tray can still meet the drawer structure. Also preserve the access needed to secure the dispenser to the top.
Keep the final hole decision explicit
The top drawing should either identify the accepted dispenser and location or clearly omit the extra opening. Do not leave a provisional pump symbol on the fabrication copy after deciding against the accessory. A later change may involve the top as well as the cabinet, so settle it before the relevant work is authorized.
For an accepted built-in arrangement, retain its bottle drawing with the vanity interior information. For the freestanding choice, give the bottle a practical place on the top and include it in the ordinary washing trial. Both outcomes can work; the choice should preserve the storage and reach that the actual bathroom needs.
Pure White
Cream White
Light Warm Gray
Gray
Navy
Black
Oak Tone
Dark Walnut Tone
Design study These finish studies are design references, not a list of currently orderable colors. Screens and lighting change the appearance; compare a physical sample before choosing.See all finish options →
Confirm the supplier's site requirements and settle the cabinet position, basin selection and edge decisions before treating a measurement appointment as a final template.
A wide, shallow drawer is useful when low-profile items need a visible layout or an uninterrupted span; choose it only after checking the actual interior height and the room needed to use it.
Give small items a bounded, visible destination that allows easy retrieval and return, then check the spaces around and beneath that organizer where items have actually been lost.
The sample shows the door frame, a separate center panel, the face frame and the cabinet box. Each component has its own place in this Shaker construction.
Shaker construction: door frame, center panel, face frame and cabinet box. The cutaway helps locate these parts; confirm each material in the specifications for the selected cabinet.
01 / Door frame
The Shaker door has rails and stiles around a separate center panel. The frame and center panel are different components; confirm their materials in the specifications for the selected cabinet.
02 / Face frame
The face frame surrounds the opening at the front of the cabinet box and sits behind the doors. The face frame, door frame and cabinet box are separate parts.
03 / Cabinet box
The sample exposes the cabinet sides, interior surfaces and layered edges. The image does not establish the wood species or material specification of a selected cabinet.