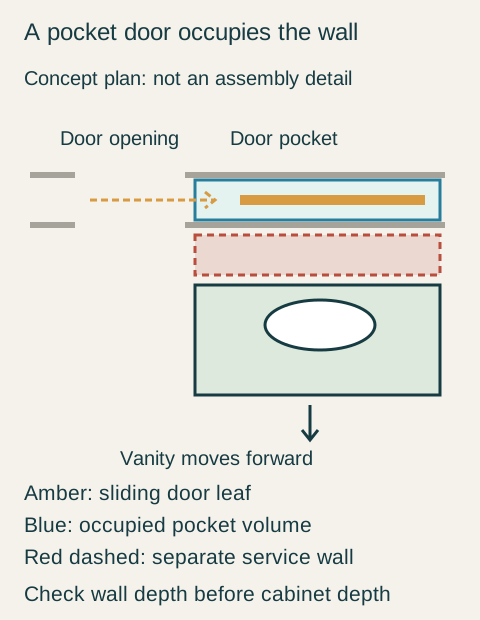
Mark the wall occupied by the retracted door before buying a vanity beside a pocket-door opening. The floor may be clear because the door no longer swings into the bathroom, but the leaf now occupies concealed wall volume. Cabinet support, plumbing and a recessed mirror cannot simply be assigned that same space.
Draw the pocket, not just the doorway
On the plan, show the opening and the full area that receives the door. Then overlay the vanity, basin connections, any wall faucet and mirror cabinet. A cabinet can sit neatly in front of the pocket on a room plan while its proposed attachment or a pipe crosses the door's travel in section.
Separate support from service space. A solution that provides a mounting surface does not necessarily provide a route for drains and supplies. Likewise, a floor-standing vanity changes how the assembly is supported but does not make the door leaf disappear from the wall. Its required wall attachments and plumbing still need a compatible location.
Johnson's pocket-door backing catalog shows plywood incorporated between frame members and identifies cabinetry among its uses. This demonstrates a designed backing arrangement, not approval for every loaded vanity. It does not create a plumbing chase or authorize attachments projecting into the door's moving space.
The appropriate frame and vanity requirements must be reviewed together. Do not choose fastening lengths or add blocking from a generic cabinet detail. Keep that design with the responsible installer and project professional, who can establish the actual load path and preserve the selected door system's operation.
A separate wall changes the furniture's room footprint
Teaching example Concept plan: the amber door leaf retracts into the blue pocket beside the opening. The green vanity sits in front of that occupied wall. The red dashed band is a possible separate service wall on the room side, which pushes the vanity farther into the room; it is not part of the door pocket. No load capacity, pipe route or required thickness is shown.
One possible response is an independently designed service wall on the bathroom side of the pocket. Its depth is additional to the selected vanity's finished projection. It may solve specific support or pipe-routing needs, but it moves the basin, top and drawer fronts into the room. Include its finished surface when comparing room clearance.
Another response is to change which side of the opening receives the door, if the actual building and door system permit it. That can free the vanity wall while consuming another wall section. Check that destination for structure, wiring, fixtures and other planned recesses; a blank elevation is not evidence that the concealed space is available.
Eliminate options using the same room references
Consider a hypothetical remodel with 64 inches from the original pocket-wall face to the opposite obstruction. The preferred vanity top projects 22 inches, leaving 42 inches in front. The household's tested layout calls for at least 40 inches there. This is their project target, not a code minimum or a universal bathroom clearance.
The first proposal retains that vanity against the pocket wall and changes it to a floor-standing model. The project review still finds the intended basin connections crossing the door cavity. The proposal is rejected because adding legs addresses a different problem. An alternative floor or side route could be investigated, but none is available within this example's retained floor and adjacent layout.
In the hypothetical second proposal, the reviewed separate service wall would add 4 inches. Keeping the 22-inch top leaves 38 inches in front, below the household's assumed 40-inch target. A 20-inch top would restore 40 inches, but the compatible shallower basin fails their washing trial. Neither combination meets the decisions already made about room use and basin function.
The designer then checks the other side of the opening. In this hypothetical project, that section can receive the selected pocket system without conflicting services or planned fixtures. Reversing the pocket frees the vanity wall for the reviewed support and plumbing arrangement. It changes the door preparation before wall closure rather than asking the cabinet to compensate for an incompatible wall.
The hypothetical buyers choose that revised pocket direction and retain the 22-inch top. With no added service-wall projection, the original 42-inch space remains. The selected basin passes their trial, and the vanity, wall connections and mirror arrangement are coordinated on the freed wall. The choice depends on the verified alternative pocket location, not on an assumption that any door can be reversed.
Resolve the wall before approving the cabinet
Freeze the pocket location, completed wall face, service routes and vanity support in the same drawings before ordering. Include a recessed mirror cabinet if one is planned; it needs its own depth and cannot be treated as a decorative sheet of glass. If a wall change is proposed later, recheck the complete elevation and section rather than relying on the unchanged cabinet width.
A pocket door can make a small bathroom easier to enter, but its benefit should be evaluated with the wall volume it consumes. Buy the vanity after that tradeoff is resolved, so the chosen basin, useful drawers and intended room space remain possible together.
Pure White
Cream White
Light Warm Gray
Gray
Navy
Black
Oak Tone
Dark Walnut Tone
Design study These finish studies are design references, not a list of currently orderable colors. Screens and lighting change the appearance; compare a physical sample before choosing.See all finish options →
The sample shows the door frame, a separate center panel, the face frame and the cabinet box. Each component has its own place in this Shaker construction.
Shaker construction: door frame, center panel, face frame and cabinet box. The cutaway helps locate these parts; confirm each material in the specifications for the selected cabinet.
01 / Door frame
The Shaker door has rails and stiles around a separate center panel. The frame and center panel are different components; confirm their materials in the specifications for the selected cabinet.
02 / Face frame
The face frame surrounds the opening at the front of the cabinet box and sits behind the doors. The face frame, door frame and cabinet box are separate parts.
03 / Cabinet box
The sample exposes the cabinet sides, interior surfaces and layered edges. The image does not establish the wood species or material specification of a selected cabinet.