Is a pot filler worth adding, or should filling stay at the sink?
A faucet at the cooking area changes the filling trip, not the entire pot-handling routine. Compare the real cookware, parked arm, finished backsplash and remaining cleanup route before adding the fixture.
Add a pot filler when filling cookware at the cooking area solves a recurring task and the complete fixture installation fits the kitchen. Keep filling at the sink when that trip is a minor part of the routine or when the added arm, connection and backsplash work cost more space or effort than the household wants to accept. The central question is what changes between taking the pot out and putting it away, not whether the faucet looks appropriate above a range.
Follow the pot through the whole meal
Start with the cookware that would actually use the fixture. Where is the empty pot stored? Where are ingredients added? Does the pot need to visit the sink before cooking anyway? Where will it be emptied and washed afterward? A faucet at the cooking position supplies water there; it does not add a basin and drain at that position.
For a routine in which an empty pot goes directly from storage to the cooktop and then needs water, the new fixture can remove the sink-to-cooktop filling trip. If the pot is already at the sink for another part of preparation, that benefit may be smaller. Neither observation decides the purchase alone, but it identifies the specific task being improved.
Do not describe the choice as eliminating all movement of filled cookware. The later draining or washing task still needs an appropriate method and destination. Discuss that sequence using empty, cold cookware during planning. A pot filler is not a reason to improvise handling of hot contents or to assume every user can perform the remaining task comfortably.
Understand the arm before choosing its location
KOHLER’s specification for the K-35744 describes a wall-mounted pot filler with an articulating spout for filling cookware at the cooking surface. It is a moving assembly, not a fixed outlet whose position can be judged from a front photograph.
Use the chosen fixture’s actual movement and mounting information. Locate the outlet over the intended pot, then consider the arm and controls while it is being positioned and returned. A maximum reach number by itself does not show the path taken by the joints or whether the household can reach the controls conveniently.
Represent the pot’s height, handles and ordinary position along with the cooking equipment’s rear features. Check the approved relationship with the cooking appliance and nearby hood or cabinetry. Do not solve a conflict by assuming the arm may occupy any space above active cooking. The fixture and appliance requirements must both be satisfied.
The parked state matters every day, including days when the filler is never used. Show the folded assembly against the finished wall, with handles and projecting trim included. An arm that reaches the pot but crowds the preferred utensil area or interrupts the intended backsplash detail is not a resolved purchase.
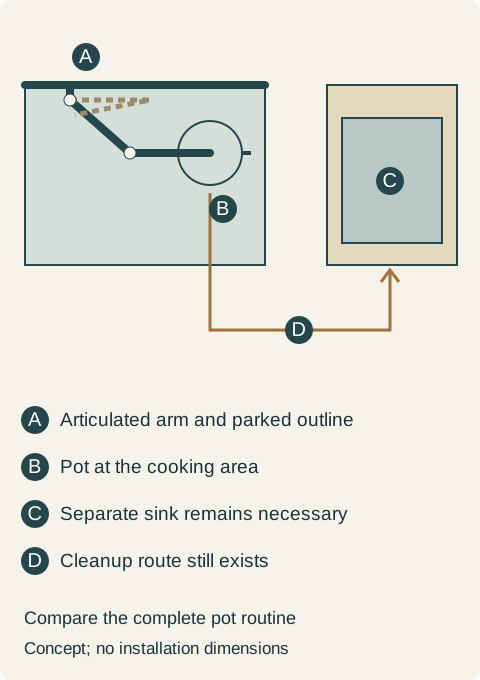
Teaching example Conceptual plan of two separate stations. A is an articulated pot-filler arm above B, a pot at the cooking area; its dashed outline shows a different parked state. C is the separate sink. D traces the pot’s remaining route to the sink for cleanup. The diagram gives no reach, mounting position, pipe route or operating clearance.
Wall and deck mounting change different surfaces
KOHLER’s pot-filler catalog includes both wall-mount and deck-mount models. These are different product arrangements; a selected wall-mounted fixture cannot simply be relocated into the countertop to avoid a wall conflict.
A wall-mounted proposal connects the fixture location to the finished backsplash and the work behind it. Coordinate that location before stone, tile or other finished surfaces are released. The decorative center of the wall may not be the working position the chosen arm and cookware need. Establish the functional arrangement before treating symmetry as the deciding dimension.
A deck-mounted alternative occupies a countertop mounting area and requires its own underside access. That space may already belong to the cooking appliance, its installation provisions or nearby cabinetry. Draw the whole assembly before calling it an easier alternative. A different mounting family changes where the coordination takes place; it does not remove the need for it.
If the project is keeping an existing finished backsplash, include the actual work needed to add the connection and restore affected finishes. If the wall is already part of a renovation, the scope may be different. Price the real project rather than applying a universal claim that pot fillers are inexpensive during remodels or always costly afterward.
A household decides the sink is enough
Consider a hypothetical kitchen whose owners initially want a pot filler because they like the articulated metalwork above the range. Their ordinary meals use modest cookware, and the larger pot is usually brought to the sink to prepare ingredients before it reaches the cooking area. A cold rehearsal shows that adding water at the range would not remove that first sink visit.
They also review the occasional larger cooking task. Filling at the range would shorten that one stage, but the later cleanup still returns to the sink. The owners do not identify a frequent filling-only task that justifies the additional fixture for their routine. This is their preference, not a conclusion that the feature has no value for other households.
The wall-mounted proposal would add work to the backsplash they intend to retain. A deck-mounted option would occupy a countertop area they want to keep clear beside the cooking equipment and would need a separate installation review. Neither is treated as a free alternative merely because the faucet itself fits in a photograph.
They omit the pot filler and retain sink filling, the accepted cookware route and the uninterrupted backsplash. The budget comparison removes the complete added-fixture scope, including affected finish work, rather than subtracting only a faucet price. Their final kitchen still has an explicit place to fill, set down and clean the regular pots.
When the added fixture earns its place
A different household may repeatedly take an empty stockpot directly to the cooking position and need water there. If the actual vessel and permitted arm arrangement work, and the users accept the remaining cleanup routine, a pot filler can address a task they perform often. That is a stronger reason to buy than assuming that a large range should always have one above it.
The completed choice should include the exact mounting family, finish and installed scope, together with the pot positions tested and the accepted parked state. Establish access for ordinary care and any future service with the responsible installer. Follow the selected fixture’s operating instructions rather than borrowing a valve sequence from a similar-looking model.
For appearance, compare the actual fixture finish with nearby hardware and the finished wall under the kitchen lighting. A matching color name does not guarantee identical sheen across manufacturers. Keep that visual choice separate from the decision to add another water fixture: an attractive finish cannot repair an unresolved working position, and a useful task does not settle which finish belongs in the room.
Pure White
Cream White
Light Warm Gray
Gray
Navy
Black
Oak Tone
Dark Walnut Tone
Design study These finish studies are design references, not a list of currently orderable colors. Screens and lighting change the appearance; compare a physical sample before choosing.See all finish options →
An extra sink earns its cabinet space when it creates an independent preparation station. Compare that gain with the drawers, uninterrupted worktop and access the new sink removes.
The sample shows the door frame, a separate center panel, the face frame and the cabinet box. Each component has its own place in this Shaker construction.
Shaker construction: door frame, center panel, face frame and cabinet box. The cutaway helps locate these parts; confirm each material in the specifications for the selected cabinet.
01 / Door frame
The Shaker door has rails and stiles around a separate center panel. The frame and center panel are different components; confirm their materials in the specifications for the selected cabinet.
02 / Face frame
The face frame surrounds the opening at the front of the cabinet box and sits behind the doors. The face frame, door frame and cabinet box are separate parts.
03 / Cabinet box
The sample exposes the cabinet sides, interior surfaces and layered edges. The image does not establish the wood species or material specification of a selected cabinet.