An over-toilet cabinet is usable only if the toilet remains usable and serviceable beneath it. Compare the floor-reaching frame with an independently supported wall cabinet before ordering. A lower opening wide enough for the tank is only the first check; the tank lid, controls, shutoff valve and the person using the toilet occupy space too.
Floor-standing furniture may still need the wall
IKEA's HEMNES over-toilet assembly shows long sides reaching the floor and an upper cabinet with an open shelf beneath it. Its instructions also require permanent wall fixation. The floor-supported appearance is not evidence that it can be used without the specified wall connection.
Read the complete sides and lower connections on the selected furniture drawing. They can meet a baseboard, valve or supply line even when the toilet tank fits between them. Do not evaluate only the narrow front legs; a wider side panel farther back may control the fit. Check cleaning access around that completed frame as well.
An independent wall cabinet removes those floor-reaching parts but asks the wall and its mounting system to support a different assembly. It is not the same purchase with the legs omitted. Do not cut down the floor frame or omit its attachment because the upper box looks similar to a hanging cabinet.
The tank lid needs a route, not just a visible gap
Establish how the actual toilet's lid is removed and what access its service requires. The first upward movement may be followed by a tilt or forward transfer. A shelf just above the closed lid can leave an attractive gap while preventing that sequence. Include any controls or other components on the tank in the review.
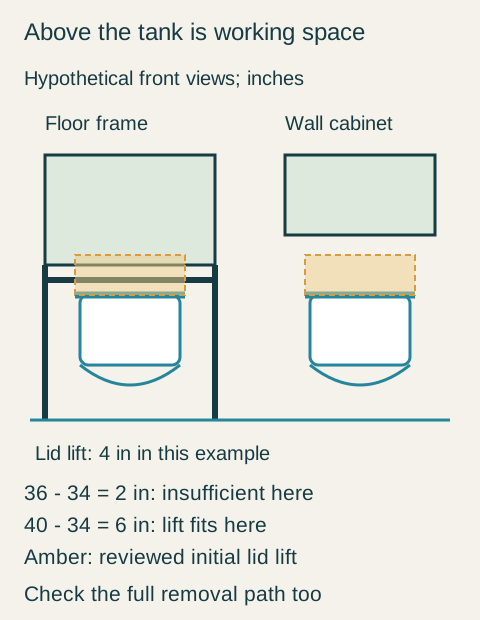
Teaching example Hypothetical front elevations. Left: a floor-frame cabinet has its lowest shelf at 36 inches above the floor over a 34-inch tank lid, leaving 2 inches. Right: a separate wall-mounted cabinet starts at 40 inches, leaving 6 inches. Amber marks the assumed 4-inch initial lid lift that was separately reviewed with its full removal path. This is not an IKEA drawing, required toilet clearance or installation detail.
Have the appropriate person assess the real fixture rather than forcing a lid beneath a mockup. A light outline can represent the proposed cabinet during the review. It should not be used as a support for a heavy ceramic lid, and the household should not have to dismantle furniture for routine toilet service.
Separately check ordinary use: sitting and rising, the seat and lid in their used positions, the flush control and the cabinet doors. Meeting the tank's static outline does not confirm these movements. The furniture comparison also does not replace the project's applicable fixture-space requirements.
A higher cabinet solves the lid conflict only if its shelves remain useful
Consider a hypothetical toilet whose tank lid top is 34 inches above the finished floor. The reviewed initial lift needed for that particular lid is 4 inches, with its subsequent removal route also established. A floor-frame storage unit places its lowest fixed shelf at 36 inches. The available gap is 36 - 34 = 2 inches, so this proposal cannot provide the assumed initial lift. These are teaching dimensions, not manufacturer dimensions or required clearances.
The owner first asks whether the shelf can simply move upward. The selected drawing identifies it as a fixed part of the frame; adjustable shelves inside the upper cupboard do not make this lower member adjustable. The floor-frame proposal is therefore rejected without cutting a panel or adding improvised blocks beneath its feet.
The alternative is a separate wall cabinet with its bottom at 40 inches, leaving 40 - 34 = 6 inches above the tank lid. That exceeds the hypothetical 4-inch initial lift, but the review also confirms the lid's full movement and the required service position. The wall construction and selected cabinet mounting are separately approved for that assembly.
The owner selects a shorter cabinet so the shelves assigned to regularly retrieved items remain within a comfortable demonstrated reach from the floor. Its doors and the user's approach are tested with the toilet present. No useful capacity is claimed for a shelf that would require standing on the toilet. The selected wall cabinet provides the intended storage while leaving the valve and surrounding floor accessible.
Keep the choice tied to the toilet that was reviewed
The accepted cabinet height belongs to this fixture and this removal path. A future toilet with a taller tank or different lid arrangement can change the result. Keep the furniture's lower edge, the reviewed lid movement and any floor-side restrictions with the purchase information, so a later fixture substitution is checked against them.
Floor-frame furniture can still be the right choice where its complete structure, required wall fixing and the toilet's operation all work together. Wall-mounted storage is preferable in the example because it removes a specific fixed-height conflict while retaining reachable shelves. Choose the arrangement that works above, beside and behind the actual toilet, not just the one whose catalog opening contains the tank.
Pure White
Cream White
Light Warm Gray
Gray
Navy
Black
Oak Tone
Dark Walnut Tone
Design study These finish studies are design references, not a list of currently orderable colors. Screens and lighting change the appearance; compare a physical sample before choosing.See all finish options →
Place the tower where its door, contents and tall side panel work with basin use, light and the room's approach; compare complete positions rather than simply filling leftover wall space.
The sample shows the door frame, a separate center panel, the face frame and the cabinet box. Each component has its own place in this Shaker construction.
Shaker construction: door frame, center panel, face frame and cabinet box. The cutaway helps locate these parts; confirm each material in the specifications for the selected cabinet.
01 / Door frame
The Shaker door has rails and stiles around a separate center panel. The frame and center panel are different components; confirm their materials in the specifications for the selected cabinet.
02 / Face frame
The face frame surrounds the opening at the front of the cabinet box and sits behind the doors. The face frame, door frame and cabinet box are separate parts.
03 / Cabinet box
The sample exposes the cabinet sides, interior surfaces and layered edges. The image does not establish the wood species or material specification of a selected cabinet.