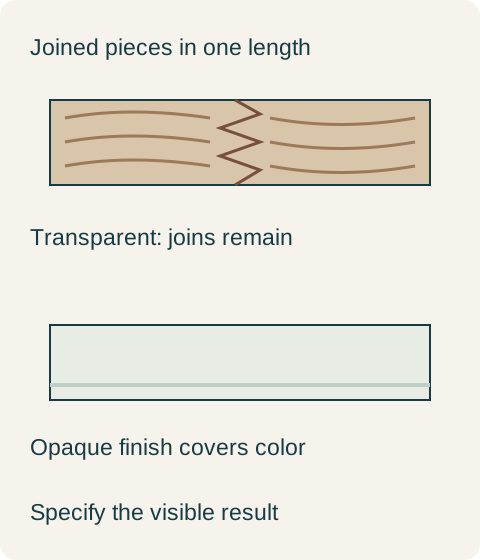
Fingerjoint moulding can be an appropriate painted cabinet trim, but the fact that it contains real wood does not promise a continuous grain appearance under a clear or transparent stained finish. Decide whether the project wants covered material joints or visible wood continuity before ordering the lineal stock. Changing paint to stain can change the required material, not just the finishing operation.
The joints are part of the stock
Keim Millwork describes joining short pieces using glued interlocking end profiles to make longer paint-grade mouldings. The joins are therefore inside the supplied length; they are not simply the installer’s corner miters. Removing a coating or changing the final color does not remove those underlying material boundaries.
Woodgrain lists raw and primed fingerjoint products under paint grade, separately from its solids/stain-grade offerings. That is a useful purchasing distinction for the named product categories, not a rule that visible fingerjoints are forbidden in every design. A deliberately expressed joint can be acceptable when that is the approved appearance.
Transparent finishing lets the separate pieces contribute their own grain and color. A joint can be sound and still interrupt the visual line. Opaque paint can conceal the color transition, while the required preparation and completed surface still need acceptance. Neither the word fingerjoint nor the word solid predicts a flawless finished trim package on its own.
Teaching example Conceptual fingerjoint lineal stock and transparent versus opaque appearance. Joint geometry and finish colors are illustrative, not a machining pattern or a promise that joints cannot show through paint.
Keep painted perimeter trim, change the stained display trim
Suppose a hypothetical kitchen has painted perimeter cabinetry and a stained display cabinet. The first trim allowance uses paint-grade fingerjoint stock throughout. The buyer keeps that stock for the painted perimeter after approving its completed sample, but changes the display-cabinet trim to the specified stain-grade material with an accepted grain range. The order now separates the materials by visible finish instead of asking a transparent stain to disguise the original fingerjoint allowance.
The change is priced as finished trim for the same profile and installed extent. It includes the appropriate material selection and finishing scope rather than comparing raw lengths alone. No universal price ratio follows from this example: the useful comparison is the quoted change in actual material and completed work.
A continuous strip still has an installed layout
Stain-grade stock does not mean an entire kitchen cornice can be one unbroken piece. Corners, available lengths and the actual trim plan may introduce installed joints. Review where those joints will be seen and how grain changes at returns. Distinguish these planned installation joints from fingerjoints already present within the purchased stock.
Record species or material category, profile, finish and the accepted joint appearance together. If a painted design later becomes stained, reopen the material line as well as the color line. That avoids a common surprise: the newly transparent finish performs as intended but reveals a construction that the original opaque design never meant to display.
Pure White
Cream White
Light Warm Gray
Gray
Navy
Black
Oak Tone
Dark Walnut Tone
Design study These finish studies are design references, not a list of currently orderable colors. Screens and lighting change the appearance; compare a physical sample before choosing.See all finish options →
A color name does not identify a finish system. Compare the decorative surface, the core, the edge and the repair method before choosing a cabinet front.
A painted door, a wood-grain side and a plywood cabinet box can belong to the same cabinet. Here is how to read those parts, what the sample photos actually show, and which details to put on a quote.
The sample shows the door frame, a separate center panel, the face frame and the cabinet box. Each component has its own place in this Shaker construction.
Shaker construction: door frame, center panel, face frame and cabinet box. The cutaway helps locate these parts; confirm each material in the specifications for the selected cabinet.
01 / Door frame
The Shaker door has rails and stiles around a separate center panel. The frame and center panel are different components; confirm their materials in the specifications for the selected cabinet.
02 / Face frame
The face frame surrounds the opening at the front of the cabinet box and sits behind the doors. The face frame, door frame and cabinet box are separate parts.
03 / Cabinet box
The sample exposes the cabinet sides, interior surfaces and layered edges. The image does not establish the wood species or material specification of a selected cabinet.