Why a different mounting plate can change the gap between cabinet doors
Door overlay belongs to the hinge, mounting plate and drilling geometry together. Work from the shared partition and desired gap before deciding that a wider door or a different hinge will fix the front.
A door can have the correct overall width and still sit in the wrong position if its hinge and mounting plate produce the wrong overlay. Before changing the door order, identify how far each edge is supposed to cover the cabinet. The word “overlay” describes that coverage; it is not the width of the gap between neighboring doors.
Start with the cabinet edge the door covers
On a frameless cabinet, overlay is measured from the side of the opening across the front edge of the cabinet panel. On a face-frame cabinet, the relevant opening and frame geometry differ. Do not move a dimension between those constructions simply because the finished doors look similar.
An outside cabinet side may be covered mainly by one door. A shared center partition may be approached by doors from both openings. Those are different arrangements. “Half overlay” refers to that shared-side application; it does not necessarily mean each door covers exactly half the partition with no space left between them.
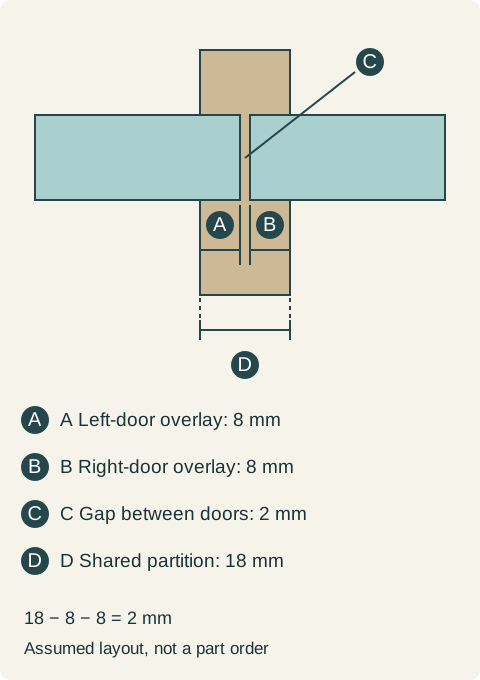
For a hypothetical shared partition 18 mm thick, suppose the desired gap between doors is 2 mm and the overlays are equal. The coverage available to both doors is 18 − 2 = 16 mm, or 8 mm per door. Giving each door half the full partition without reserving the gap would make their edges meet in this simplified front view.
This calculation establishes a target closed position only. It says nothing about the clearance needed while each door swings, manufacturing tolerances or the hinge adjustment available. Those still belong to the actual door thickness, profile and selected hardware.
The mounting plate is part of the geometry
Blum’s concealed-hinge quick reference expresses overlay as FD + B − H, where FD is the hinge’s fixed distance, B is the boring distance and H is mounting-plate height. Use the drawing and table for the specific hinge; the relationship is not a universal formula for unrelated hinge systems.
The important purchase lesson is that the hinge arm alone does not identify the resulting overlay. A plate that clips onto it may have a different height. A door drilled with another boring distance can also change its position. Treat the hinge, plate and door preparation as a matched selection.
As a hypothetical comparison within a system using that relationship, hold the hinge and door boring unchanged. If a selected combination produces 8 mm of overlay and the plate height is increased by 3 mm, the calculated overlay becomes 5 mm. That arithmetic does not confirm that the taller plate is permitted for this application.
Keep the terms straight: mounting-plate height describes a hardware geometry dimension. It is not the same as using the plate’s adjustment to raise the entire door vertically. Asking an installer to “raise the plate” without naming which operation is intended can send the discussion in the wrong direction.
Teaching example Hypothetical front view: two doors share an 18 mm partition. An 8 mm overlay from each side leaves a 2 mm gap. The same dimensions shown below the doors identify the partition edges; this is not a hinge installation drawing.
Measure the problem before choosing a repair
Close the doors and compare the gaps at the top and bottom. A gap that changes along its height suggests a different problem from a uniform gap that is too wide everywhere. Check that the cabinet is square and that the doors are not warped before buying a different overlay arrangement.
Record the current hinge and plate identifiers, door thickness and boring dimensions. Then compare the intended closed position with the manufacturer’s selection table. An adjustment may resolve a small alignment problem within its permitted range. It cannot make an arbitrary combination equivalent to a specified one.
For paired doors, inspect both sides of the joint. Changing only the left overlay can move the meeting gap off the intended center. If both doors change, confirm that their outside edges still align with the rest of the cabinet run. Correcting the center while creating mismatched end reveals is not a finished result.
Confirm closed appearance and open movement
In a sample order, the homeowner requests the same wider gap on a new cabinet that they liked in a display. The designer records the desired front layout and selects a compatible hinge-and-plate combination for the actual partition. A trial front then confirms both the closed gap and the opening path. The solution does not rely on ordering oversized doors and hoping the adjustment screws will recover the difference.
Ask for the approved door sizes, hinge models, plate models and boring specification to travel together in the order. Where a supplier proposes a substitute, have them confirm the resulting overlay and opening clearance. A similar-looking plate should not silently change the cabinet’s front arrangement.
Pure White
Cream White
Light Warm Gray
Gray
Navy
Black
Oak Tone
Dark Walnut Tone
Design study These finish studies are design references, not a list of currently orderable colors. Screens and lighting change the appearance; compare a physical sample before choosing.See all finish options →
The sample shows the door frame, a separate center panel, the face frame and the cabinet box. Each component has its own place in this Shaker construction.
Shaker construction: door frame, center panel, face frame and cabinet box. The cutaway helps locate these parts; confirm each material in the specifications for the selected cabinet.
01 / Door frame
The Shaker door has rails and stiles around a separate center panel. The frame and center panel are different components; confirm their materials in the specifications for the selected cabinet.
02 / Face frame
The face frame surrounds the opening at the front of the cabinet box and sits behind the doors. The face frame, door frame and cabinet box are separate parts.
03 / Cabinet box
The sample exposes the cabinet sides, interior surfaces and layered edges. The image does not establish the wood species or material specification of a selected cabinet.