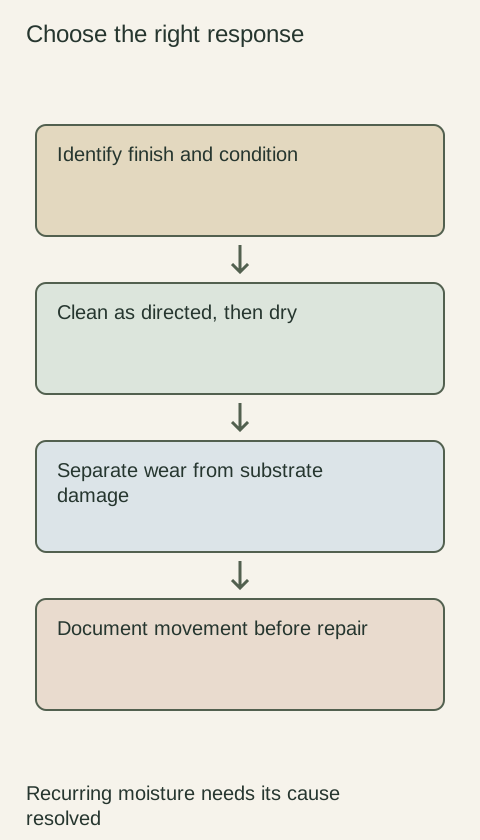
Routine cleaning, a finish touch-up and a moving wood joint need different responses. Identify the surface and condition before applying a cleaner or repair product.
KraftMaid's care guidance recommends wiping its cabinets with a damp cloth and drying, with attention to spills near sinks and dishwashers. It warns against abrasive cleaning and excessive moisture. Use the care sheet for your own cabinet finish to choose the cleaner; a recommendation for one manufacturer's coating does not authorize it on every painted, wrapped or decorative surface.
Keep the finish identification with the cleaning supplies so a household member or cleaner can find it. For an undocumented older surface, begin with identification and a careful assessment rather than a stronger chemical. A shiny area may be grease, worn coating or a previous polish. Scrubbing harder before distinguishing those conditions can make the result worse.
Clean a small area and leave it dry
Remove loose surface dust without grinding grit into the finish. Use a clean soft cloth with the amount of moisture allowed by the care sheet, then dry the area. Apply an approved cleaner by the stated method instead of flooding edges and joints. A cloth used for dishes may carry grease or cleaning residue, so keep a cabinet cloth separate.
Pay attention to the sink-door edge, dishwasher-adjacent front and underside of a frequently wet pull. Wipe spills when they occur and avoid leaving a damp towel against a door. Follow the selected appliance and cabinet instructions around heat or cleaning cycles. Do not invent a universal heat clearance or assume a protective-looking coating makes standing water harmless.
Diagram Illustrative diagram; not a product specification.
Separate cleaning from finish repair
Cleaning removes soil. A touch-up changes the appearance of a damaged finish, and it may remain visible. Photograph the mark, clean only as permitted and let the surface reach the condition required by the repair instructions. Identify whether the issue is a small contrasting nick, a dent, peeling surface or swollen core.
Use a manufacturer-compatible touch-up material for the actual finish when one is available. Test according to its instructions in an unobtrusive permitted location. A color match can still differ in gloss or texture. Do not layer an unrelated polish or paint over the mark to chase an invisible result. If the damage is broad or the substrate is failing, assess replacement or specialist repair instead.
Understand a seasonal change without dismissing damage
The USDA wood handbook explains that wood dimensions respond to moisture conditions. KraftMaid discusses visible finish lines at wood joints in its own guidance. A change that follows the season is therefore worth documenting, but it does not prove every gap, rub or crack is acceptable. A loose joint or water-damaged attachment still needs evaluation.
Record the location, date, room conditions and whether the door still operates normally. Look for a nearby leak, persistent condensation or a new source of steam. Compare later observations from the same position. Follow the cabinet manufacturer's indoor-condition requirements rather than choosing a humidity target from an unrelated product.
Avoid repairs that conceal the cause
For an illustrative example, imagine a narrow finish line at a door-frame joint that changes appearance with room conditions while the joint remains stable. Filling every line immediately may complicate a moving assembly. In a different cabinet, a growing separation with loose hardware or a damp edge needs prompt diagnosis rather than a seasonal label.
Do not sand a door edge because it rubs until you have checked the cabinet, hardware and condition. Removing material is harder to reverse than an identified adjustment. Keep photographs and ask for a specific repair scope when the evidence points to more than surface wear.
Build a short maintenance record
Store finish and hardware identification, the approved care sheet, any touch-up product and photographs of changes. Mark what was cleaned, what was repaired and what remains under observation. The useful outcome is a dry, normally operating cabinet and a traceable repair decision, not a promise that every mark can disappear. Recheck recurring wet areas and address the moisture source when the same edge repeatedly becomes damp.
Give a cleaner an actionable care note
Write the finish identification, permitted cleaning method and areas that need drying on a short note kept with the care sheet. Include any previous repair and product used, so another person does not mistake a touch-up for removable dirt.
State how to report a new lifting edge or recurring damp patch before applying another cleaner.
If a mark changes after cleaning, photograph the change rather than adding several products in succession. A clear sequence protects the finish and preserves the information needed if a specialist later evaluates it.
Finish references
Pure White
Cream White
Light Warm Gray
Gray
Navy
Black
Oak Tone
Dark Walnut Tone
Design study Design references only. The finish studies do not establish actual material, color matching or availability. Compare the selected physical sample.See all finish options →
Stop the moisture source and assess the cabinet before ordering a new door. A replacement front can improve appearance while leaving a damaged box or attachment unresolved.
The sample shows the door frame, a separate center panel, the face frame and the cabinet box. Each component has its own place in this Shaker construction.
Shaker construction: door frame, center panel, face frame and cabinet box. The cutaway helps locate these parts; confirm each material in the specifications for the selected cabinet.
01 / Door frame
The Shaker door has rails and stiles around a separate center panel. The frame and center panel are different components; confirm their materials in the specifications for the selected cabinet.
02 / Face frame
The face frame surrounds the opening at the front of the cabinet box and sits behind the doors. The face frame, door frame and cabinet box are separate parts.
03 / Cabinet box
The sample exposes the cabinet sides, interior surfaces and layered edges. The image does not establish the wood species or material specification of a selected cabinet.