A touchless bathroom faucet can require a valve box and battery compartment inside the vanity. Choose the interior so the battery compartment can be reached and removed as intended after the basin, drawers and supplies are in place. Fitting the closed box into an unused corner does not establish a workable service arrangement.
The installation drawing includes more than the spout
Kohler's cited touchless bathroom-faucet instructions require cabinet clearance for installation and service, including access to the battery box. They show a battery compartment that slides out of the valve box. That removal method belongs to the documented assembly and is not shared by every sensor faucet.
Bring the equipment drawing into the vanity discussion before ordering a drawer-heavy interior. Show its mounting area, cables, hoses and access direction alongside the basin and cabinet members. The installer's approved placement must meet the selected product instructions; a convenient empty space elsewhere in the cabinet is not automatically an alternative mounting location.
Separate the closed equipment outline from the movement needed to service it. If a compartment withdraws toward a partition, there may be room for the installed box but not for the complete withdrawal. Also check how a person reaches the latch or cover through the door opening. Being able to photograph the box does not demonstrate access to the relevant part.
Compare interiors around the actual service task
Imagine a hypothetical vanity where the required equipment location falls behind a fixed interior shelf. The box fits above the shelf, but the battery compartment cannot be removed through the available route. Cabinet A therefore fails this service check even though its top view shows no overlap with the basin.
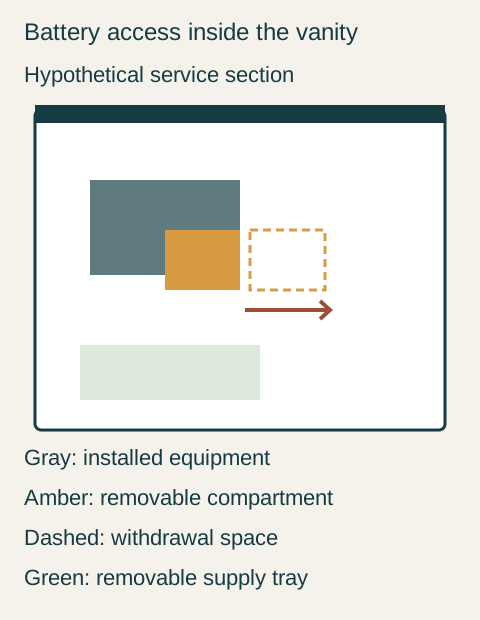
Teaching example Hypothetical Cabinet B: the gray valve box stays in place; the amber battery compartment withdraws into the dashed space. The green supply tray below is removable. No dimensions or mounting instructions are implied.
Cabinet B has an open door compartment at the same side and a removable supply tray below the equipment. The installer confirms that the mounting arrangement and withdrawal route satisfy the selected faucet instructions. The owner removes the tray, reaches the compartment and returns the tray without disturbing plumbing. The household chooses Cabinet B and moves items formerly assigned to the fixed shelf into the side drawer.
This choice sacrifices a fixed shelf to gain a usable maintenance path. It does not assume that all shelves can be removed, or that the valve box may be relocated freely. If the preferred cabinet only works after cutting a structural member, ask for a supported interior or reconsider the equipment selection before purchasing.
Evaluate the ordinary storage load
Test access with the actual tray contents, including handles and taller bottles. The complete tray must come out through the door opening without requiring it to be emptied first if that is the household's intended routine. Mark its temporary landing place during service so the task is practical in a small bathroom.
Keep the equipment zone distinct from general cleaning storage. Use the faucet manufacturer's requirements to decide what may be stored near electronic components. A cabinet advertised as roomy does not establish chemical compatibility, permitted cable routing or an acceptable position for damp supplies.
Make the service plan visible at handover
Save the faucet identification, battery-service instructions and an interior photograph showing the accepted route. Identify which tray or designed removable element comes out first. The person changing batteries later should not have to guess which cabinet pieces are structural.
Have the installer demonstrate the documented battery-access movement with the finished vanity assembled. Check the service task without improvising disconnections or moving plumbing. The final purchase should include both useful daily storage and a clear way to maintain the selected faucet.
Pure White
Cream White
Light Warm Gray
Gray
Navy
Black
Oak Tone
Dark Walnut Tone
Design study These finish studies are design references, not a list of currently orderable colors. Screens and lighting change the appearance; compare a physical sample before choosing.See all finish options →
Keep a record of the installed components, the openings used to reach them and the items that must move first. Distinguish ordinary removal of stored belongings from any cabinet or fixture work requiring the appropriate professional. The handoff should describe the finished installation, including confirmed changes made on site.
Choose a defined storage location that meets the products' labels and household access requirements, then test the original containers and the complete removal-and-return task.
Choose a removable tray when lifting out a useful group improves the routine or cleaning access, and choose fixed divisions when the items are better retrieved individually from stable positions.
The sample shows the door frame, a separate center panel, the face frame and the cabinet box. Each component has its own place in this Shaker construction.
Shaker construction: door frame, center panel, face frame and cabinet box. The cutaway helps locate these parts; confirm each material in the specifications for the selected cabinet.
01 / Door frame
The Shaker door has rails and stiles around a separate center panel. The frame and center panel are different components; confirm their materials in the specifications for the selected cabinet.
02 / Face frame
The face frame surrounds the opening at the front of the cabinet box and sits behind the doors. The face frame, door frame and cabinet box are separate parts.
03 / Cabinet box
The sample exposes the cabinet sides, interior surfaces and layered edges. The image does not establish the wood species or material specification of a selected cabinet.