Thin cabinet fronts need a hinge plan before the doors are made
A thin decorative front can require a different fixing system, not a shallower version of the usual hole. Compare the complete door material, attachment and motion before approving fabrication.
Select the hinge and its attachment before approving an unusually thin cabinet front. The front may achieve the intended light edge, yet leave too little material for a conventional cup recess. Making that recess shallower is not a reliable solution: the hinge still needs its specified seating and fixing geometry. A purpose-designed system can solve a different problem, but it must suit the actual door material and application.
Thickness is only the first compatibility check
Record the finished door construction, including any decorative layer, core and backing. A thickness measured at an exposed edge may not describe the material into which the fastener anchors. A decorative face bonded to a backing is also a different assembly from a homogeneous sheet of the same total thickness.
The fixing must transfer the operating loads into a suitable material. Do not assume that a hard face, a thin stone-like sheet or a lightweight panel accepts the same expansion anchor or screw as a wood-based board. The applicable material limits and professional fabrication method are part of the selection, not details to resolve after the doors arrive.
Suppose a hypothetical front is 10 mm thick and the proposed conventional cup recess is 12 mm deep. The recess would pass 2 mm beyond the front surface. This simple subtraction rejects that machining plan. It does not establish a safe residual thickness for another hinge, and it does not justify reducing the required recess depth.
Different thin-front systems solve the fixing differently
Blum’s US EXPANDO T page describes sufficiently stable and strong fronts from 8–14 mm, using 10 mm diameter, 6 mm deep fixing holes without a conventional hinge-cup bore. Those values describe the named system, not a generic preparation for every thin front.
Hettich’s thin-front presentation describes a shallow Sensys cup. This is a different attachment concept from eliminating the conventional cup bore. Do not combine the hole dimensions from one system with the hinge from the other.
The distinction matters when requesting a quote. “Thin-door hinge” is not a complete manufacturing instruction. Identify the actual hinge, fixing components, plate and material construction. The fabricator needs the matching drawing and any required material trial, not merely a picture showing a slim edge.
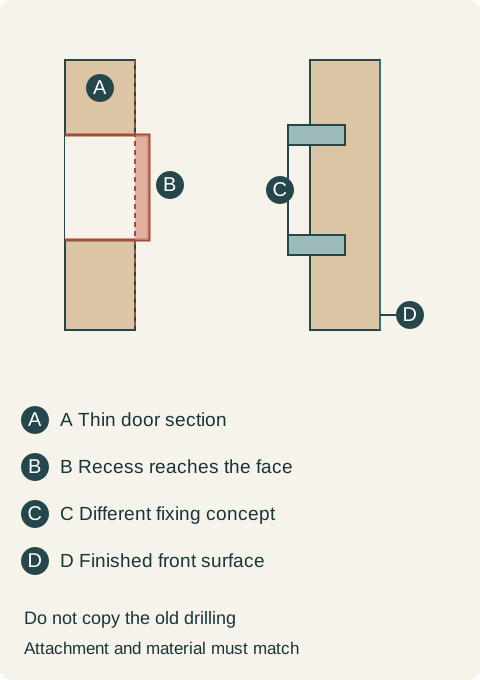
Teaching example Conceptual sections compare a deep cup recess with a shallow fixing arrangement. Red shows a recess that would pass through the assumed thin panel; the alternative is only a different attachment concept, not a substitute hole pattern. Follow the chosen system’s drawing.
Recheck the closed front and its opening path
Changing the front thickness can alter its relationship to neighboring doors, end panels and handles. Keep the target outer face and edge alignment visible in the drawing. A front that now sits farther back or leaves a changed reveal may look different from the approved kitchen even though its fixing is sound.
Then check the movement. The correct attachment does not prove that the door clears its neighbor or permits an internal drawer to pass. Door height, width and weight still need an appropriate hinge arrangement. A lighter-looking edge is not evidence that a large door is light enough for the previous hardware schedule.
Existing predrilled doors need particular care. A different fixing pattern cannot be assumed to bridge an old cup recess or weakened area. Ask the fabricator to evaluate the actual blank before proposing an alternate attachment. A new pattern may require a newly made front rather than further drilling into the old one.
Compare the finished front package before approving the look
Imagine a cabinet proposal that starts with ordinary slab fronts and later changes to a thin decorative material. The original door line includes conventional boring, while the new material quote covers only cut sheets. Neither line now describes a finished operable door. The revised quote must include the compatible backing or material construction where required, attachment system, edge completion and finished component preparation.
Approve a representative assembled front, not just a loose material chip. Open and close it with the intended handle and inspect its relationship to adjoining fronts. Keep its material specification and hardware schedule with the order. In this hypothetical order, the cut-sheet proposal has no documented compatible attachment. The buyer rejects that substitution and retains the original approved front construction and its matched hardware package. The slim appearance should be the result of a complete door design, not a reason to improvise its fixing.
Pure White
Cream White
Light Warm Gray
Gray
Navy
Black
Oak Tone
Dark Walnut Tone
Design study These finish studies are design references, not a list of currently orderable colors. Screens and lighting change the appearance; compare a physical sample before choosing.See all finish options →
Door overlay belongs to the hinge, mounting plate and drilling geometry together. Work from the shared partition and desired gap before deciding that a wider door or a different hinge will fix the front.
A painted door, a wood-grain side and a plywood cabinet box can belong to the same cabinet. Here is how to read those parts, what the sample photos actually show, and which details to put on a quote.
The sample shows the door frame, a separate center panel, the face frame and the cabinet box. Each component has its own place in this Shaker construction.
Shaker construction: door frame, center panel, face frame and cabinet box. The cutaway helps locate these parts; confirm each material in the specifications for the selected cabinet.
01 / Door frame
The Shaker door has rails and stiles around a separate center panel. The frame and center panel are different components; confirm their materials in the specifications for the selected cabinet.
02 / Face frame
The face frame surrounds the opening at the front of the cabinet box and sits behind the doors. The face frame, door frame and cabinet box are separate parts.
03 / Cabinet box
The sample exposes the cabinet sides, interior surfaces and layered edges. The image does not establish the wood species or material specification of a selected cabinet.