How wide is a modular mirror-cabinet assembly after adding lights?
Add the dimensions that contribute to the finished assembly, including lights and required end pieces. The sum of the mirror-cabinet widths alone can understate what must fit above the vanity.
Check the complete outside width before choosing modular mirror cabinets for a fixed wall space. Cabinet modules, integrated light strips and exposed-end pieces may all contribute. A layout that fits when only the mirrored doors are counted can extend into a window casing or side wall once the selected components are assembled.
Start with a component schedule, then read the assembly drawing
Robern's lighting ganging reference lists cabinet-and-light sequences and distinguishes the kits for recessed and surface-mounted arrangements. The examples demonstrate that a combined mirror wall is a selected group of components, not simply a pair of cabinets pushed together.
Ask for the finished assembly dimension and the specific parts that create it. Do not blindly add every catalog width: a kit may sit behind a cabinet, a light may share a connection detail, or a stated width may already include an end piece. The product drawing determines what adds to the outside span. Keep ordering completeness and width calculation related but separate; a necessary connector can matter without adding visible width.
Expose the missing width before comparing storage
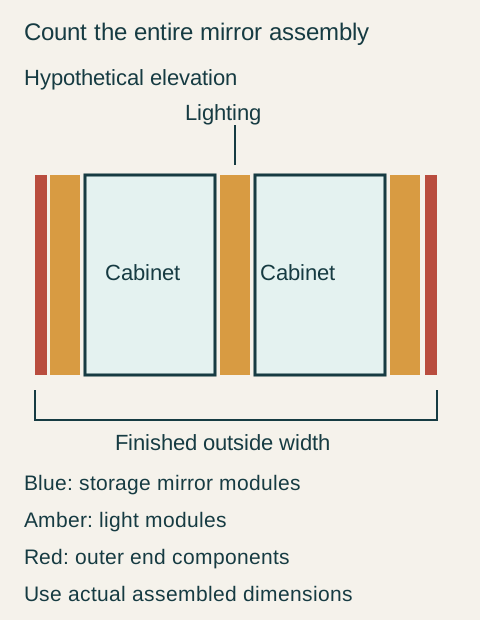
Consider a hypothetical available wall span of 58 inches. A proposed pair of 24-inch cabinet modules totals 48 inches, which looks generous enough. The hypothetical assembly drawing also shows three light modules, each adding 3 inches, and two end components adding 1.5 inches each. The complete sum is 48 + 9 + 3 = 60 inches, exceeding the wall span by 2 inches. These are teaching dimensions, not a Robern assembly.
The owner cannot recover that space by narrowing the vanity below. The conflict is at the wall above it. Removing an end piece is also not an acceptable assumption if it is part of the selected mounting or finish arrangement. First decide which function can change: cabinet storage, lighting arrangement, wall location, or mounting type.
Teaching example Hypothetical modular mirror elevation: blue blocks are storage mirror cabinets, amber strips are lights, and red outer strips are end components. The lower bracket spans the complete assembly, including the parts outside the cabinet modules. Shapes are schematic; actual product drawings determine overlaps and total width.
Narrower modules can preserve the intended arrangement
In the hypothetical alternative, two 22-inch cabinet modules contribute 44 inches. The same added lighting and end components contribute 9 and 3 inches, producing a 56-inch assembly. Against the hypothetical 58-inch wall span, 2 inches remain in total. That remainder is a geometric result, not a universal installation clearance; the selected system still must fit with its actual mounting and door requirements.
For this example, the narrower cabinets are compatible with the selected system, and the project review confirms its required installation space fits within the available wall. The household's daily kits fit their individual shelves, while each person can use the reflection from the corresponding basin. The owner chooses the narrower modules and retains the intended light locations. The original larger modules are rejected because their extra storage cannot be installed in this wall arrangement.
Recheck the joint between appearance and operation
A continuous mirrored elevation can conceal several separate doors. Show their hinge sides and open positions, including the relationship to light modules and nearby returns. Cabinet edges that line up attractively do not establish useful reflection at each washing position; check the users from the selected basins rather than from the center of the room.
Surface mounting and recess mounting may use different end treatments, support and wall preparation. Changing the method to make a width appear to work creates a new assembly that needs its own drawing. Electrical connections, controls and service access belong in that coordination without turning the cabinet purchase into a wiring project.
Approve a named component set with its assembled dimensions. That prevents a later substitution of a different light or side kit from quietly changing the span. The useful outcome is a mirror wall that fits, stores the intended supplies and serves the actual basin positions—not merely a neat row of nominal cabinet widths.
Pure White
Cream White
Light Warm Gray
Gray
Navy
Black
Oak Tone
Dark Walnut Tone
Design study These finish studies are design references, not a list of currently orderable colors. Screens and lighting change the appearance; compare a physical sample before choosing.See all finish options →
Compare how the household uses the space between the basins, how each cabinet is positioned and what the top arrangement requires. Separate cabinets can create independent locations, but they also create end conditions and spaces that need a purpose. A continuous top does not automatically make independent cabinets a resolved single assembly.
Review the selected cabinet, top, basin, faucet and connection components as a single proposed installation. Confirm their identities, check each interface and resolve the remaining conditions before relying on the combination. Separate product approvals do not by themselves establish that the assembly works together in the measured bathroom.
The sample shows the door frame, a separate center panel, the face frame and the cabinet box. Each component has its own place in this Shaker construction.
Shaker construction: door frame, center panel, face frame and cabinet box. The cutaway helps locate these parts; confirm each material in the specifications for the selected cabinet.
01 / Door frame
The Shaker door has rails and stiles around a separate center panel. The frame and center panel are different components; confirm their materials in the specifications for the selected cabinet.
02 / Face frame
The face frame surrounds the opening at the front of the cabinet box and sits behind the doors. The face frame, door frame and cabinet box are separate parts.
03 / Cabinet box
The sample exposes the cabinet sides, interior surfaces and layered edges. The image does not establish the wood species or material specification of a selected cabinet.