Can you add a vanity cabinet without removing the wall-mounted basin?
A matching retrofit cabinet can be an option, but the retained basin fixes more than width. Check the underside, cabinet placement route, plumbing enclosure and support before buying.
You can consider adding a cabinet beneath a wall-mounted basin when the basin and cabinet have a documented compatible arrangement and the installer can achieve it with the basin retained. Measuring the empty space underneath is not enough. The basin's underside, existing support and plumbing determine what can occupy that space and how the cabinet can get there.
Start with the fixture already on the wall
Identify the existing basin by its actual model and installation, not by a similar photograph. Record its position and visible underside, the supports that must remain, and the current drain and supply arrangement. If the identity cannot be established, resolve it before shopping for a supposedly matching drawer unit.
Duravit's US Collection One page specifically describes adding vanity cabinetry to its wall-mounted basins as a retrofit. This is a useful example of a planned product relationship. It does not mean a cabinet from that collection fits another basin, or that a generic cabinet can be slipped under any wall-mounted fixture.
Ask the supplier to identify the exact pairing for the basin that is already installed. A current cabinet with the same series name may still need a variant check. Keep the review tied to the existing physical fixture and the proposed cabinet designation; the purchase must work with that basin, not just with a new basin pictured above the cabinet.
A cabinet that fits when finished may still need a different installation route
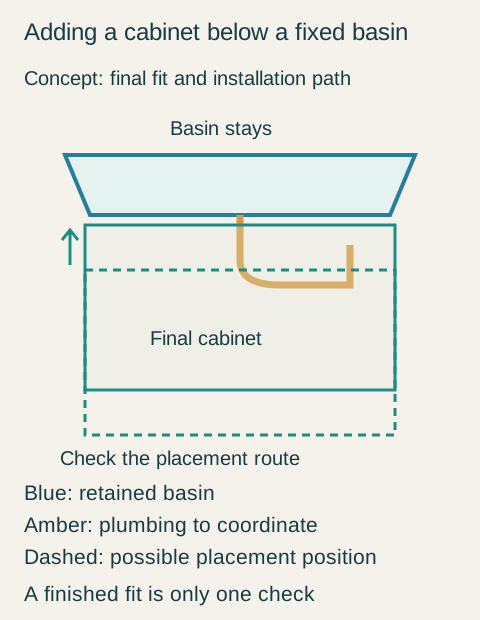
A finished elevation shows where the furniture ends up. It does not show whether the cabinet can be brought into that position while the basin stays on the wall. Have the installer review the specified assembly and hanging sequence with the retained bowl, pipework and nearby walls in place.
Teaching example Concept front elevation: the blue existing basin stays in place. Green solid lines show the proposed cabinet in its final position; the green dashed outline shows a possible earlier lifting position that must be checked against the retained basin and plumbing. Amber marks retained plumbing. The diagram does not prescribe an installation route or authorize a cabinet modification.
For example, a rail or mounting detail may need movement above its final position. Alternatively, an opening intended to pass around a drain may not let the assembled cabinet pass around the existing connection. These are questions for the selected product and site, not instructions to cut a larger notch. A proposal that requires removing the basin does not meet a brief that explicitly retains it in place.
Keep support responsibilities clear. Do not treat the new cabinet as an unreviewed prop beneath the basin, or remove the basin's support merely because furniture will hide it. The cabinet itself also needs the attachment specified for its installation. Adding storage does not settle either support question automatically.
Enclosing an exposed drain changes what can be reached
With an open wall basin, valves and drain fittings may be directly visible. A drawer unit adds backs, rails and moving boxes around them. Confirm where the selected fittings sit and what remains reachable for the required work. The fact that the basin does not move does not guarantee that every existing pipe component can stay.
Discuss any compatible replacement drain arrangement as an explicit part of the installation scope. Retaining the ceramic fixture can be valuable even when some connection parts change. Conversely, a quotation that promises to keep everything untouched needs to demonstrate that promise on the actual cabinet drawing, including drawer movement and service access.
A retrofit that keeps the basin but changes the enclosure
Consider a hypothetical owner who likes the installed wall basin but wants enclosed storage below it. A generic cabinet is proposed first because its outside width fits. The final-position drawing looks plausible, but the installer finds that the required placement movement meets the retained bowl and that the existing trap crosses an upper drawer. That proposal is rejected instead of being rescued by unapproved cuts.
A second proposal identifies a documented cabinet pairing for the existing basin. In this example, the installer confirms a feasible placement sequence and the required wall attachment. It includes a compatible revised drain arrangement, retains the basin's reviewed support and provides the specified access through the removable drawer.
The owner accepts that proposal after reviewing the change from open underside to enclosed furniture. Keeping the basin is the priority; keeping every old connection component is not. The purchase therefore includes the matched cabinet and the agreed plumbing work, rather than a cabinet-only order with an unresolved promise to make the pipes fit later.
Before committing, also check whether the former open area serves a needed approach, cleaning task or applicable access requirement. If it does, adding cabinetry may be the wrong improvement. Where the enclosure works for the room, the successful retrofit is the one that preserves the chosen basin while deliberately changing the space beneath it.
Pure White
Cream White
Light Warm Gray
Gray
Navy
Black
Oak Tone
Dark Walnut Tone
Design study These finish studies are design references, not a list of currently orderable colors. Screens and lighting change the appearance; compare a physical sample before choosing.See all finish options →
Plan a removable base when a defined future use requires a different under-basin arrangement, and review both the installed cabinet and the proposed condition after removal before ordering. An ordinary cabinet that can be dismantled is not automatically an adaptable assembly.
The sample shows the door frame, a separate center panel, the face frame and the cabinet box. Each component has its own place in this Shaker construction.
Shaker construction: door frame, center panel, face frame and cabinet box. The cutaway helps locate these parts; confirm each material in the specifications for the selected cabinet.
01 / Door frame
The Shaker door has rails and stiles around a separate center panel. The frame and center panel are different components; confirm their materials in the specifications for the selected cabinet.
02 / Face frame
The face frame surrounds the opening at the front of the cabinet box and sits behind the doors. The face frame, door frame and cabinet box are separate parts.
03 / Cabinet box
The sample exposes the cabinet sides, interior surfaces and layered edges. The image does not establish the wood species or material specification of a selected cabinet.